South Park
Travis Davids shares a breakdown of how South Parks iconic character, Kenny’s outfit was created, with a big, medium, small approach with the garments.
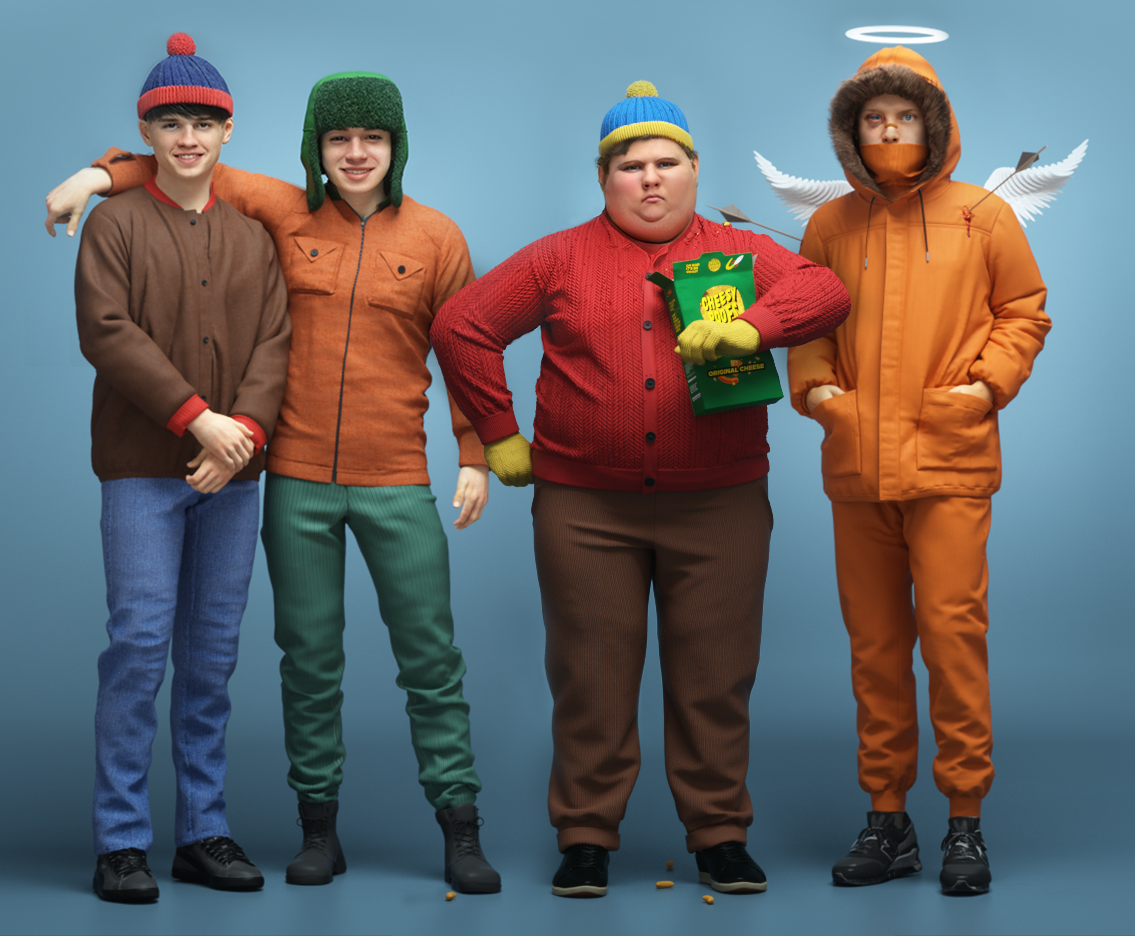
Interview with Travis Davids| South Park | 3D Generalist
1. Artist Introduction
Hello, my name is Travis Davids, I'm from Johannesburg, South Africa and I'm a freelance digital artist and content creator.
I primarily focus on creating 3D related content in the form of tutorials or resources for digital artists. My content is available on multiple websites like YouTube, Gumroad and Artstation.
I’m a 3D generalist who loves experimenting with multiple workflows.
I’ve been doing 3D full time since 2015 but my journey started in 2007 when i created mod items for a video game called The Sims. It sparked my interest to explore an expanding universe of endless possibilities.
3D gave me a platform to bring my ideas and emotions to life. It’s something I'm very passionate about and I thoroughly enjoy the endless journey of self improvement.
Love what you do and do what you love!
2. Workflow for your artworks with a brief introduction
I used Marvelous Designer to create realistic outfits for all of my reimagined characters for South Park.
Reimagining South Park Characters
I followed the same approach for every garment. I will do a breakdown of how Kenny’s outfit was created.
All of my garments start with the most basic building blocks. I follow a Big, Medium, Small approach with my garments.
Big Basic shapes and buildings blocks to create a basic template with a great fit.
Medium Detailing the garment, adding new elements to the design.
Small Adding smaller details like internal lines for topstitching, seams, buttons, and layer clones as well as reducing the particle distance to 5 or 3.
Detailing the garment further in Zbrush and bringing it to completion is also included during this phase.
Creating The Base (BIG)
I focus primarily on creating a garment with a good base.
Once you have a good base created that fits your avatar correctly, you can transform that basic template into a variety of different garments.
In this case, I had a long sleeve t-shirt I created that fit Kenny perfectly and I tweaked it to turn it into a jacket.
This saved me some time from having to create the base garment from scratch.
I use Daz Studio to generate my human characters. They are fully rigged and easy to pose.
I always create my garments on a character that is in a T-Pose or A-Pose.
It makes your life a lot easier to create the patterns and drape a garment on a symmetrical pose.
Later on once you’re detailing the garment further you can transition to a different pose.
I also keep my particle distance on 20 or 15 during the early stages for the sake of performance.
I’ll also use GPU simulation in certain instances to see my simulation results in what can only be described as real time and then go back to normal simulation mode for accurate results.
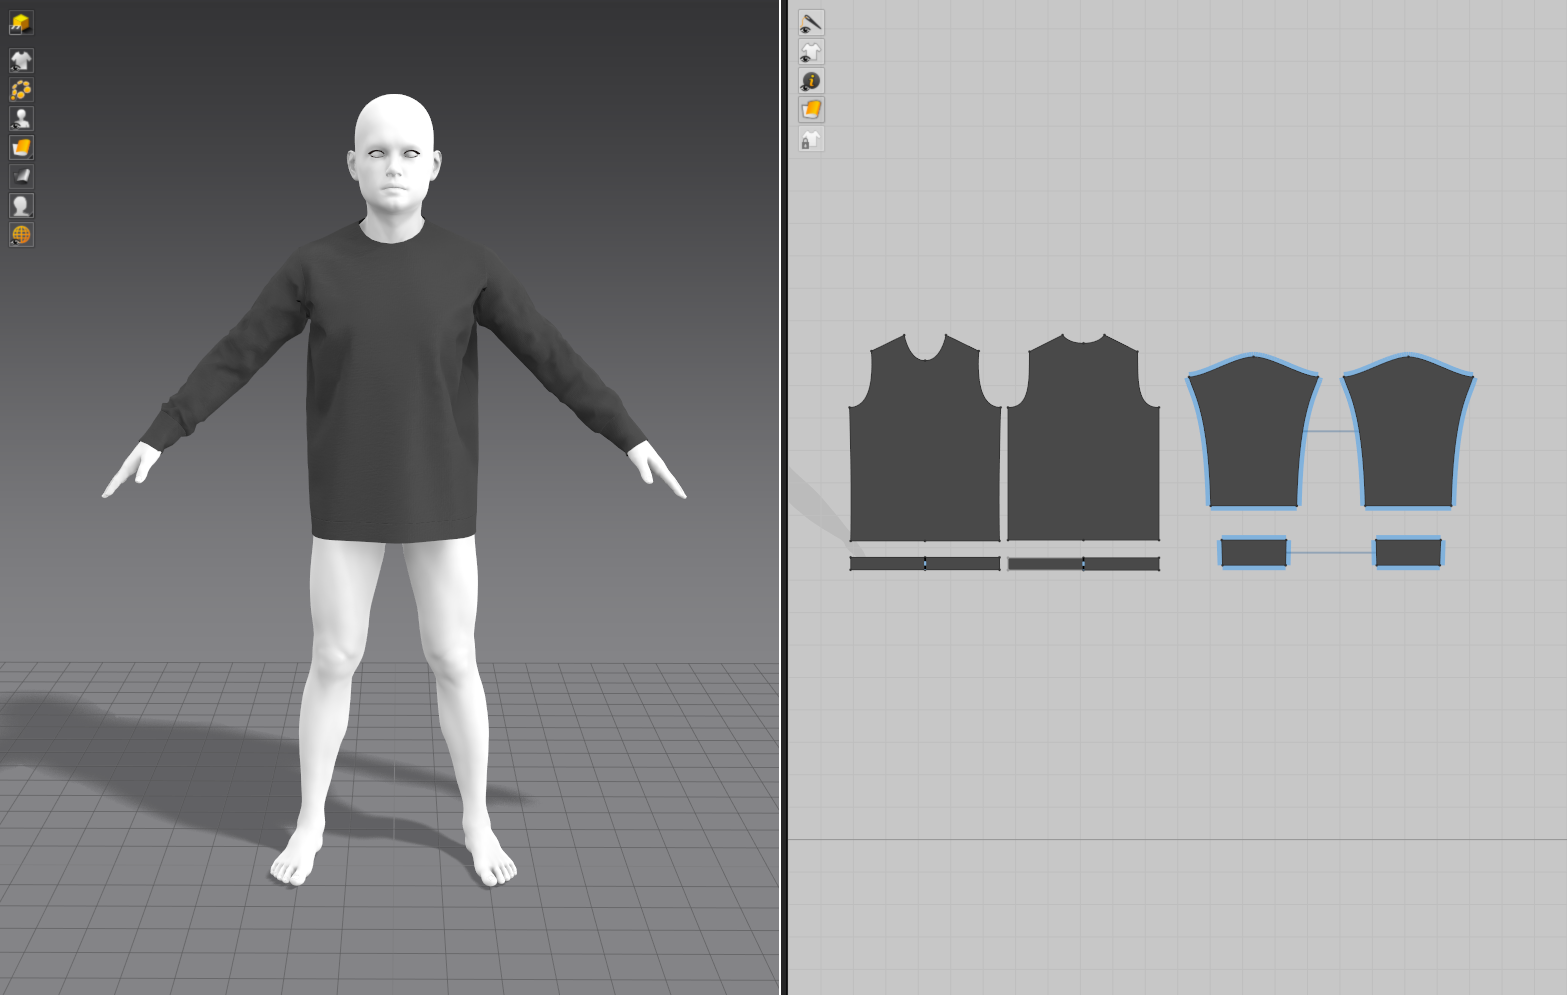
QUICK TIP: When you are creating your basic shapes, don’t add curvature to the pattern while you’re drafting it, add this afterwards by using the “Edit Curvature” tool.
You will thank yourself later because by adding curvature afterwards, if you go to “Edit Pattern” you will have access to anchor points that you can adjust to control the amount of curvature.
This makes the process of adjusting curvature non destructive and easy to change.
Transitioning To A Different Pose
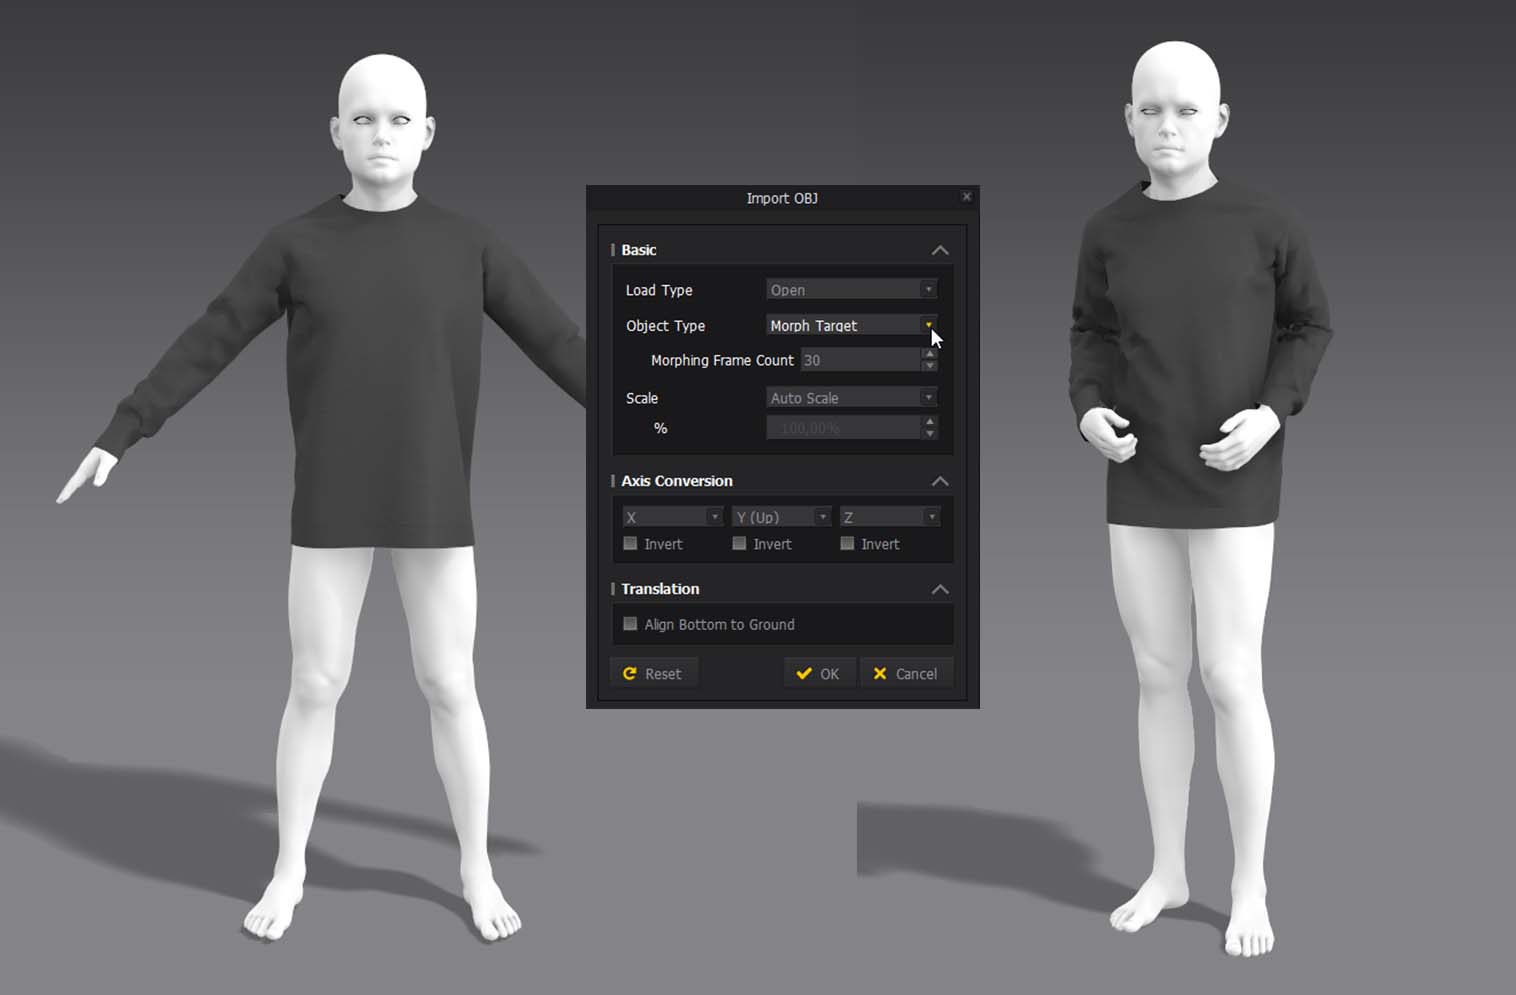
Once I have a good base I'll actually use morph targets to see how my garment looks in a different pose.
Since I’m using morph targets i can easily go back to the a-pose if I need to further adjust my garment.
QUICK TIP: There are various ways to transition to different poses but an easy method is to use morph targets.
If you saved out two obj’s of your character (a-pose and posed), import the a-pose first and drape your garment on the a-pose.
Now go to “File” “Import OBJ” and instead of importing an OBJ as an avatar, import it as a morph target so change “Object Type” to Morph Target.
Your character will transition from the a-pose to the next pose.
Detailing The Garment Further (MEDIUM)
During this phase I decrease my particle distance to 10 just to see a better representation of my fabric.
Since the garment is going to be getting more detailed I might lose some performance but i can always go back to 15.
The majority of my time is spent on this process by creating new garment pieces like the hood, adjusting fabric settings, choosing different fabric colors,
adding render thickness to the garment to get a much better idea of what the garment looks like with thickness and changing it to “Thick Textured Surface” to see the end result.
I always add thickness in Marvelous Designer even if i plan on exporting a thin version of the garment.
If I'm going to add thickness in zbrush, I can just reference the thickness I created in MD.
Garments are usually not paper thin and by adding just a subtle layer of thickness, it gives the garment a much better visual representation.
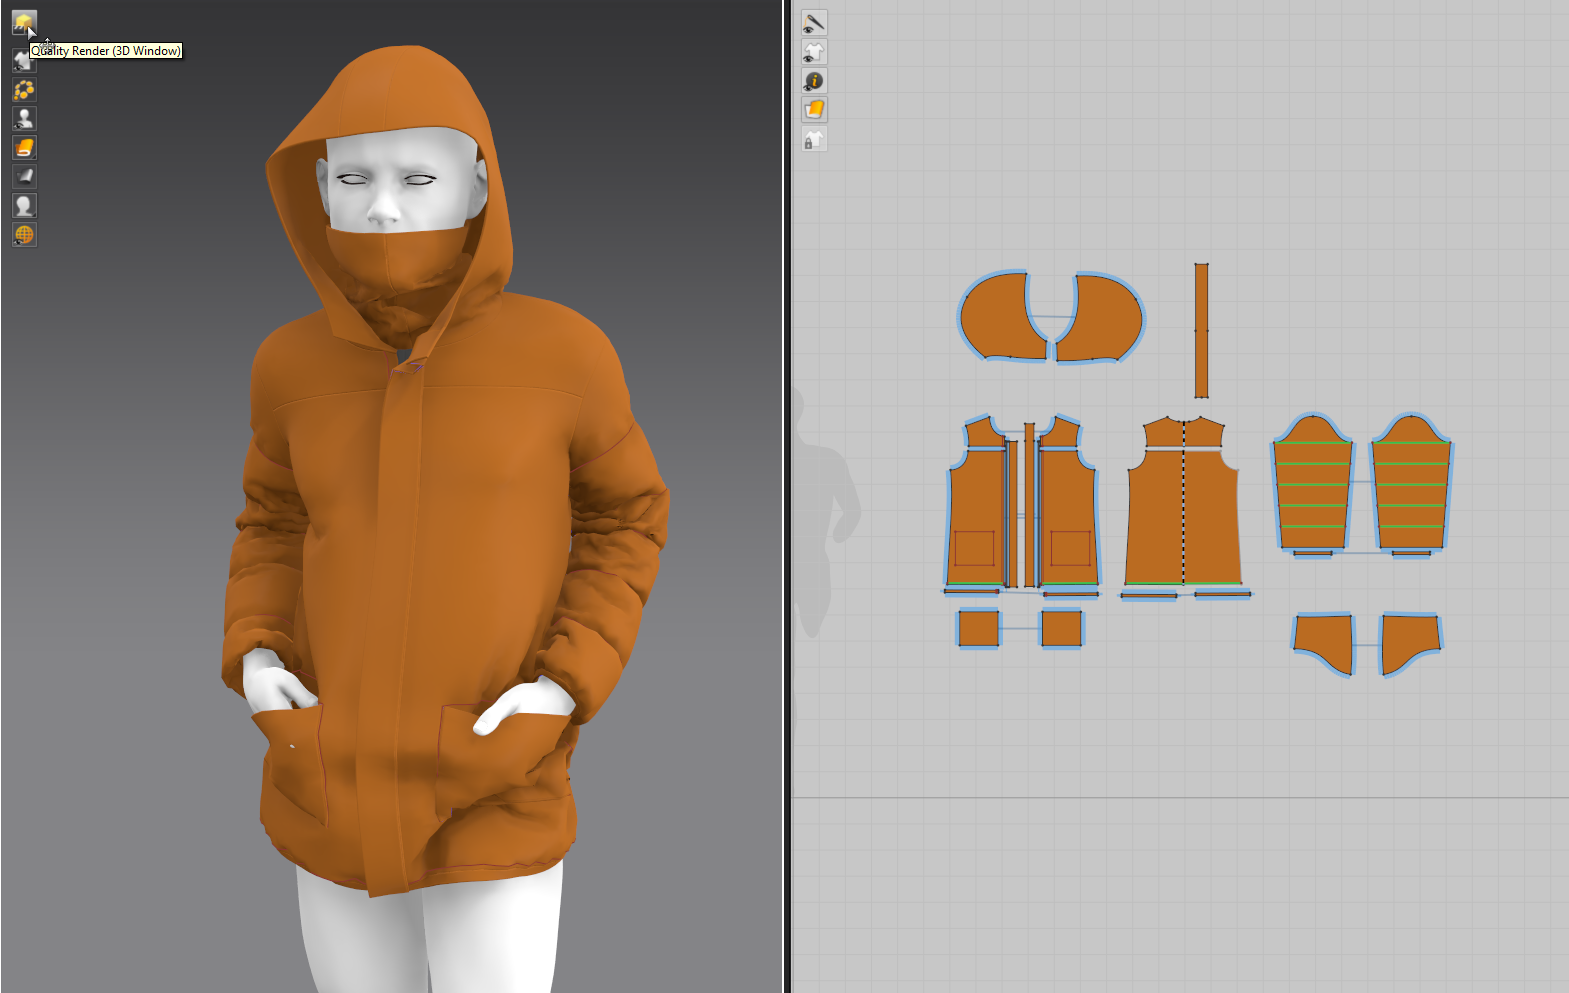
QUICK TIP: Use Marvelous Designer 10’s brand new “Quality Render” feature to see what a garment looks like with ambient occluded shadows.
It gives you a much better representation of what the garment would look like if I was actually rendered. Folds and wrinkles look so much better with this enabled.
Adding The Finer Details (SMALL)
Now it’s all about the small details. Since I was creating a jacket and I wanted it to visually look warmer, I created a layer clone of the garment.
A layer clone doubles up your fabric and is a fantastic method to make garments look thicker/warmer.
Any internal lines that you have included on your pattern will be a lot more visible on a layer clone.
It’s almost like adding the icing on top of a cake and works very well if you’re creating jackets.
Keep in mind that sometimes you might need to change the layer order of a layer clone to prevent it from causing simulation issues,
and then bring it back to its original number to make everything simulate correctly.
I add internal lines along the seams of the garment and adjust the fold angle to make them more predominant.
Once i’m happy, i’ll reduce my particle distance to 5 or 3 to get the best quality possible.
I’ll also quandragulate my garment in MD if i plan on taking it over to zbrush for additional sculpting. I’ll also arrange my UV’s in MD’s UV Editor so everything is nice and organized.
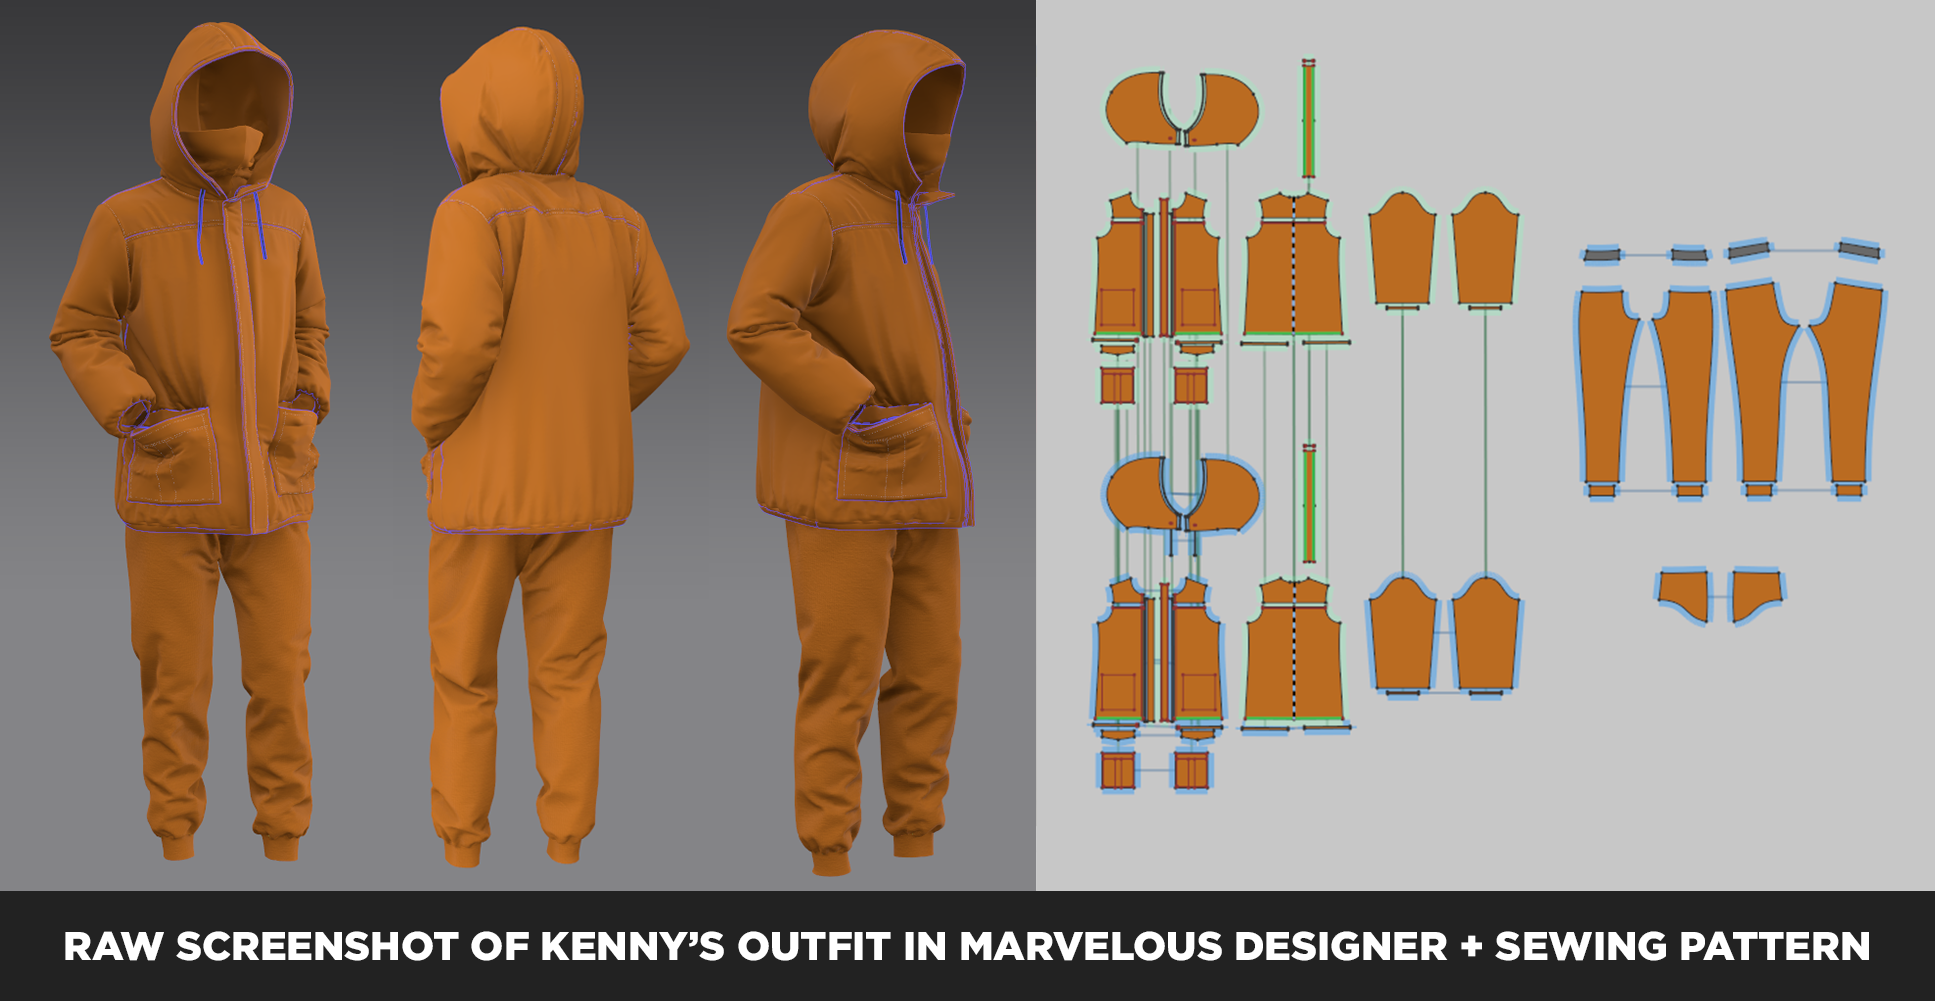
Since I didn't intend on adding thickness in another program to this garment,
I could select my entire pattern for different garment pieces, go to “File” “Export OBJ Selected” and export my garment as “Multiple Objects", "Thick”,
and I make sure “Unified UV Coordinates” is selected. I also put my scale on “cm (Daz Studio) and my % at 100% and then click on ok.
QUICK TIP: If you’ve created a garment with multiple pieces like a t-shirt, jacket and pants, export these pieces individually instead as one garment.
It keeps everything organized to have these garments separated as their own OBJ’s.
Assembling The Scene
For Kenny’s outfit I only did a little bit of detailing in Zbrush by sculpting additional folds but Marvelous Designer did all of the heavy lifting.
I assemble my scenes in Cinema 4D and create all of my materials with Octane Render.
With certain garments I'll also do my texturing in Substance Painter or create my own tileable materials from scratch with Substance Designer.
The scene is basic with only 2 area lights. I also used the power of artificial intelligence from Artbreeder to generate a realistic human face for Kenny.
If you want to see my entire workflow I have uploaded a breakdown video on youtube via this link.
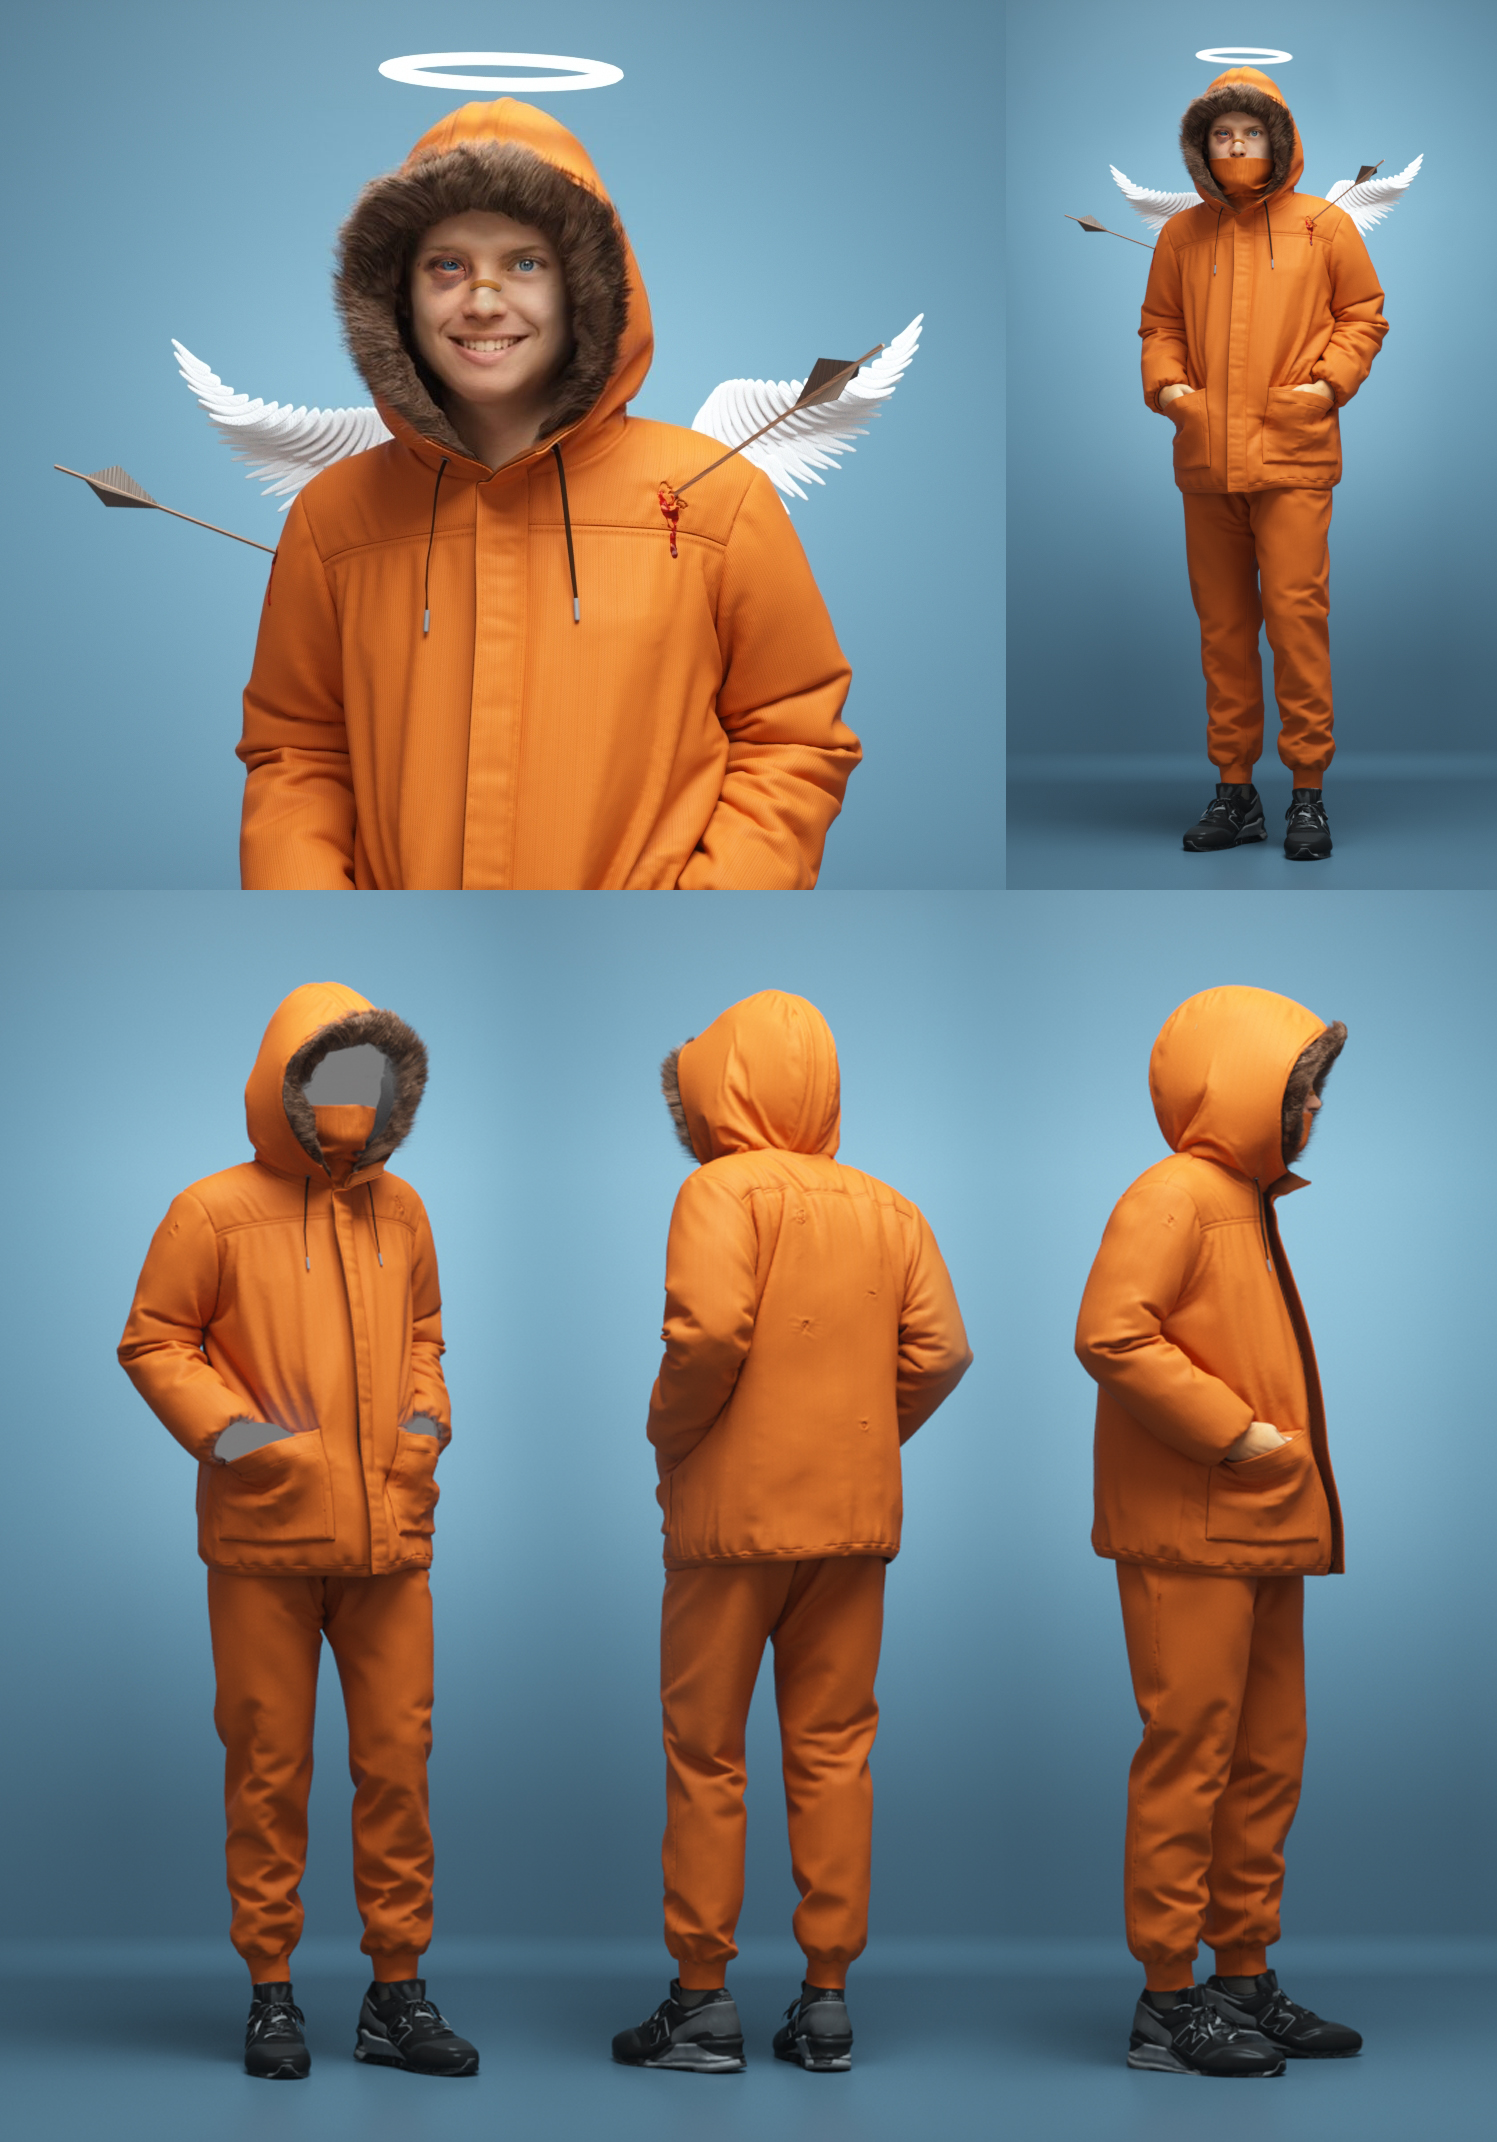
by Travis Davids
Link to Youtube
Link to Artstation
Link to Facebook
Link to Instagram
이 작업은 Cinema4D, Blender, ZBrush, Substance, Pattern, Pose 등의 기술로 제작되었습니다.
Marvelous Designer로 이와 같은 3D 의상·캐릭터 작업을 직접 만들어볼 수 있습니다.