SORCERESS
Georgian Avasilcutei, Senior Character Artist, praises Marvelous Designer's efficiency in creating detailed clothing, shares insights, and encourages new users
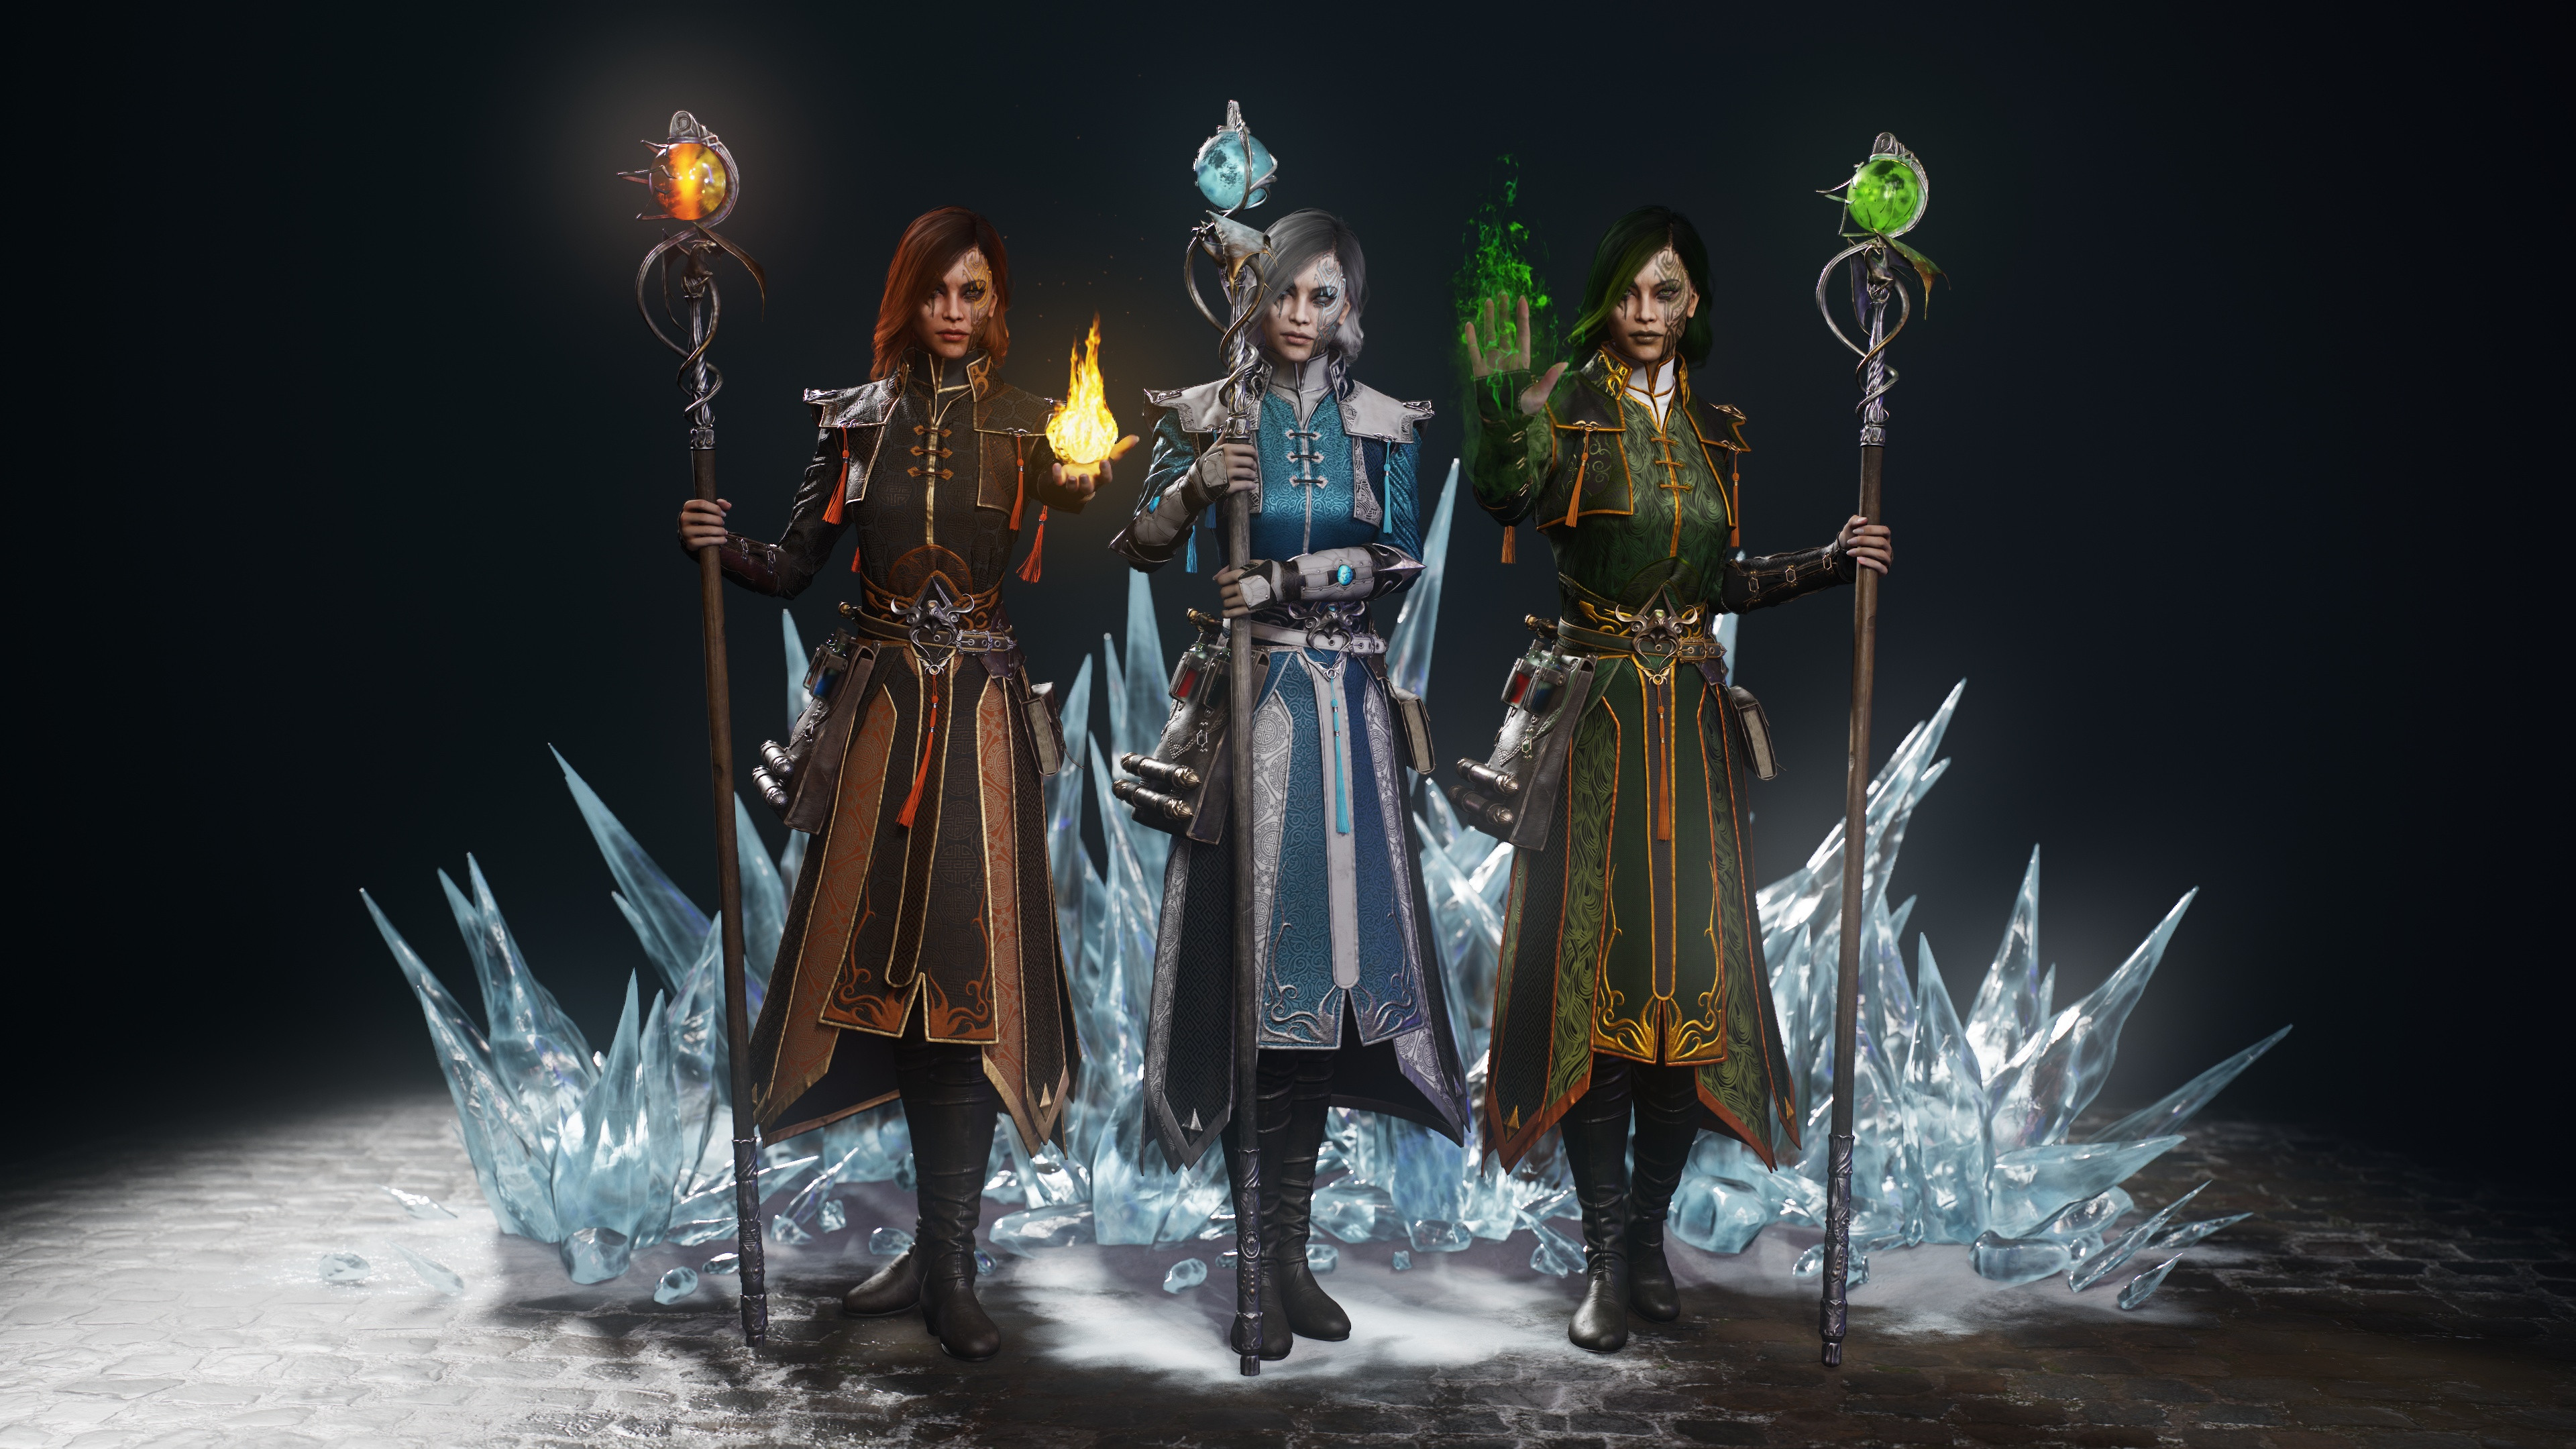
Interview with Georgian Avasilcutei | SORCERESS | Senior Character Artist / Mentor
Artist Introduction
Hi. My name is Georgian Avasilcutei. I’m a senior game character artist with more than 20 years of experience in the industry. I’ve worked on quite a lot of games during the years with the last one being Hogwarts Legacy. Nowadays I’m involved less in game production and more focused on my mentorship program, preparing the next generation of artists.
When did you start learning Marvelous Designer?
I have had a fascination for dynamic simulations since the very early days of my 3D career. I was dabbling back in the day with the default cloth simulation in 3ds Max and tried various clothing simulation plugins afterward.
It was a hassle and very time-consuming back in the days but seeing cloth behaving relatively naturally it was so amazing. When CLO 3D evolved into a standalone software I moved instantly to using it. Over the years, even when I was working as a prop artist, I would always choose to simulate fabrics rather than sculpt them, even though at that point the processing power of my pc was not great it was still worth the effort. So I can say I was around Marvelous Designer since the beginning, obviously with more time spent in it once I became a character artist.
What model do you want to present to us?
I’m gonna talk a bit about the sorceress I did some time ago. It was an interesting project in terms of clothing design and I’ve tried to push the usage of Marvelous Designer on more than just the clothing and I think that would be beneficial for the people reading this to see.
For this project I’ve used Marvelous Designer to create obviously the clothing but I’ve also made the book and the scroll pouch on her waist and the boots with the help of Marvelous Designer. People very often disregard how easy it is to create some good leather boots in Marvelous Designer and they prefer to just sculpt the thing and end up with some very unnatural folding most of the time.
How do you start with your design in Marvelous Designer?
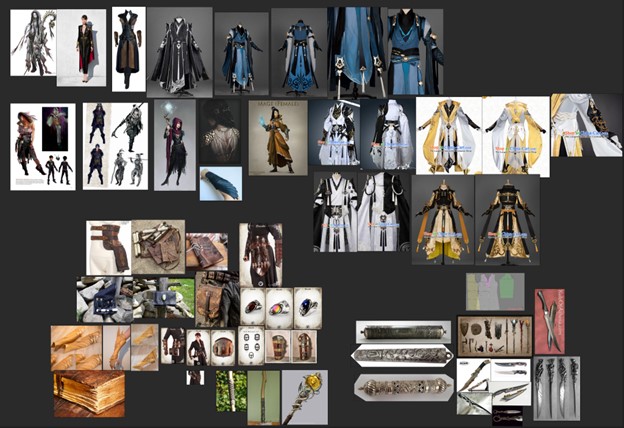
Before doing any actual work of course I need to gather some references. In general, for my personal projects, I went with more design and less following a concept/reference.
In this case, the base for the clothing was a Chinese traditional dress but to which I added quite a few extra elements to make it belong in a fantasy environment.
You can see I had in my PureRef quite a few different costumes, concepts and prop inspiration so that I can create something that is unified in design but also unique.
Once I’ve decided what kind of stuff I want to create is time to prepare the avatar. I know a lot of people who just use the default avatars in Marvelous Designer but I need more control over what I can do.
People often forget that clothing influences the flesh also so in general you need to make sure that you have sculpted any kind of influence. For example a belt on the waist will deform the flesh and will create some changes in volumes. Sculpting the influence is not only gonna give you a result where the clothing will not just float in place but also the information you need to get some really good folding and a good reference point for where you want a specific piece of clothing to rest.
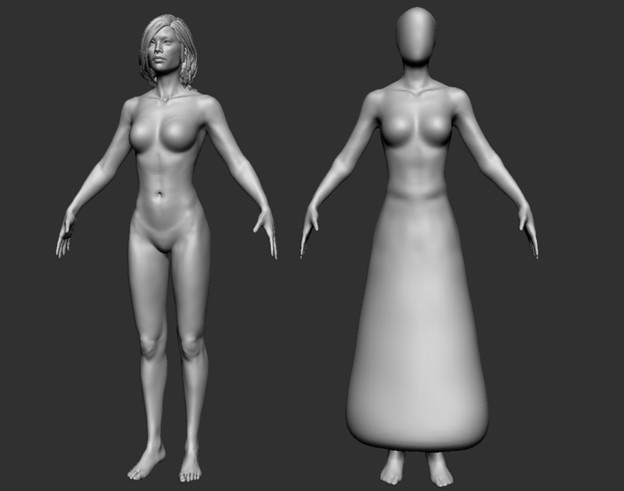
You might wonder why I have that “skirt” looking volume on my avatar. The reason for it is that I wanted my skirt to flare but in a very uniform-looking way. Initially, I tried to simulate the skirt using stiff materials but the results would be too far from what I wanted so I decided to give it a helping hand. Especially for games you can use tricks like this because you’re not gonna use this avatar for any animation and you want your model to get as close as possible to the concept/reference without struggling too much. Doing this my skirt ended up quite nice and straight and all the layering fabrics that I have there didn’t prove to be a nightmare when it comes to simulation.
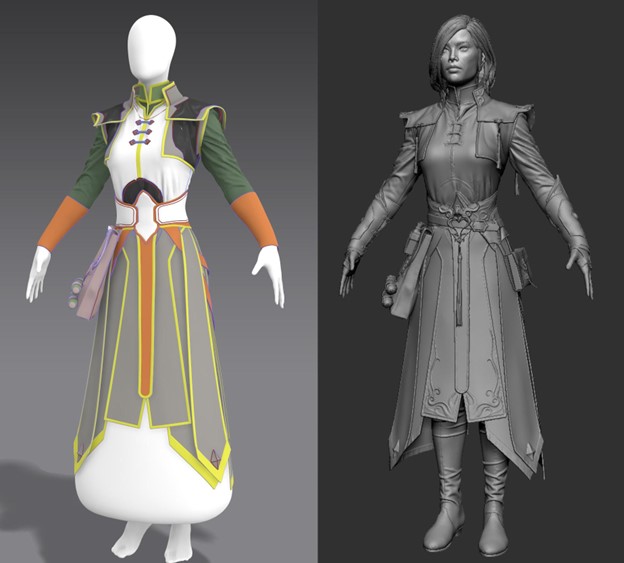
Due to the fact that most of my work is game art I know for a fact that a lot will be modified afterwards in ZBrush, but in general I try to push my Marvelous Designer work as far as I can in terms of detailing so that when I do corrections in ZBrush they’re all quite small and not require too much sculpting involved.
As you can see in this image there are still some differences between the final Marvelous Designer result for the clothing and the final high poly in ZBrush. A lot of ornaments, buttons and so on were left to be done outside Marvelous Designer and I haven’t bothered to import them in Marvelous Designer due to their limited influence.
What are the most important things that people ignore when it comes to creating clothing?
In my opinion, people are not taking care enough about the avatar. From proportions to posture and pose everything counts in the way your cloth will fold. I’ve seen plenty of nice garments fit a very stiff or wrong posture avatar which created some very undesirable folds. When it comes to games it’s quite important to limit the folding in some areas that will deform in a very specific way. There is a reason why I’m always making my clothing in an A-pose even if the final model might end up being in a T-pose for rigging purposes. People also underestimate how much influence the avatar details have. For example, I’ve seen avatars with too low poly density and then the users asking why when they get all that polygon-shaped deformation on their tight-fit clothing. I’ve also seen people who completely disregard the way the cloth influences the flesh and the final result always looks like floating above and not really interacting with the body.
When it comes to the Marvelous Designer part of things, people have a tendency of ignoring especially the layering effect of clothing. I see people making winter jackets or suit jackets and completely ignore the fact that the clothing has linen.
If we look at my character at first glance the upper body clothing looks more like a 2 layer job. In reality, I have 4 overlapping layers and the last 2 are also doubled with fabric on the inside also.
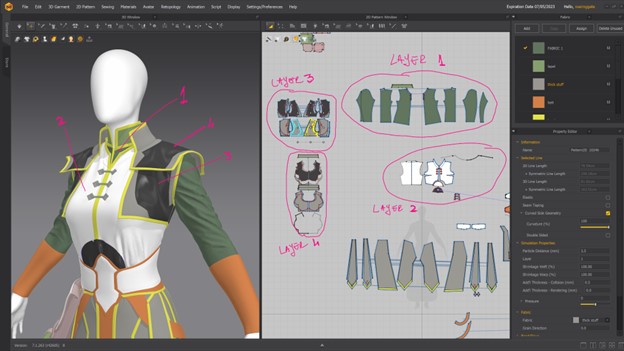
Another thing that I’ve seen often is that the users tend to go into detail very soon. It’s a general rule in 3D to gradually add details while making sure that the first pass is as close as possible to what you desire. If you go into details from the beginning you will end up with a nightmare if you want to change a major shape later. So take your time to make sure you have the right fitting for your clothing and that you are in a good place with the way the folds look before adding more poly density and any kind of detail.
Can you do a quick breakdown of the Marvelous Designer work for this character?
Sure. My character was split into 4 different scenes.
The one you’ve seen in most of the images so far is the main one where I did the dress and scroll pouch.
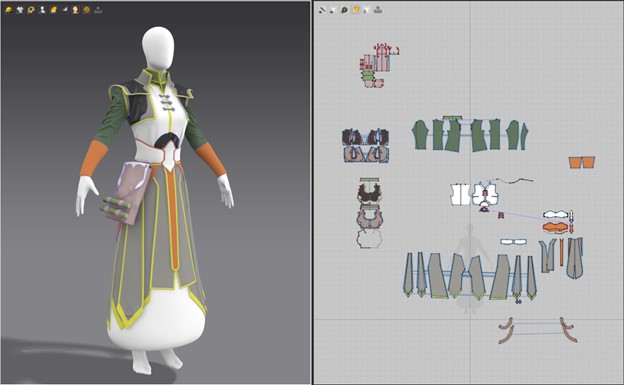
The second one is the scene with the boots.
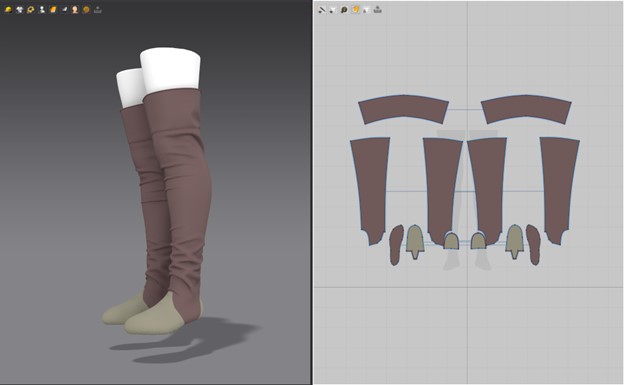
“Why not just model those boots?”
I’ve got this question during the streams very often and I cannot state how much time I save doing any kind of work in Marvelous Designer. Sculpting good folds requires a lot of experience and precision and even then most of the time you will get it a bit off. Marvelous Designer can help you make leather boots in a matter of minutes.
I have made a more in-depth explanation about how to approach making boots in Marvelous Designer during one of my streams.
For the boots, I just wanted some over-the-knee soft leather design that is not too complicated but that brings some interest through nice folding.
Again the avatar is very important so for the boots I go and sculpt a very simple shape from the leg I have where I collapse the toes into a volume that is very similar to a footwear last.
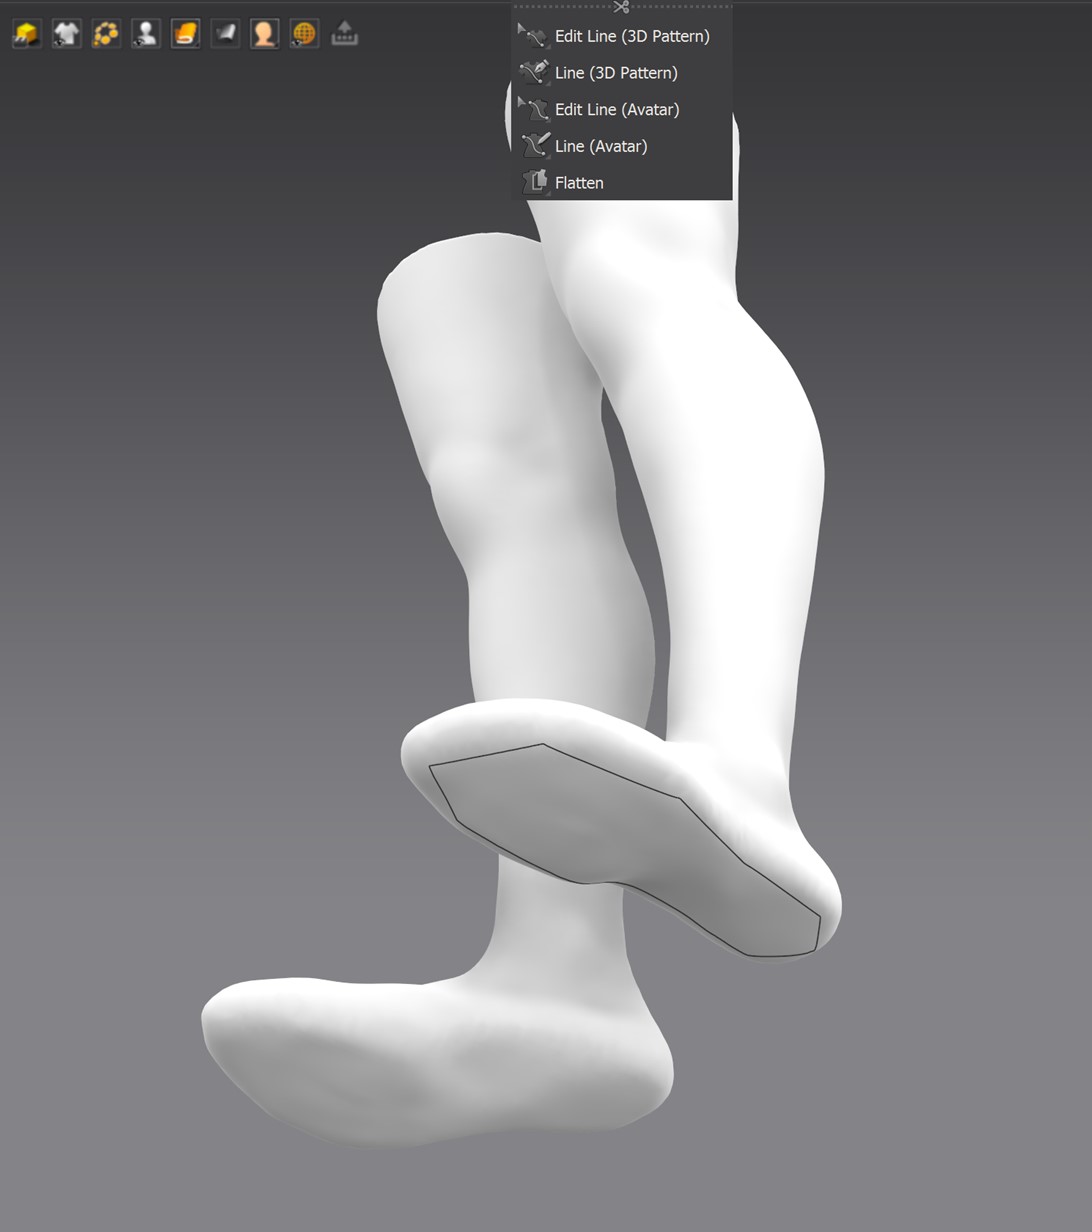
I draw a quick 3D line on the avatar and flatten it to a shape similar to a sole. This piece will be frozen and used to sew the rest of the boot while getting the nice round shape the leather gets when it’s twisted to connect with the sole. The actual sole was modelled in 3ds Max for these boots.
The third one is the scene for the bracers.
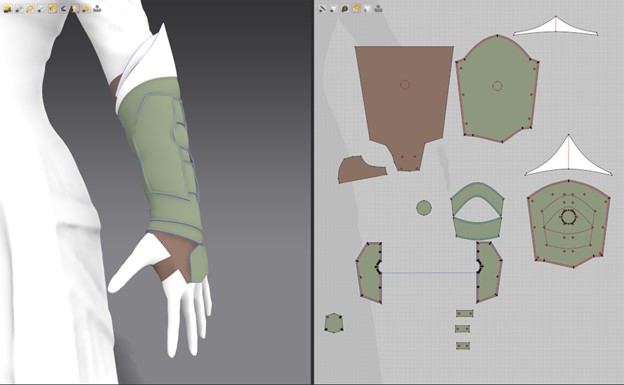
The bracers were a pretty complex shape and I wanted to keep them separated so that I don’t struggle simulating. As you can see I have a lot of rivets and straps that I completely disregard while working in Marvelous Designer. I tend to just put a circle inner line where a rivet would be and just simulate the interaction with the other layers.
Even though most of the materials on the bracer are very stiff, the slight folding is way easier to achieve here rather than modelling.
The last one is the scene for the book cover.
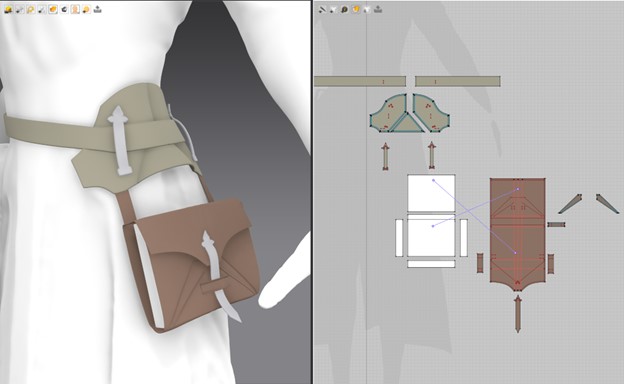
I wanted to make this book cover and the belts holding it in Marvelous Designer with the intention of making my viewers aware of how easy it is to do stuff like this rather than modelling it.
As you can see the white patterns are there just to simulate the pages of the book and constrain the cover to a nice shape. As for the rest of the work I did for this character I do not create any kind of buttons or details in Marvelous Designer. My focus is only on making good shapes and having the right folding and interaction.
You can see in the image that I’ve collapsed all my clothing into a simplified avatar to use as a base for this whole prop.
Do you have anything to say to the new Marvelous Designer users?
I think the new users need to understand that while Marvelous Designer is a very easy-to-learn software, mastering it requires a lot of experience. Understanding how the patterns behave, learning how to use the internal lines to your benefit, figuring out the fabrics and all the other tools this amazing software provides is gonna take some time and practice. Also, you need to understand that if you want to build some very complex clothing you will need a quite powerful PC.
What I can tell you is that no matter what kind of work you do, you will need to learn how to use Marvelous Designer. At this point there is no better solution to simulate fabrics and the tools in Marvelous Designer are unmatched. Marvelous Designer was and will be one of the most important software in my pipeline.
In the end, I want to thank you for the opportunity to write this and I want to thank the Marvelous Designer team who have been very helpful and supportive in the past years.
For those interested in the whole process of making this character, the saved videos with the streams while working on this can be found on my Patreon, alongside many other characters that we’ve made during the last years of streaming.
by GEORGIAN AVASILCUTEI
이 작업은 Marmoset, Substance, 3dsMax, ZBrush, RizomUV, TopoGun 등의 기술로 제작되었습니다.
Marvelous Designer로 이와 같은 3D 의상·캐릭터 작업을 직접 만들어볼 수 있습니다.