Odin
Nishas VN, a senior game character artist with over 7 years in the industry and 2 years in graphic design, highlights her expertise in her latest project, Odin Alfiifir.
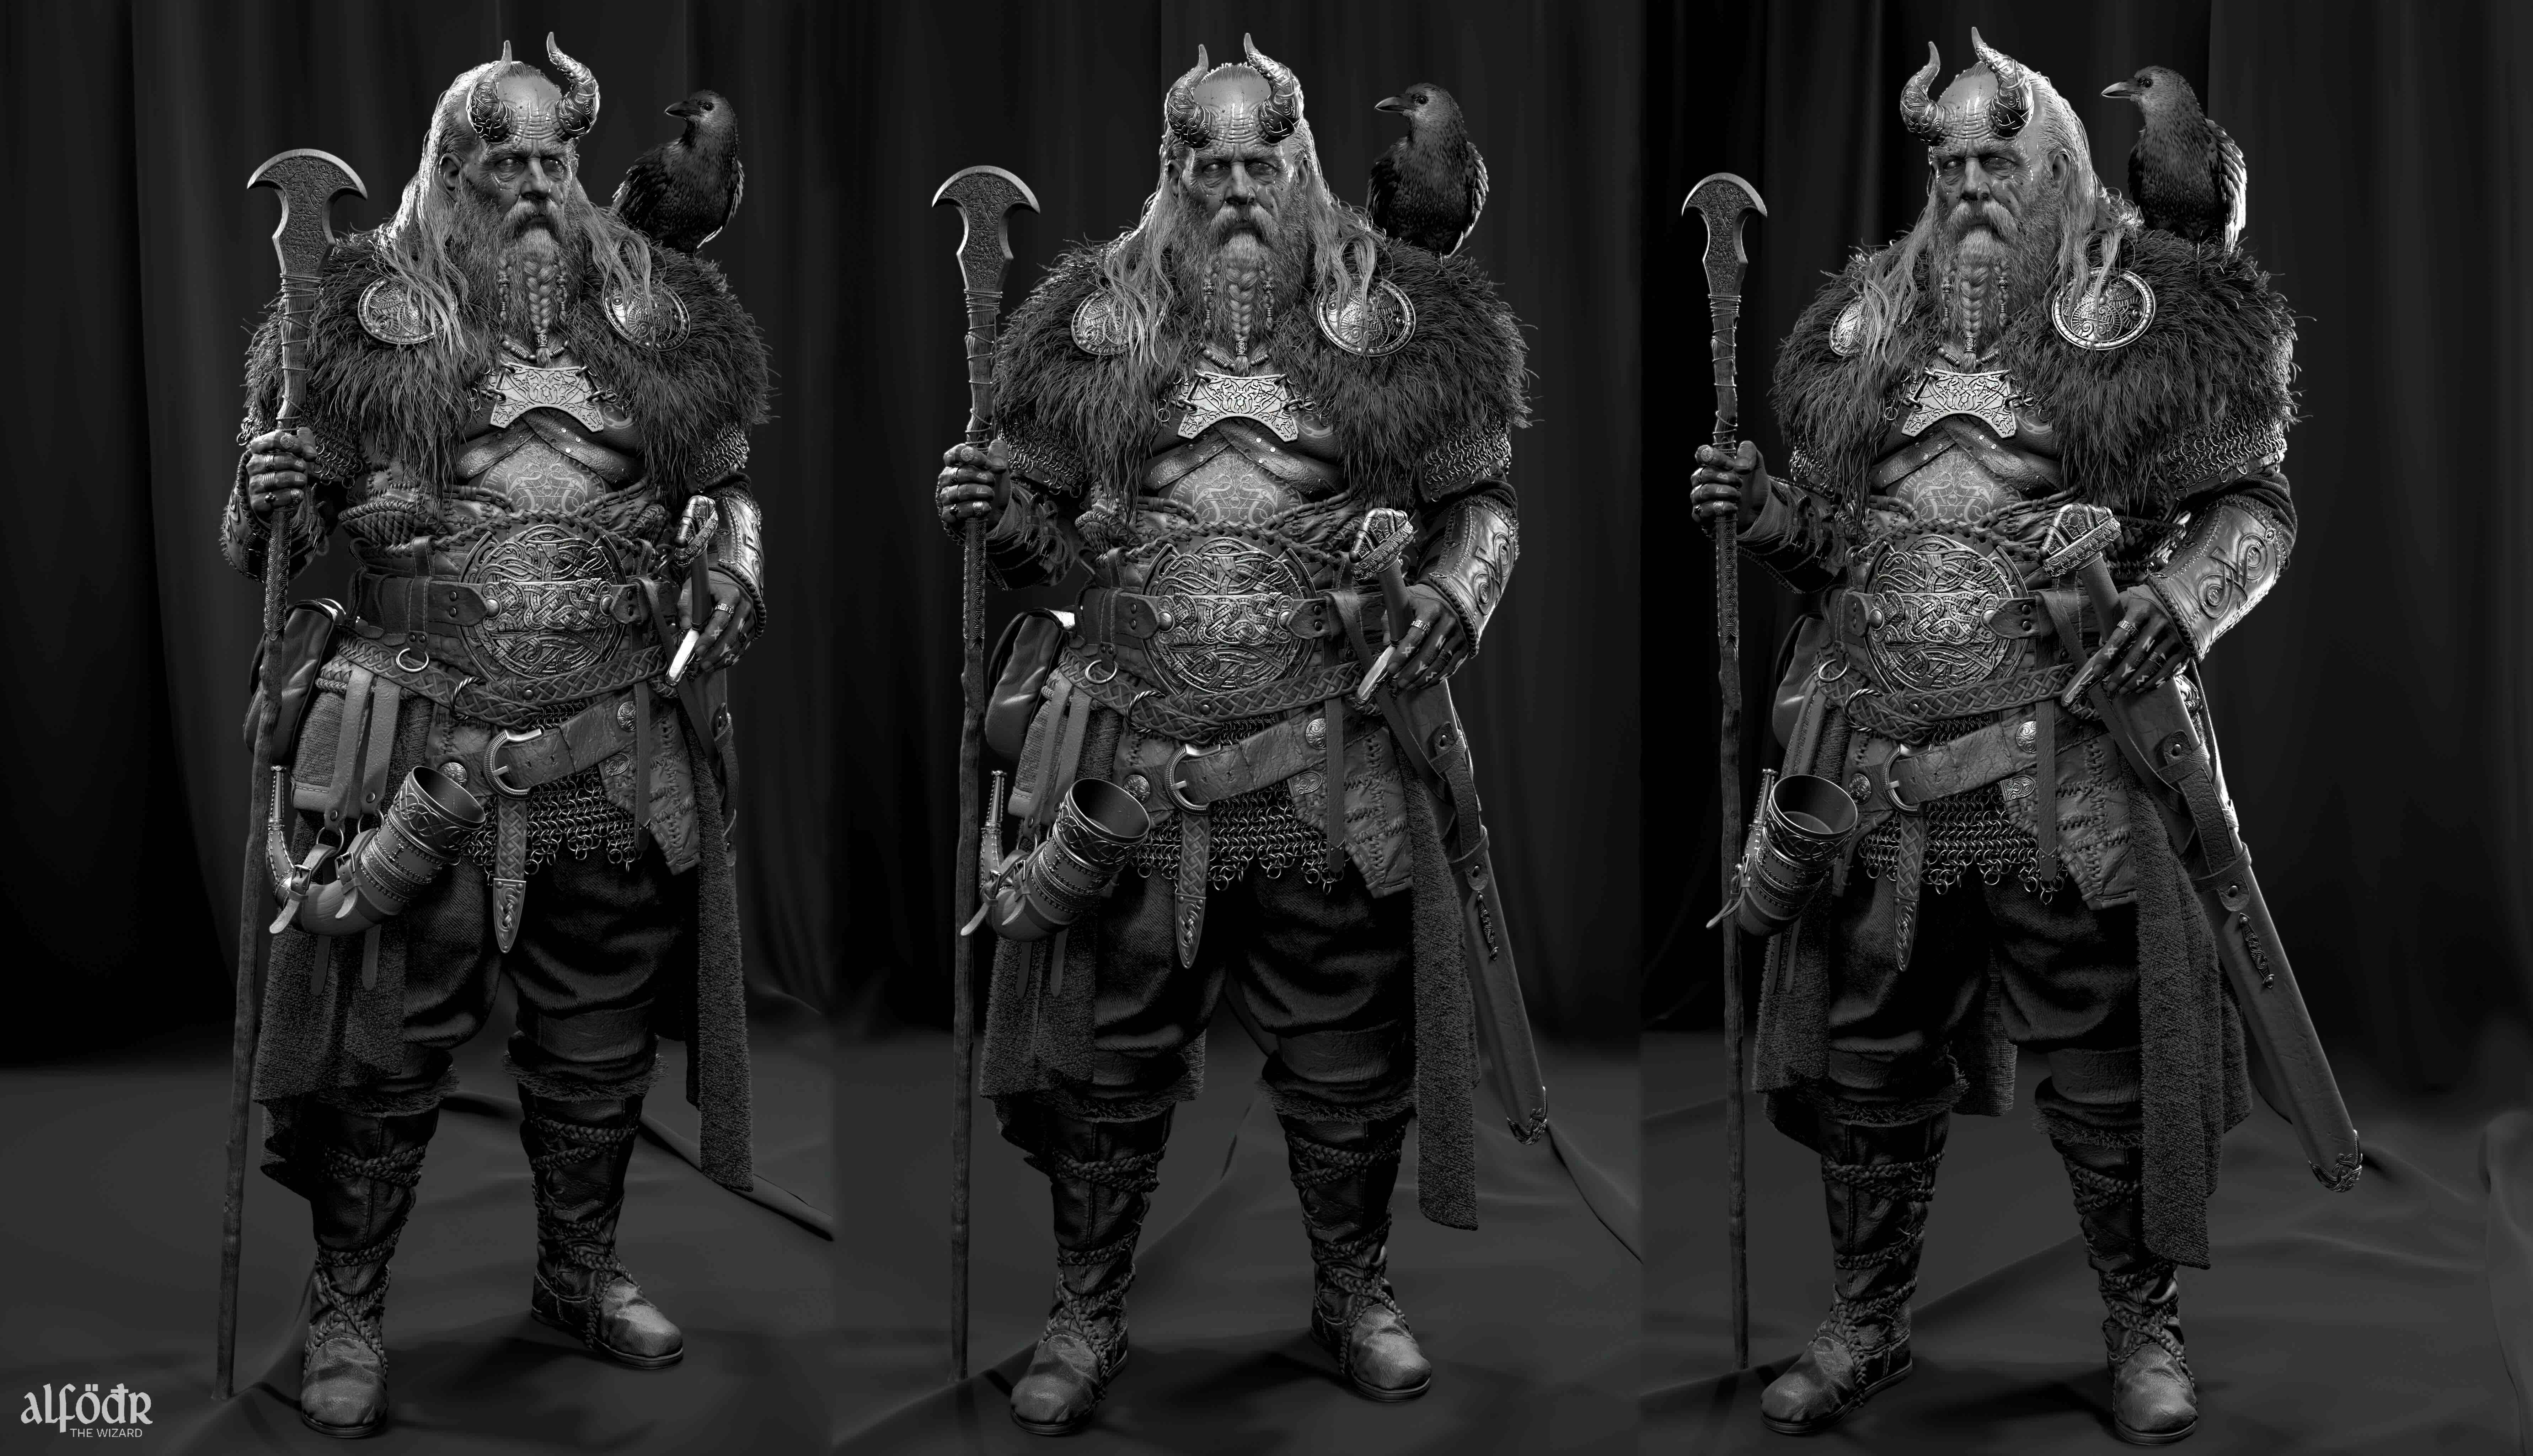
Interview with NISHAS VN | Odin | Character Artist
Artist introduction
My name is Nishas VN. I'm a senior game character artist with more than 7 years of experience in the Game industry and 2 years experience in graphic design . I've worked on quite a lot of games during the years with the last one being Alan Wake 2.
When did you start using Marvelous Designer and how did that affect your workflow process?
Seven years ago, I ventured into the world of Marvelous Designer. My journey began by immersing myself in online tutorials on YouTube, gradually uncovering its immense potential. This software has revolutionized the fashion and 3D design industries by enabling the creation of lifelike 3D clothing and fabric simulations. Not only confined to fashion, but Marvelous Designer has also started making waves in the realm of gaming. Its integration into games, like the renowned Metal Gear Solid V: The Phantom Pain by Konami and Kojima Productions, showcased the software's versatility and impact beyond traditional design spheres. Witnessing its application in such high-profile projects piqued my interest and solidified my belief in its far-reaching influence.
Marvelous Designer has remarkably streamlined my workflow, replacing time-consuming traditional cloth sculpting with hyper-realistic garments in mere minutes. Its extensive library of fabrics allows for the authentic capture of cloth materials, elevating the realism of designs. Moreover, Marvelous Designer not only enhances cloth creation but also significantly expedites other processes, such as high-poly and low-poly UV mapping, ultimately saving valuable time across multiple facets of the design pipeline.
As a student, how much time did you find sufficient to gain confidence in using Marvelous Designer?
I was pleasantly surprised by how easy it was to start using Marvelous Designer, and within a month, I was able to achieve some results. However, to produce high-quality work, you must invest more time in learning shortcuts, selecting the appropriate tool for each situation, and researching information for the tools you are unfamiliar with. If you take a break from using Marvelous Designer for some time, it can feel like starting from scratch again.
Explain the project's creation aspects, including intentions, goals, cloth design approach, and references.
Let me delve into my recent project featuring Odin Alfiifir. This endeavor posed unique challenges, particularly in clothing design, prompting me to explore Marvelous Designer's capabilities beyond traditional garment creation. I aimed to showcase a versatility for readers' benefit In this venture, Marvelous Designer played a pivotal role, not only in crafting the clothing but also in designing elements like the bag, cape, and boots. Often overlooked, Marvelous Designer's prowess extends beyond typical clothing design; it aided me in achieving remarkable results, notably in crafting authentic leather boots. Many tend to underestimate its ability to create such intricate details, opting for sculpting methods that often result in unnatural folds. Marvelous Designer, however, provides a more intuitive and realistic approach to crafting these elements.
Prior to diving into the creative process, gathering references is a crucial step. For my personal projects, I typically blend design freedom with inspiration rather than strictly adhering to a specific concept or reference. For this particular endeavor, I drew from a Norse Viking dress as a foundation, embellishing it with numerous additional elements to seamlessly integrate it into a fantastical setting. This approach allowed me to infuse elements of my imagination while retaining the essence of the original Norse design.
In my PureRef canvas, I curated a diverse array of costume concept and prop inspirations. This compilation served as a rich tapestry of ideas, guiding me to craft a design that strikes a balance between cohesion and distinctiveness. The goal was to create a unified yet uniquely individualized piece, drawing from various sources to inspire a cohesive and original design.
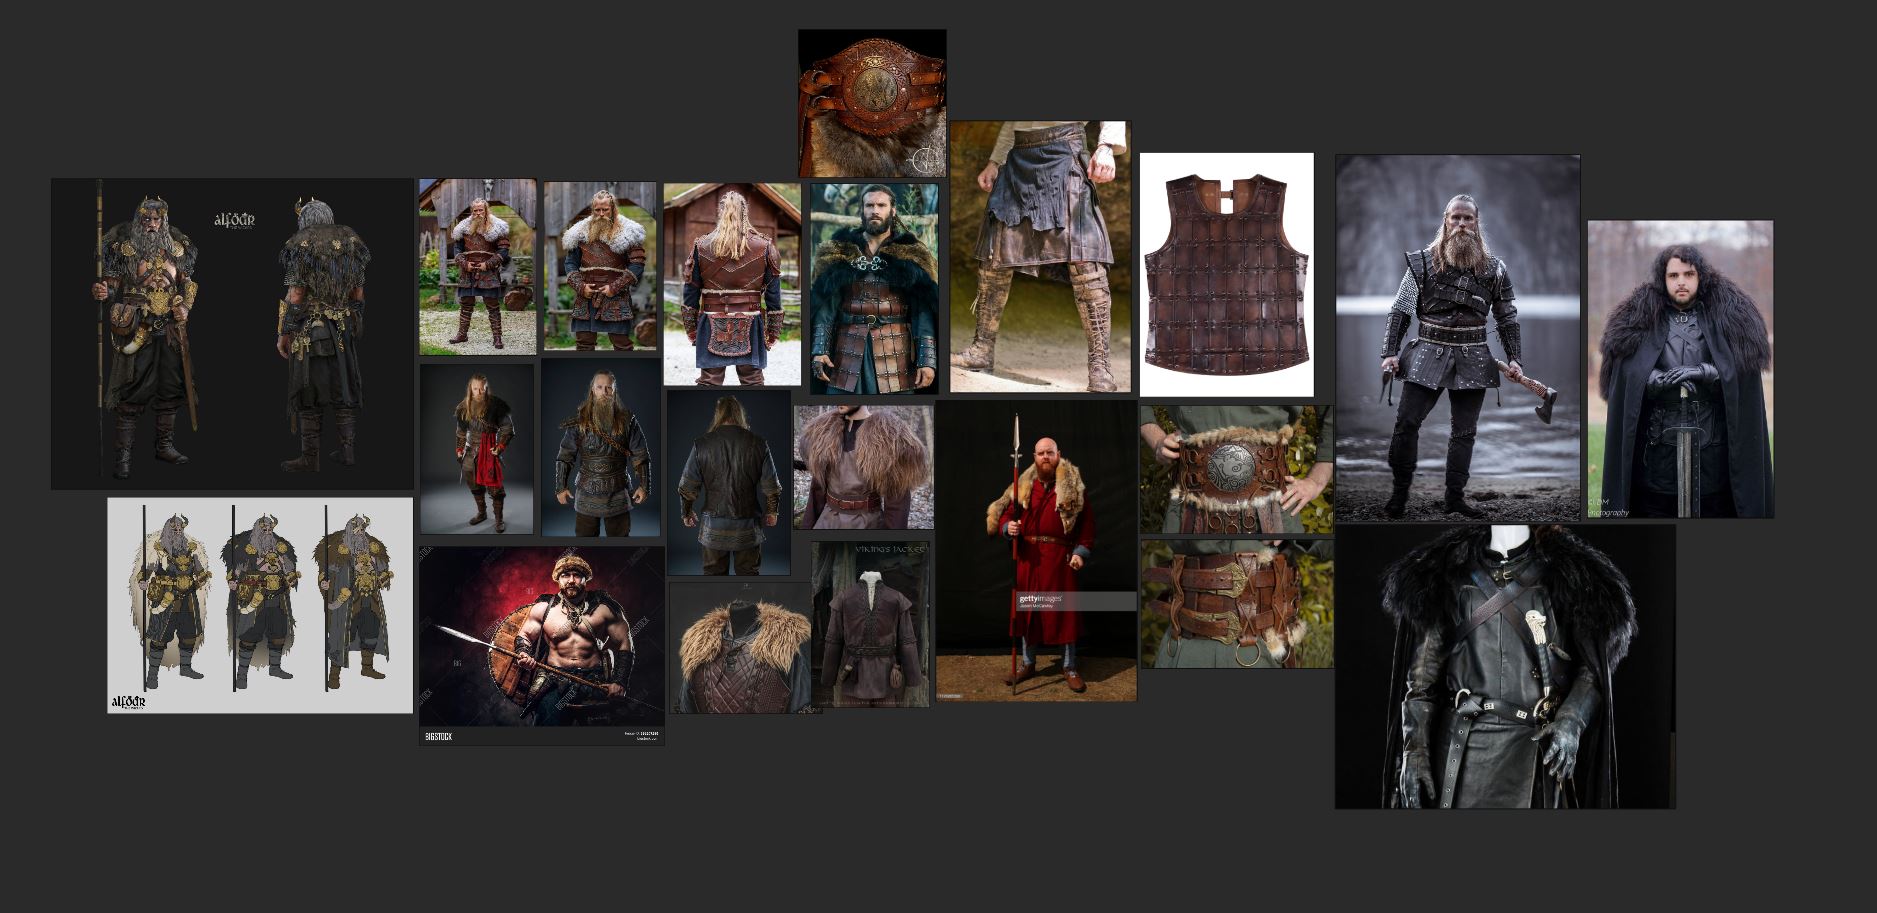

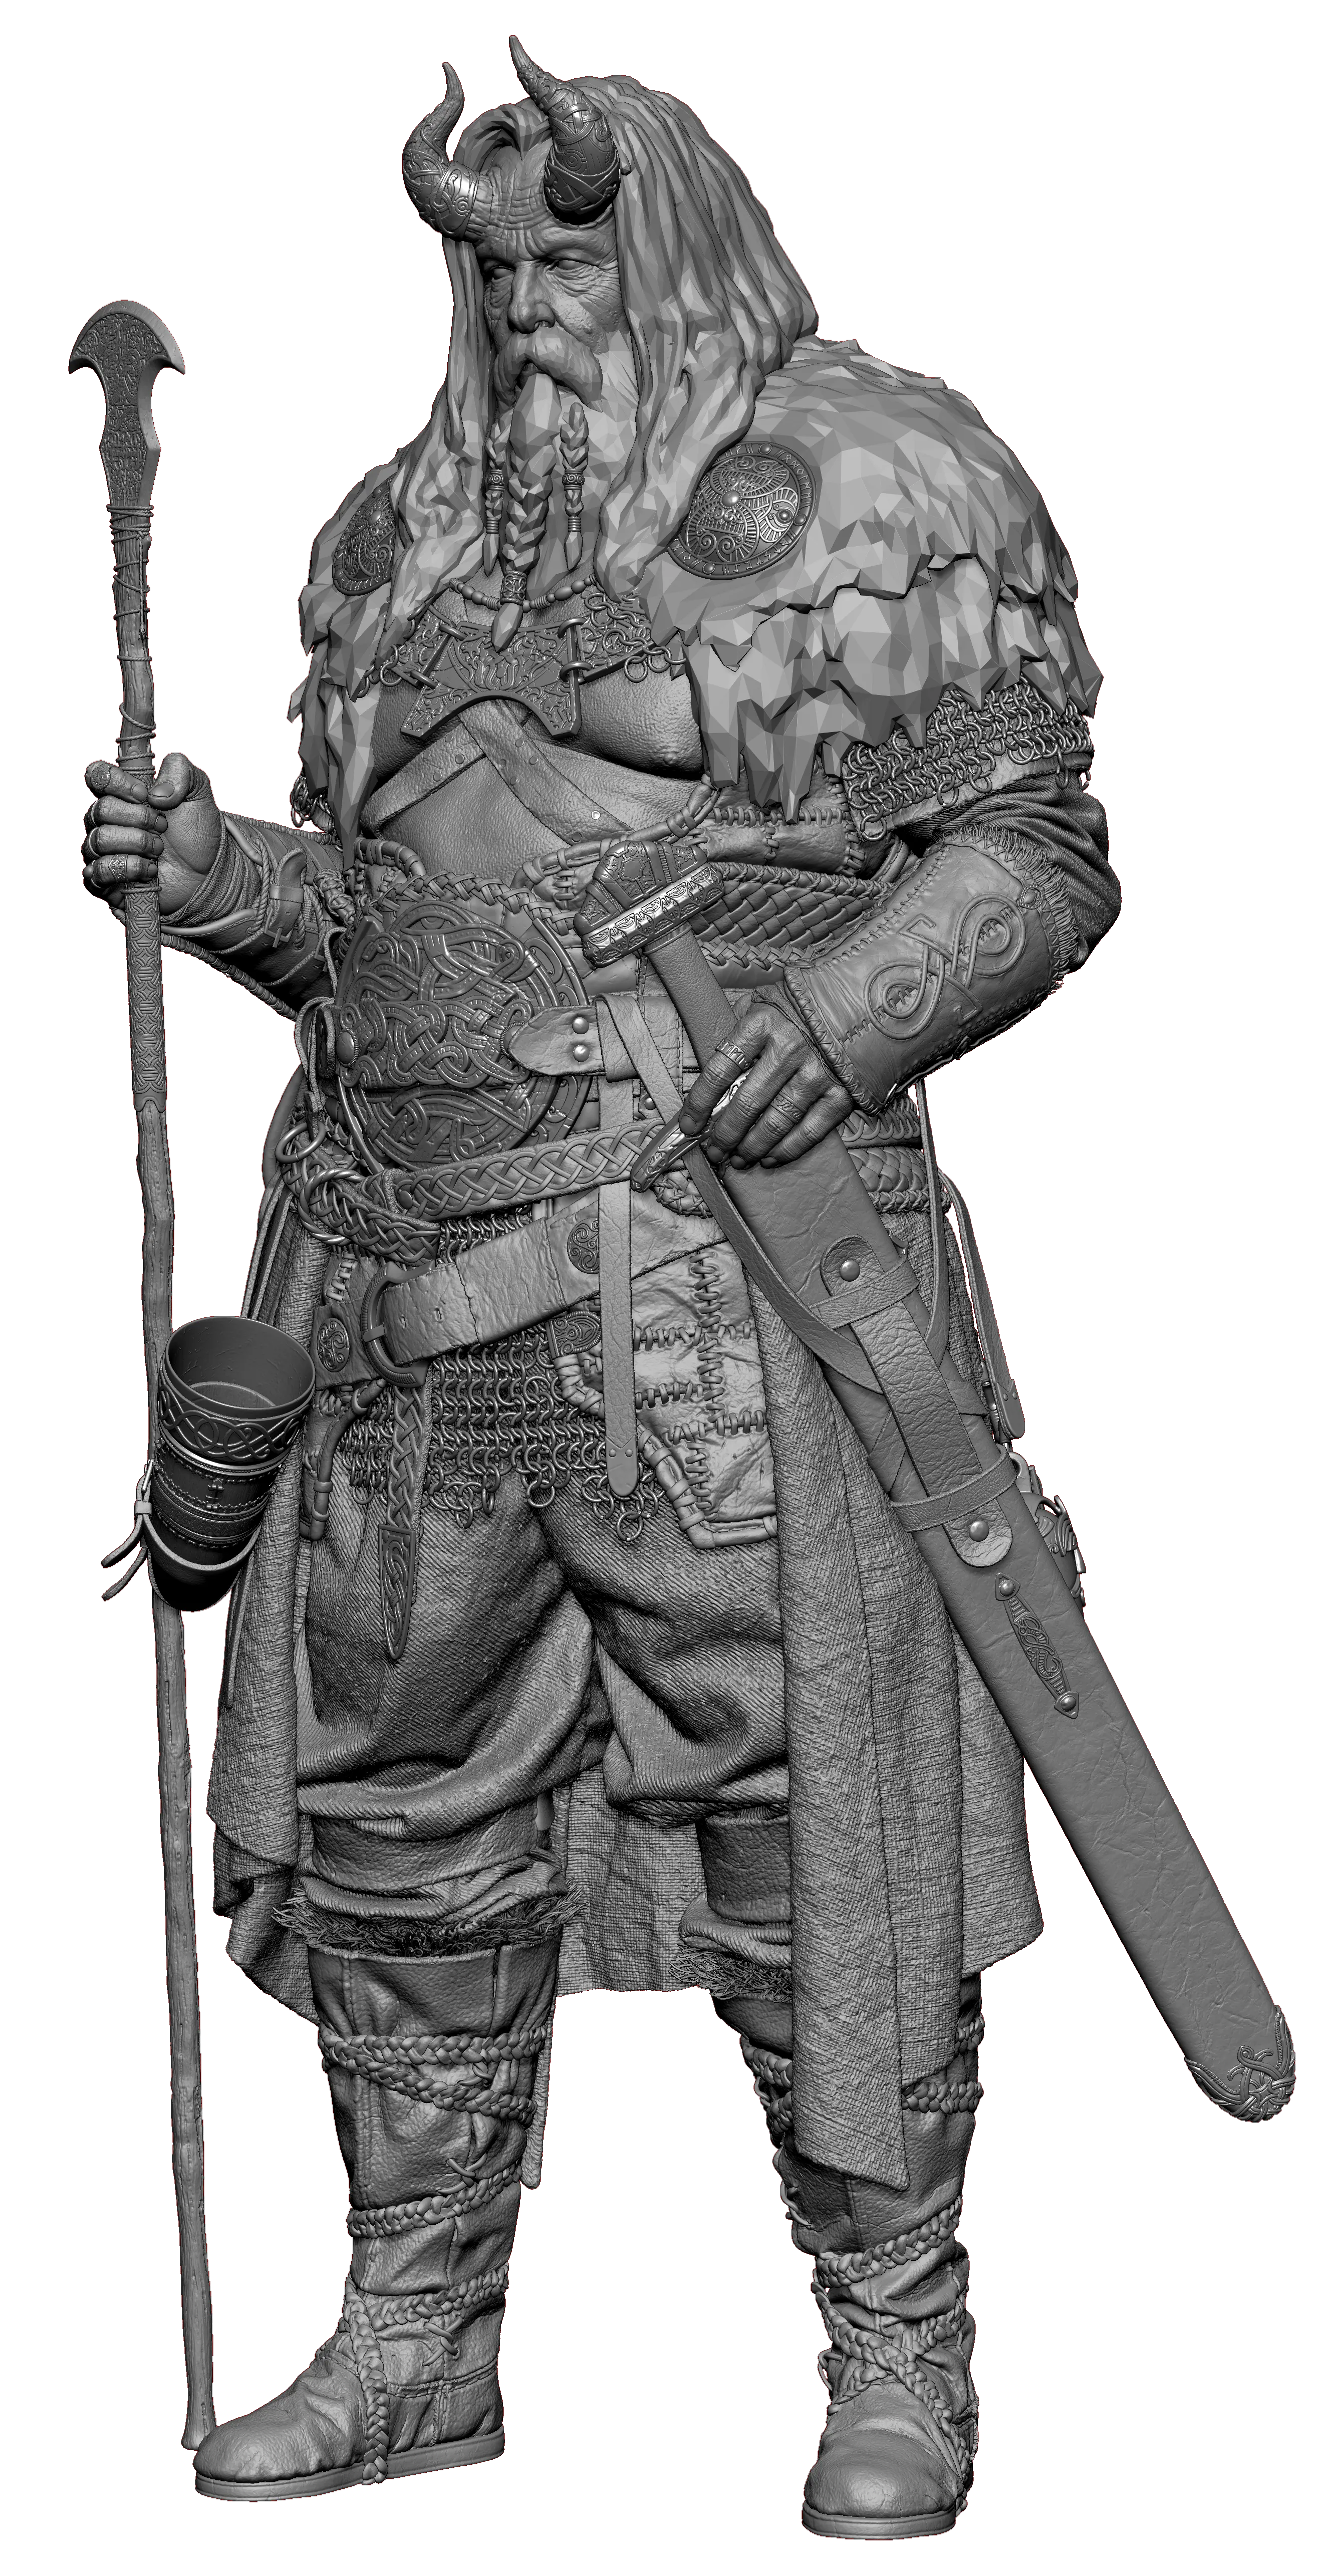
Once I've determined the direction for my creation, it's time to import the base mesh or avatar. While many opt for default avatars in Marvelous Designer, I prefer a more controlled approach. It's crucial to have greater influence and control, as clothing inherently influences the form of the underlying flesh. This detail often gets overlooked. Therefore, sculpting any potential influence is essential to ensure a seamless integration between the clothing and the body underneath.
From my experience, I've learned that achieving realistic clothing hinges greatly on the initial fitting of the garments. It's crucial to focus on clean patterns and precise fitting as natural stitching and realistic folds tend to emerge more natural during simulation. I advise limiting the use of pins to necessities, as excessive pinning and forced folds can contribute to an unrealistic feel in the clothing. To maintain authenticity steer clear of excessive pinching or symmetrical folds, aiming instead for balanced and natural drapery. Additionally, when dealing with layered clothing, it's advisable to avoid utilizing the fast (GPU) simulation, Due to complications with layered garments, it's best to avoid utilizing the (GPU) simulation, as it may not effectively handle the complexities inherent in layered clothing.
Many decorative elements such as ornaments and weapons were deliberately excluded from Marvelous Designer, as their impact on the clothing simulation was minimal. Hence, I chose not to import these details into Marvelous Designer, opting to address them separately outside the software.
Share your approach to working with Marvelous Designer. What tricks have you discovered to boost efficiency, and what advice would you offer to new users?
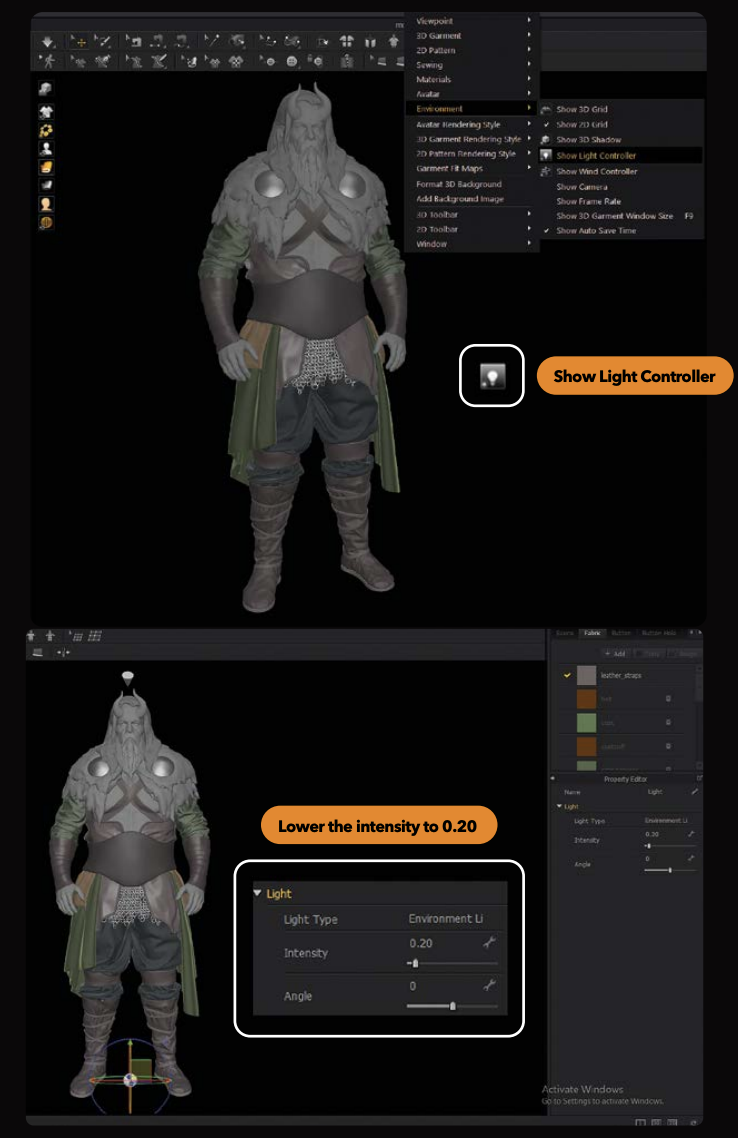
Prior to diving into the task at hand, I make it a point to set up the lighting meticulously. Getting the lighting just right is crucial as it significantly amplifies the overall appearance and visibility of folds and wrinkles in the design.
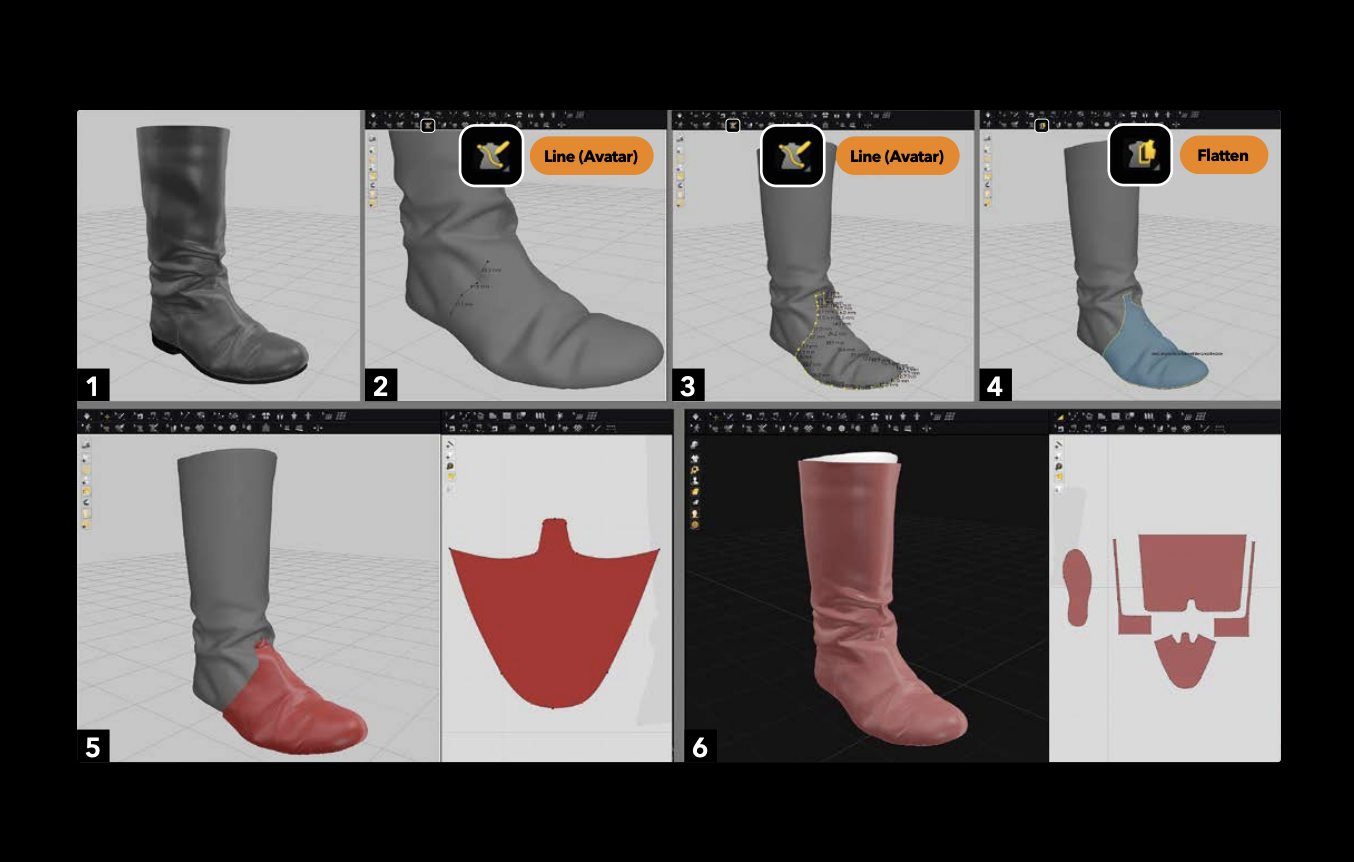
Constructing the boot
I adopt a different approach in crafting boots by initially sculpting a base model in ZBrush, which I later import into Marvelous Designer. Using this base mesh as a guide, I employ the Line tool to delineate the boot's outline, refining it further with the Flatten tool to generate a visible pattern, reflecting in the 2D pattern window. Once the entire boot design is established, I simulate its appearance, utilizing the ZBrush base mesh as the avatar mesh within Marvelous Designer. This methodology allows for precise control over achieving the desired fold Mixture in the design.
My workflow within Marvelous Designer follows a clear path. Initially, I focused on constructing a clean pattern and stitching to generate a blockout file with high particle distance. This blockout serves as the foundation, aimed at refining the fitting precisely without relying on excessive pinching or excess fabric. Once the primary fit is perfected, I progress to the secondary detail stage, decreasing the particle distance to introduce moderate folds and simulate additional intricacies. Finally, in the temporary detail phase, I set a low particle distance to add the final touches and meticulously finalize the file.
Explain your process of moving between Marvelous Designer and other software. How do you prepare your project for a smooth transition?
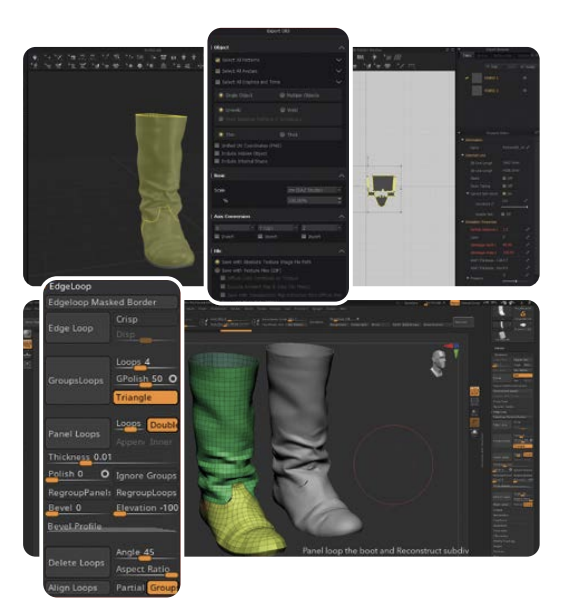
To convert the Marvelous Designer file into a clean topology, I utilize Maya's Transfer Attributes tool. After exporting, I save two sets of files named boot3D and boot2D. The boot3D file is the direct export from Marvelous Designer, while the boot2D represents the 2D pattern version obtained by right-clicking and selecting "Reset 2D Arrangement." Next, I import the boot2D file into Maya and proceed to create a clean topology using either the Quadraw tool or by employing ZRemesher in ZBrush. Once the retopology process is complete, I save the file as bootretopo. To finalize the transformation, I configure the Transfer AMibutes settings accordingly through the tool's options.
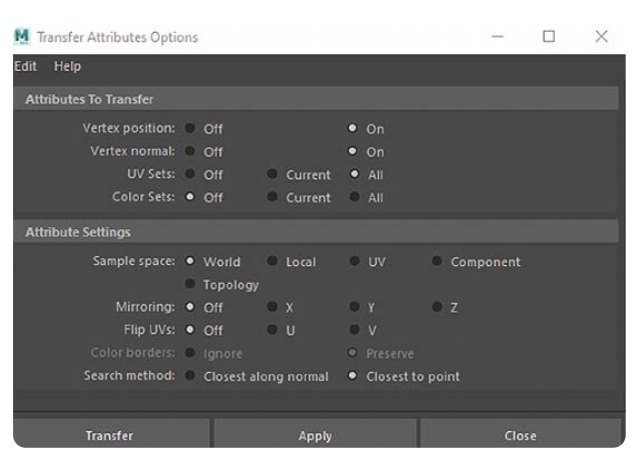
Following the retopology process, select the boot2D file first, then the boot retopology file in Maya. Utilize the Transfer Attributes tool and click "Apply" to transfer the UVs from boot2D to boot retopology. Once the transfer is complete, adjust the Transfer Attributes settings as needed to ensure the seamless transfer of UVs between the files.
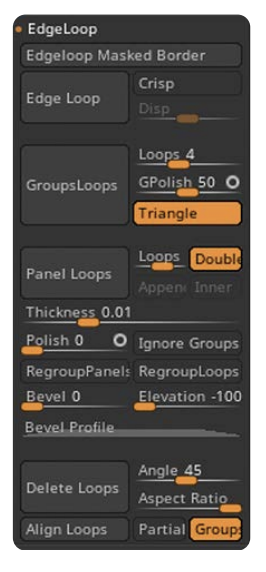
Afterward, right-click and choose "Smooth" to increase the subdivision of the boot reæpo in Maya. Following this, select the boot 3D file first, then the boot reæpo file, and click "Apply" in the Transfer Attributes tool. This action directly transfers the boot retopo attributes to the boot3D file. Next, clear any history by selecting "Edit" and then "Delete by Type > History." You can proceed to remove both the boot3D and boot2D meshes. Export and save the boot retopo mesh. Subsequently, import it into ZBrush and access the Geometry tab, selecting Edge Loop > Panel Loops. Employing this function provides thickness to the boot. Apply "Reconstruit" to revert to lower subdivisions, resulting in a refined and clean high-poly boot mesh.
by Nishas VN
ArtStation
이 작업은 ZBrush, Maya, Avatar, IndividualArtwork, CharacterArt 등의 기술로 제작되었습니다.
Marvelous Designer로 이와 같은 3D 의상·캐릭터 작업을 직접 만들어볼 수 있습니다.