Evil Jester
From Sewing Machines to Marvelous Designer: How Think Tank Graduate Sia Melnychenko Merges Her Lifelong Passion for Sewing with MD to Create High-End Characters.
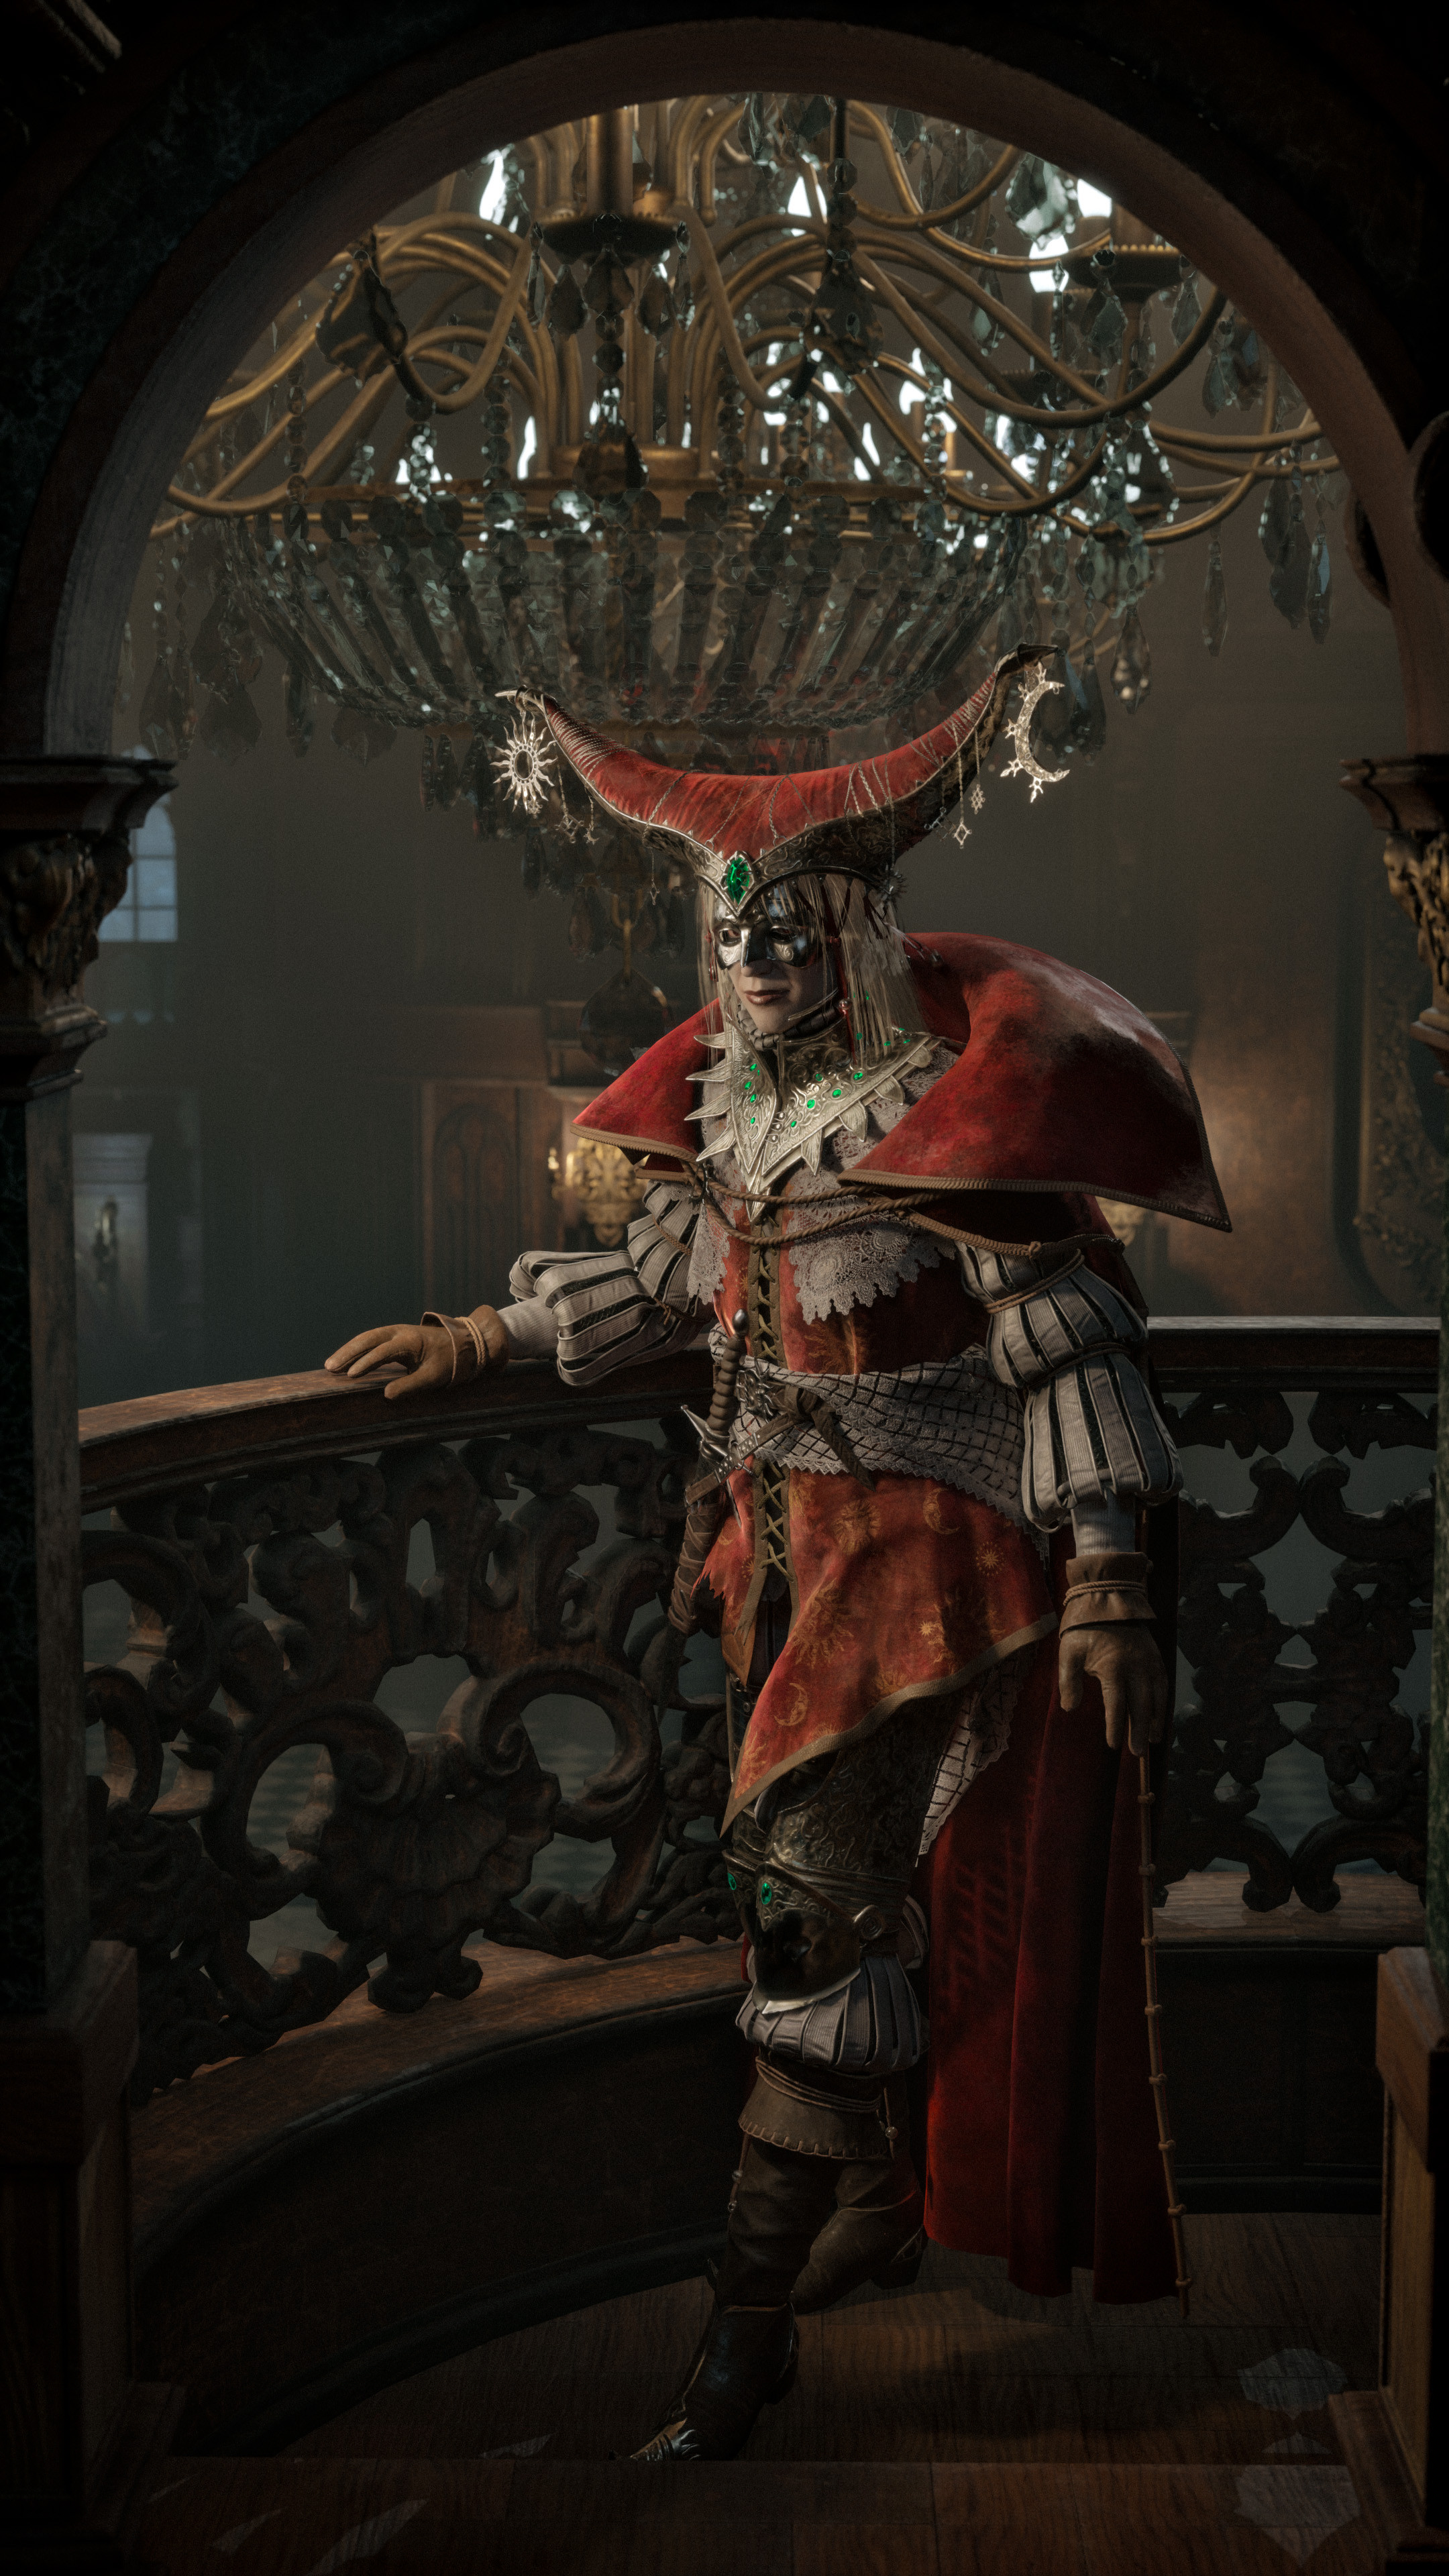
Software Used:
Zbrush - Blockout, Sculpting
Marvelous Designer - Garment Creation
Maya - Retopology, UV-unwrapping, xGen Interactive Groom
Marmoset Toolbag - Baking
Substance Painter - Texturing
Unreal Engine - Character Setup(simulations, physics), Lighting & Rendering
Could you briefly introduce yourself and tell us about the "Evil Jester" project?
My name is Sia and I’ve been learning 3D Character Art for 3 years. I was always into arts and crafts, but I was also a big fan of video-games. I think deep down I always knew what I wanted to do for work: growing up one of my favorite games was The Sims 2, where I’d always spend hours creating characters. At some point I even discovered The Sims 2 Body Shop and started redrawing textures in Paint to create custom clothing pieces.
I started thinking about doing 3D around 2019, but I had too many excuses - my ancient laptop won’t boot up Maya, I was a full-time student with a job, etc. So after I got laid off from my recruiter job in late 2022 I knew it was time to finally focus on something I really wanted. It’s 2026 and I have never looked back ever since. I have worked on a mobile RPG game in a small company for nearly two years, where I learned a lot of technical stuff and optimization. Now, after graduating from Think Tank, my main goal is to transition into a PC/Console space and join a company where I can use my skillset to create a game that hopefully inspires other people just like I was inspired by some of my favorite titles.
Evil Jester was meant to be the crown jewel of my time at Think Tank. I had very high hopes for the project: I wanted to develop complex cloth elements, include armor pieces, and have a visually interesting character with a lot of accessories.
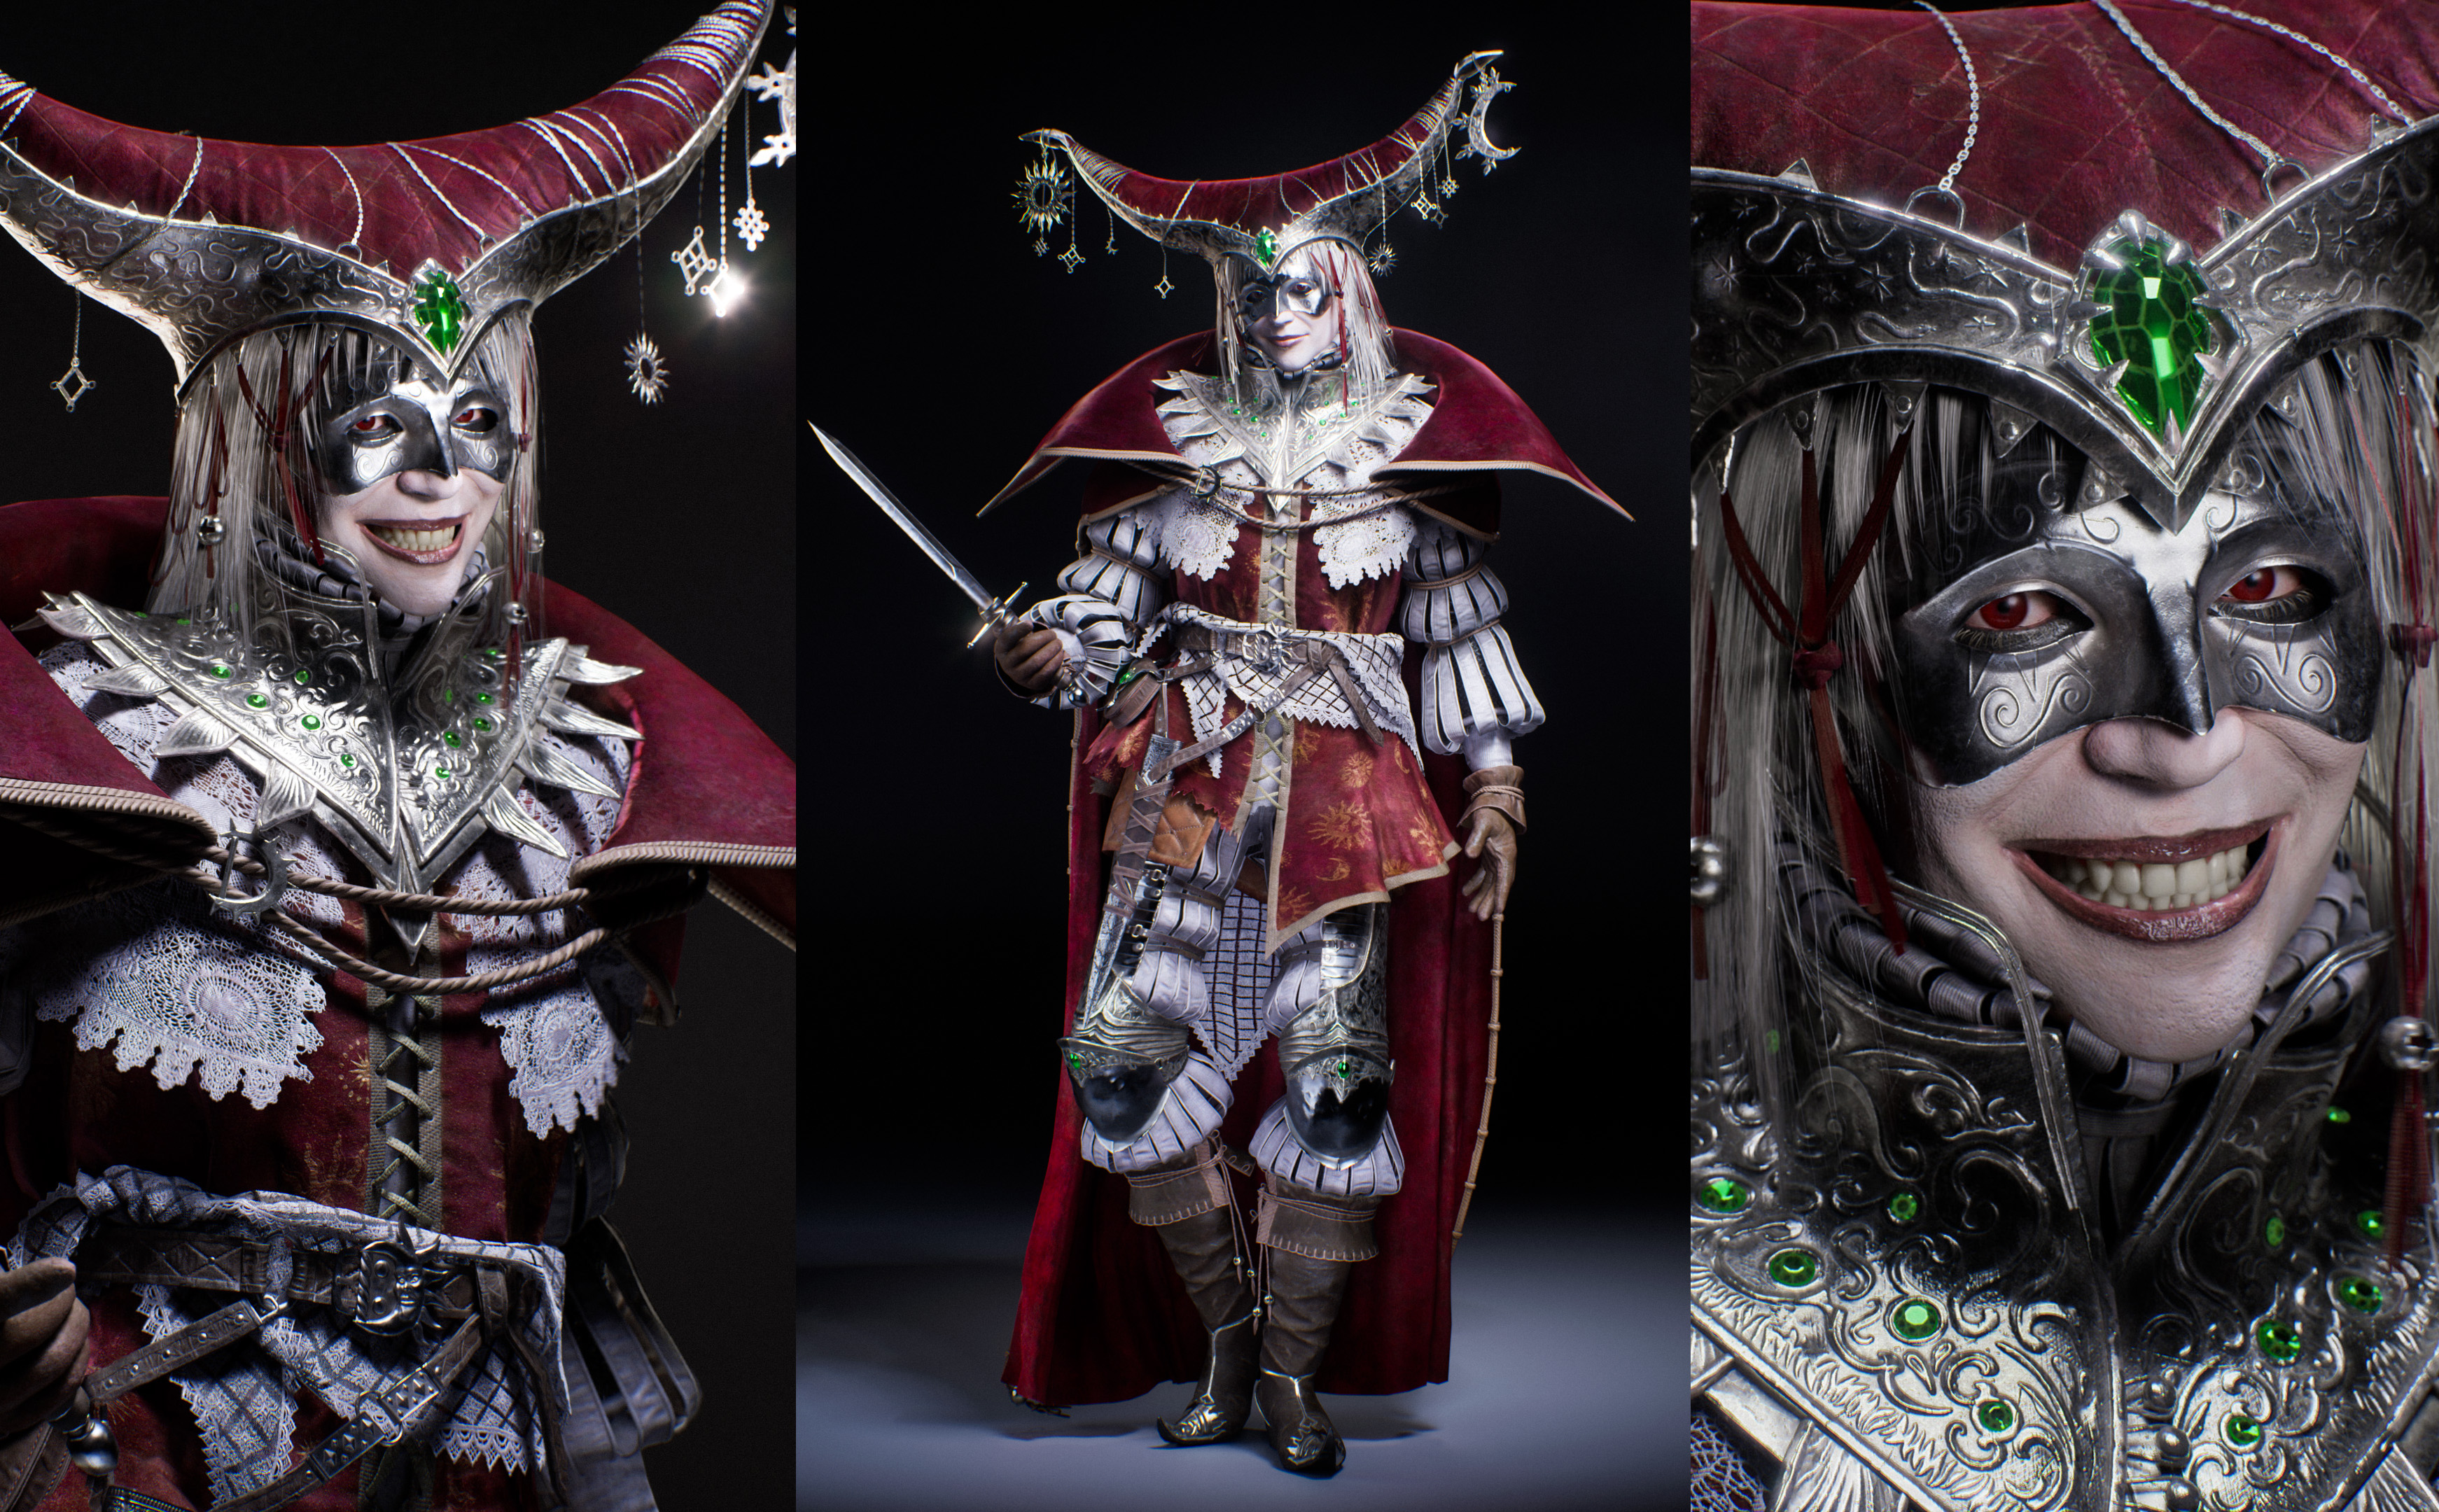
I didn’t settle on the concept art until the very last minute, since nothing ticked all of my boxes. I do have a strict rule when it comes to choosing a concept art - I have to love it. I came across “Jester” by Dariya R on Pinterest and it was love at first sight. I didn’t even run it by my mentor first, I was so certain that the concept was “it”. I just started the blockout that same day just so he can’t say no to me.
You mentioned that your lifelong passion for sewing makes you look forward to the garment creation stage in MD. For artists without a sewing background, what do you think is their biggest hurdle when learning MD, and how could MD features make cloth-making even more intuitive for them?
Sewing is an incredibly rewarding craft - you get to actually experience your fruit of labor. I always gravitated towards sewing machines, watched sewing content and tried to do a little sewing myself - I made toys and outfits for dolls.
When I got to experience Marvelous Designer for the first time I was blown away - I can create outfits for my characters using actual patterns and sewing techniques?! It took some adjusting for sure, but it still brings me as much joy as it did when I first launched the software.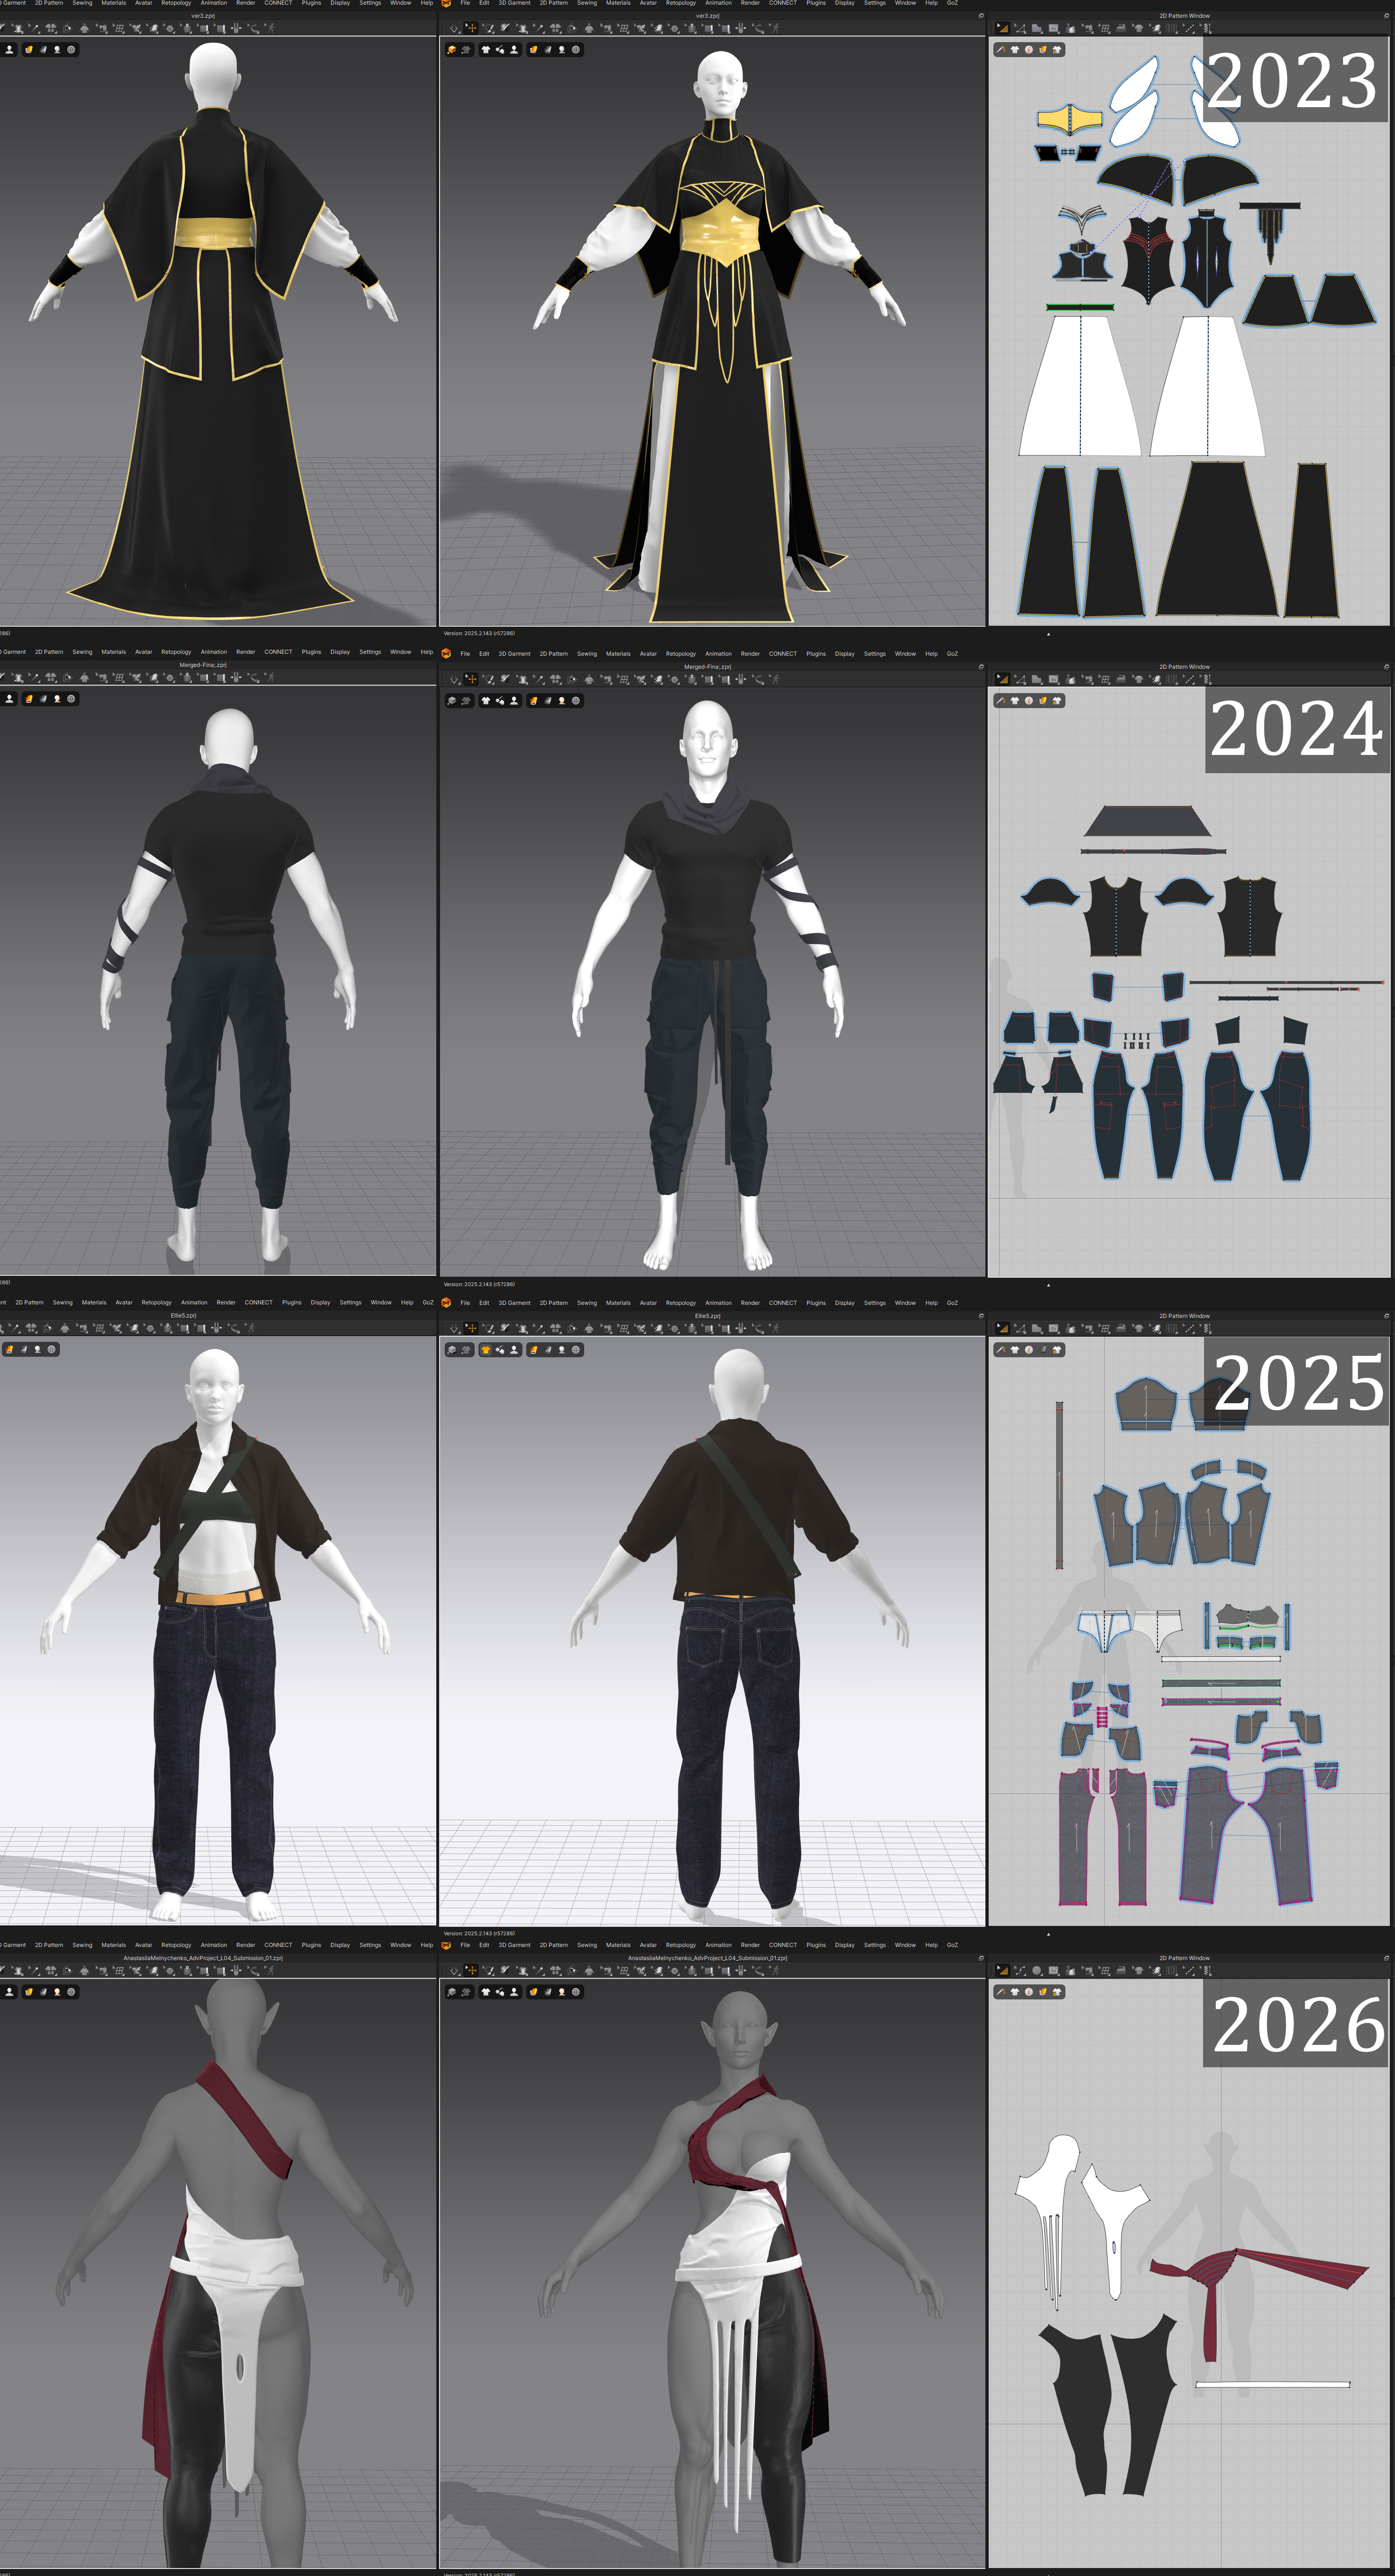
For those who are not as “in the theme” of sewing I’m sure Marvelous Designer can be frustrating at first. But there’s nothing a simple pattern from the web can’t fix. For most use cases there will be a real life counterpart that has a pattern. As with anything else in 3D - it’s always great to have references.
While working with people who are less comfortable with MD I noticed that they’re afraid to be creative - in order to achieve your vision you need to drastically modify patterns, cut, stitch, create darts, try out different fabrics for their simulation properties, etc. The 3D viewport tells the story perfectly - it’s easy to see where I need to take the fabric in, and where to add. Some also overlook Curve Tools, which in my opinion are essential if you're trying to get a good fitting garment.
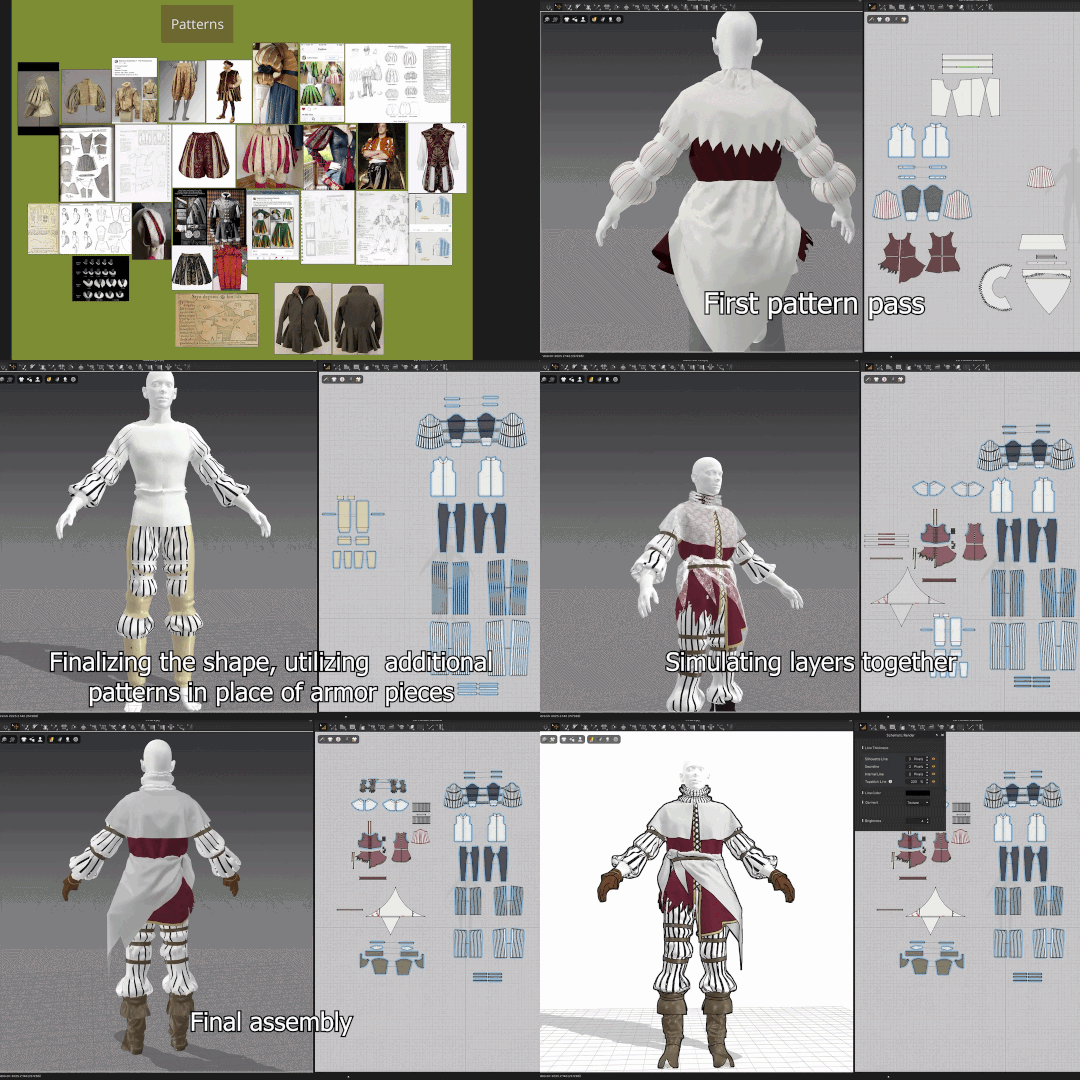
And another small piece of advice I can give is watching sewing videos. If your goal is to understand how it all works and get more savvy - that’s the best way. Sometimes if you’re making a difficult garment it’s important to know the right order of manipulations, and how are you supposed to know this if you’re never seen it done? I think that seeing how it’s done in real life gives you a better insight on how pattern creation works, attaching more meaning to the pixel patterns on the screen.
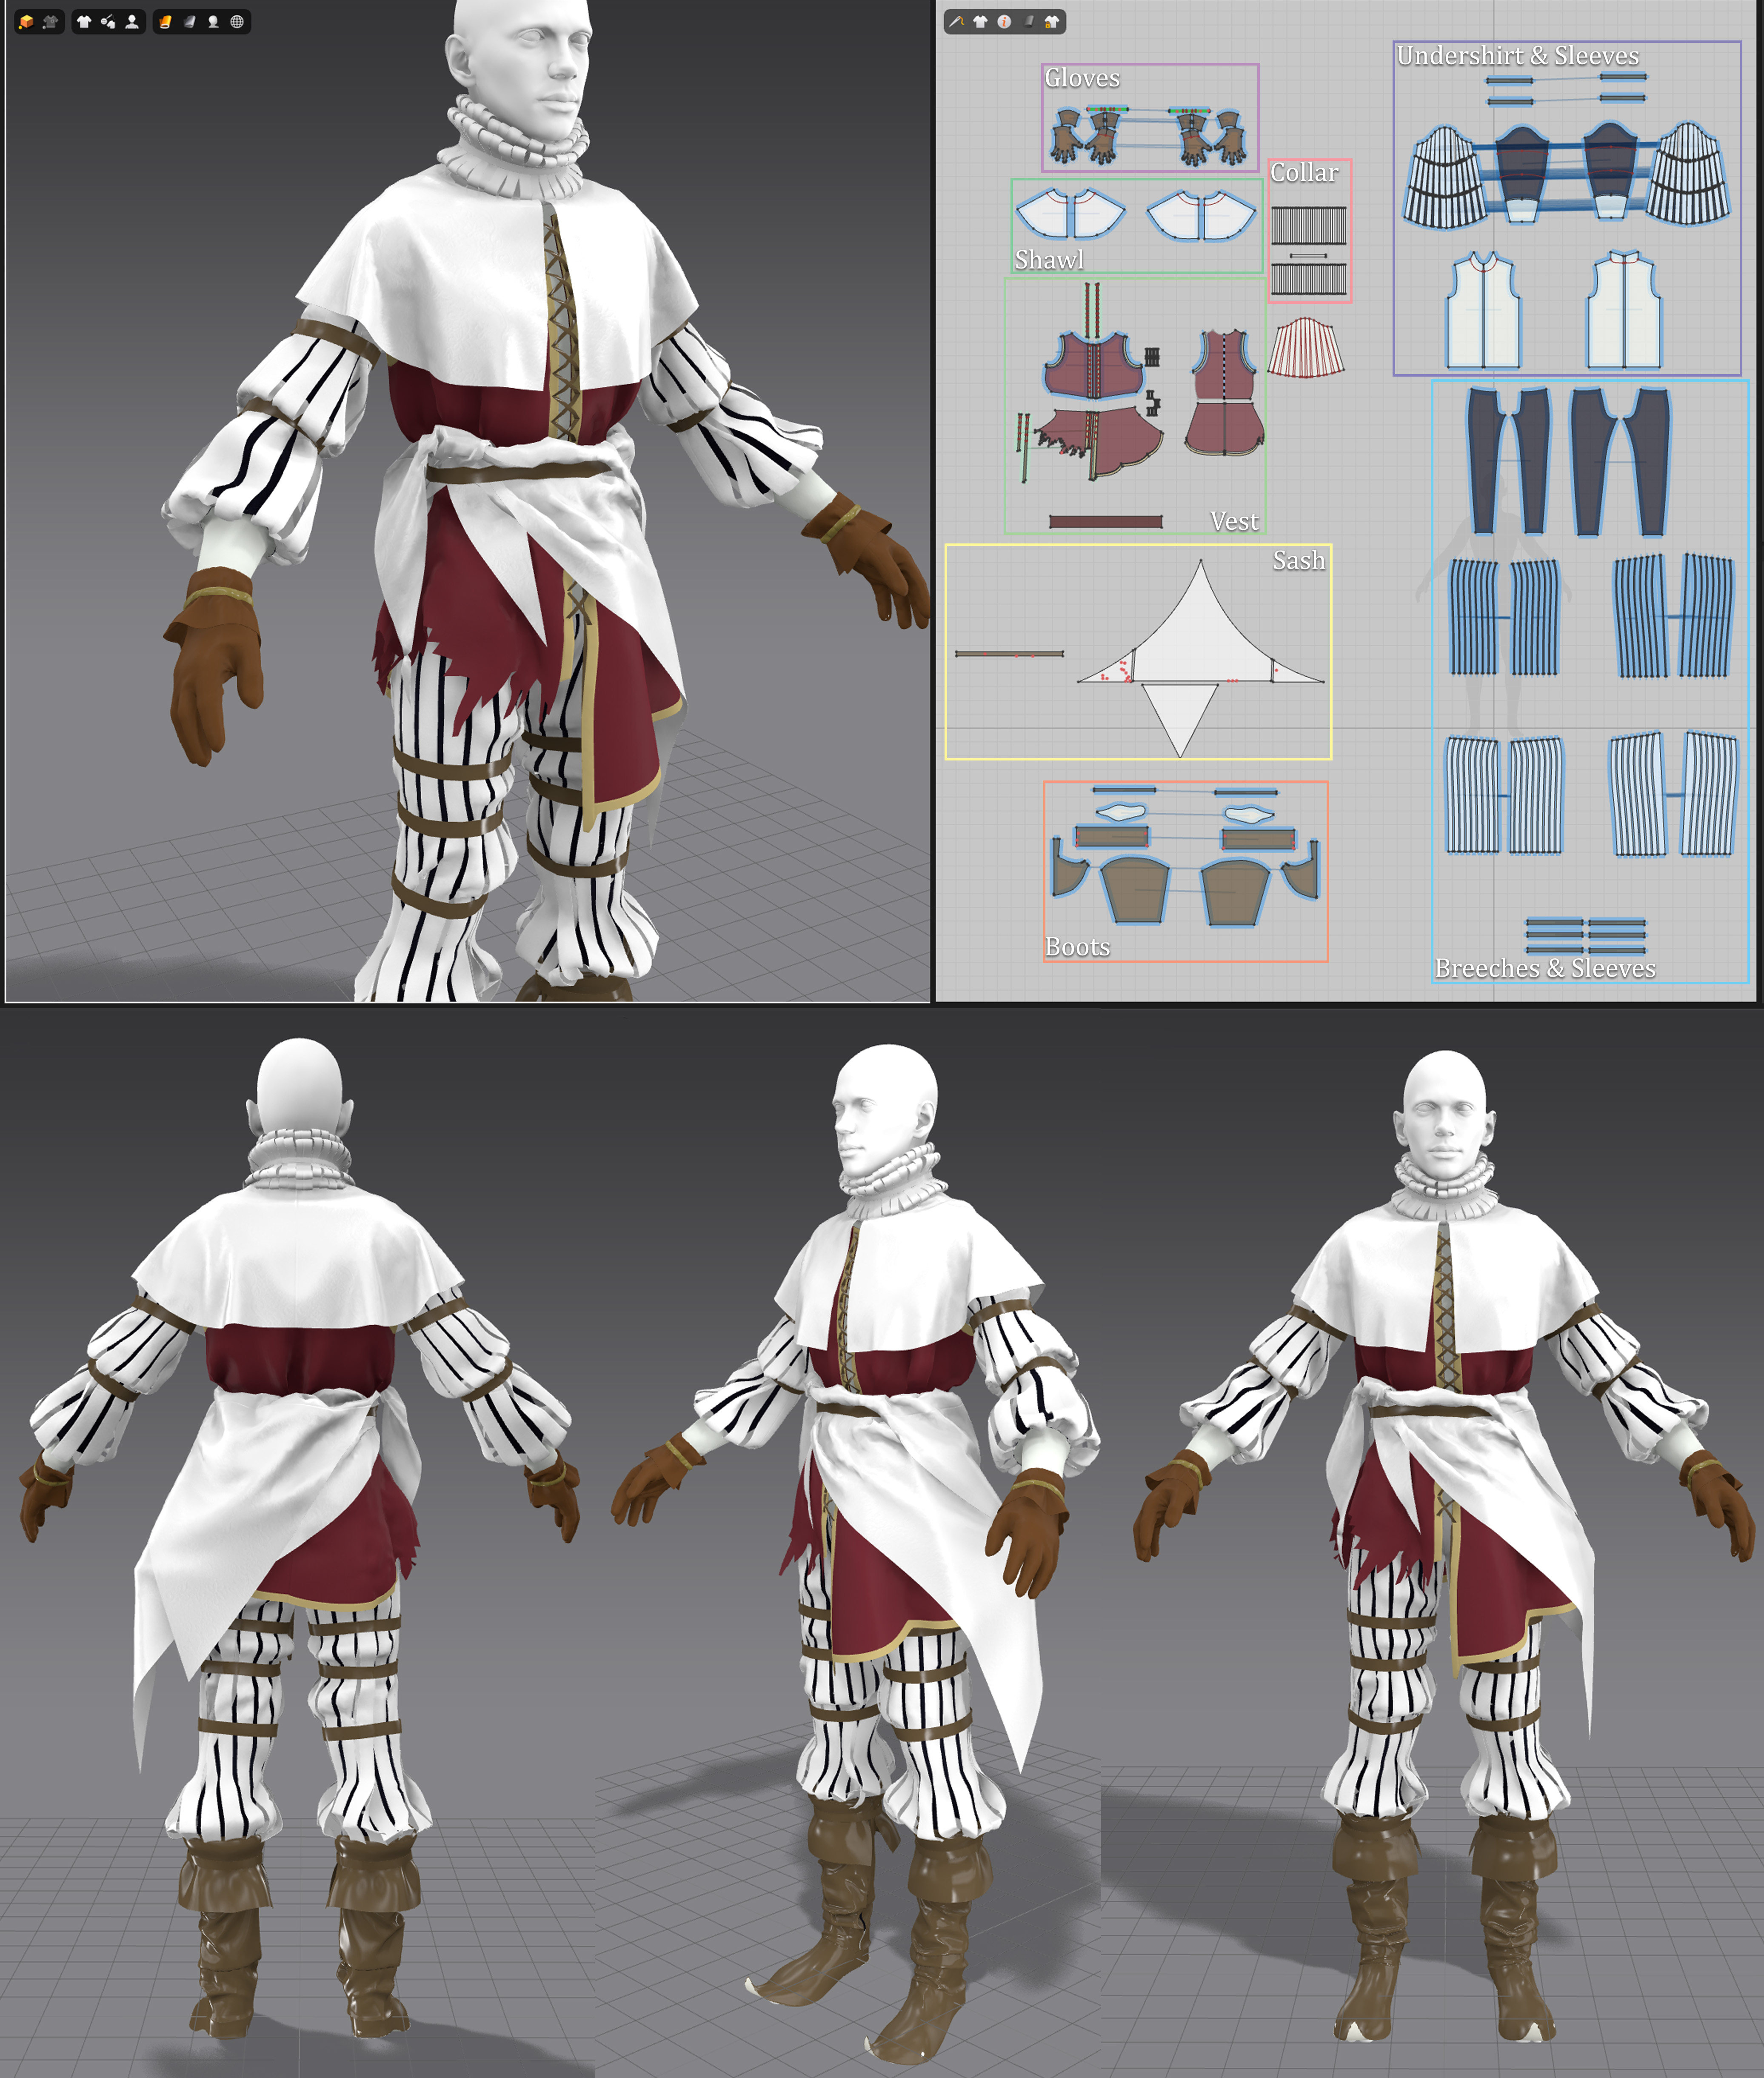
You highlighted Freeze and Solidify as 'game changers' during your 'Evil Jester' project. Could you walk us through a specific part of that garment where these tools saved time or enabled a complex design?
Evil Jester’s outfit featured the classic “Jester sleeves”, as well as the dress-like vest with lacing at the front. It was rather important for me to try and preserve the distinct shapes of these two elements.
I always start with blocking inside of ZBrush, it provides a pretty solid base for what I have in mind. In Marvelous, I like to start from a blank canvas with my avatar and work on patterns, see how it looks and then go from there.I did an extensive research into the jester fashion and was lucky to find some actual patterns that looked promising.
I think that every garment I create in Marvelous Designer opens up new tools that make the process exponentially more satisfying. While working on Evil Jester I found my newest helper: I would paint a part of my garment that I want to freeze or solidify - and that really helped me achieve the best shape possible.
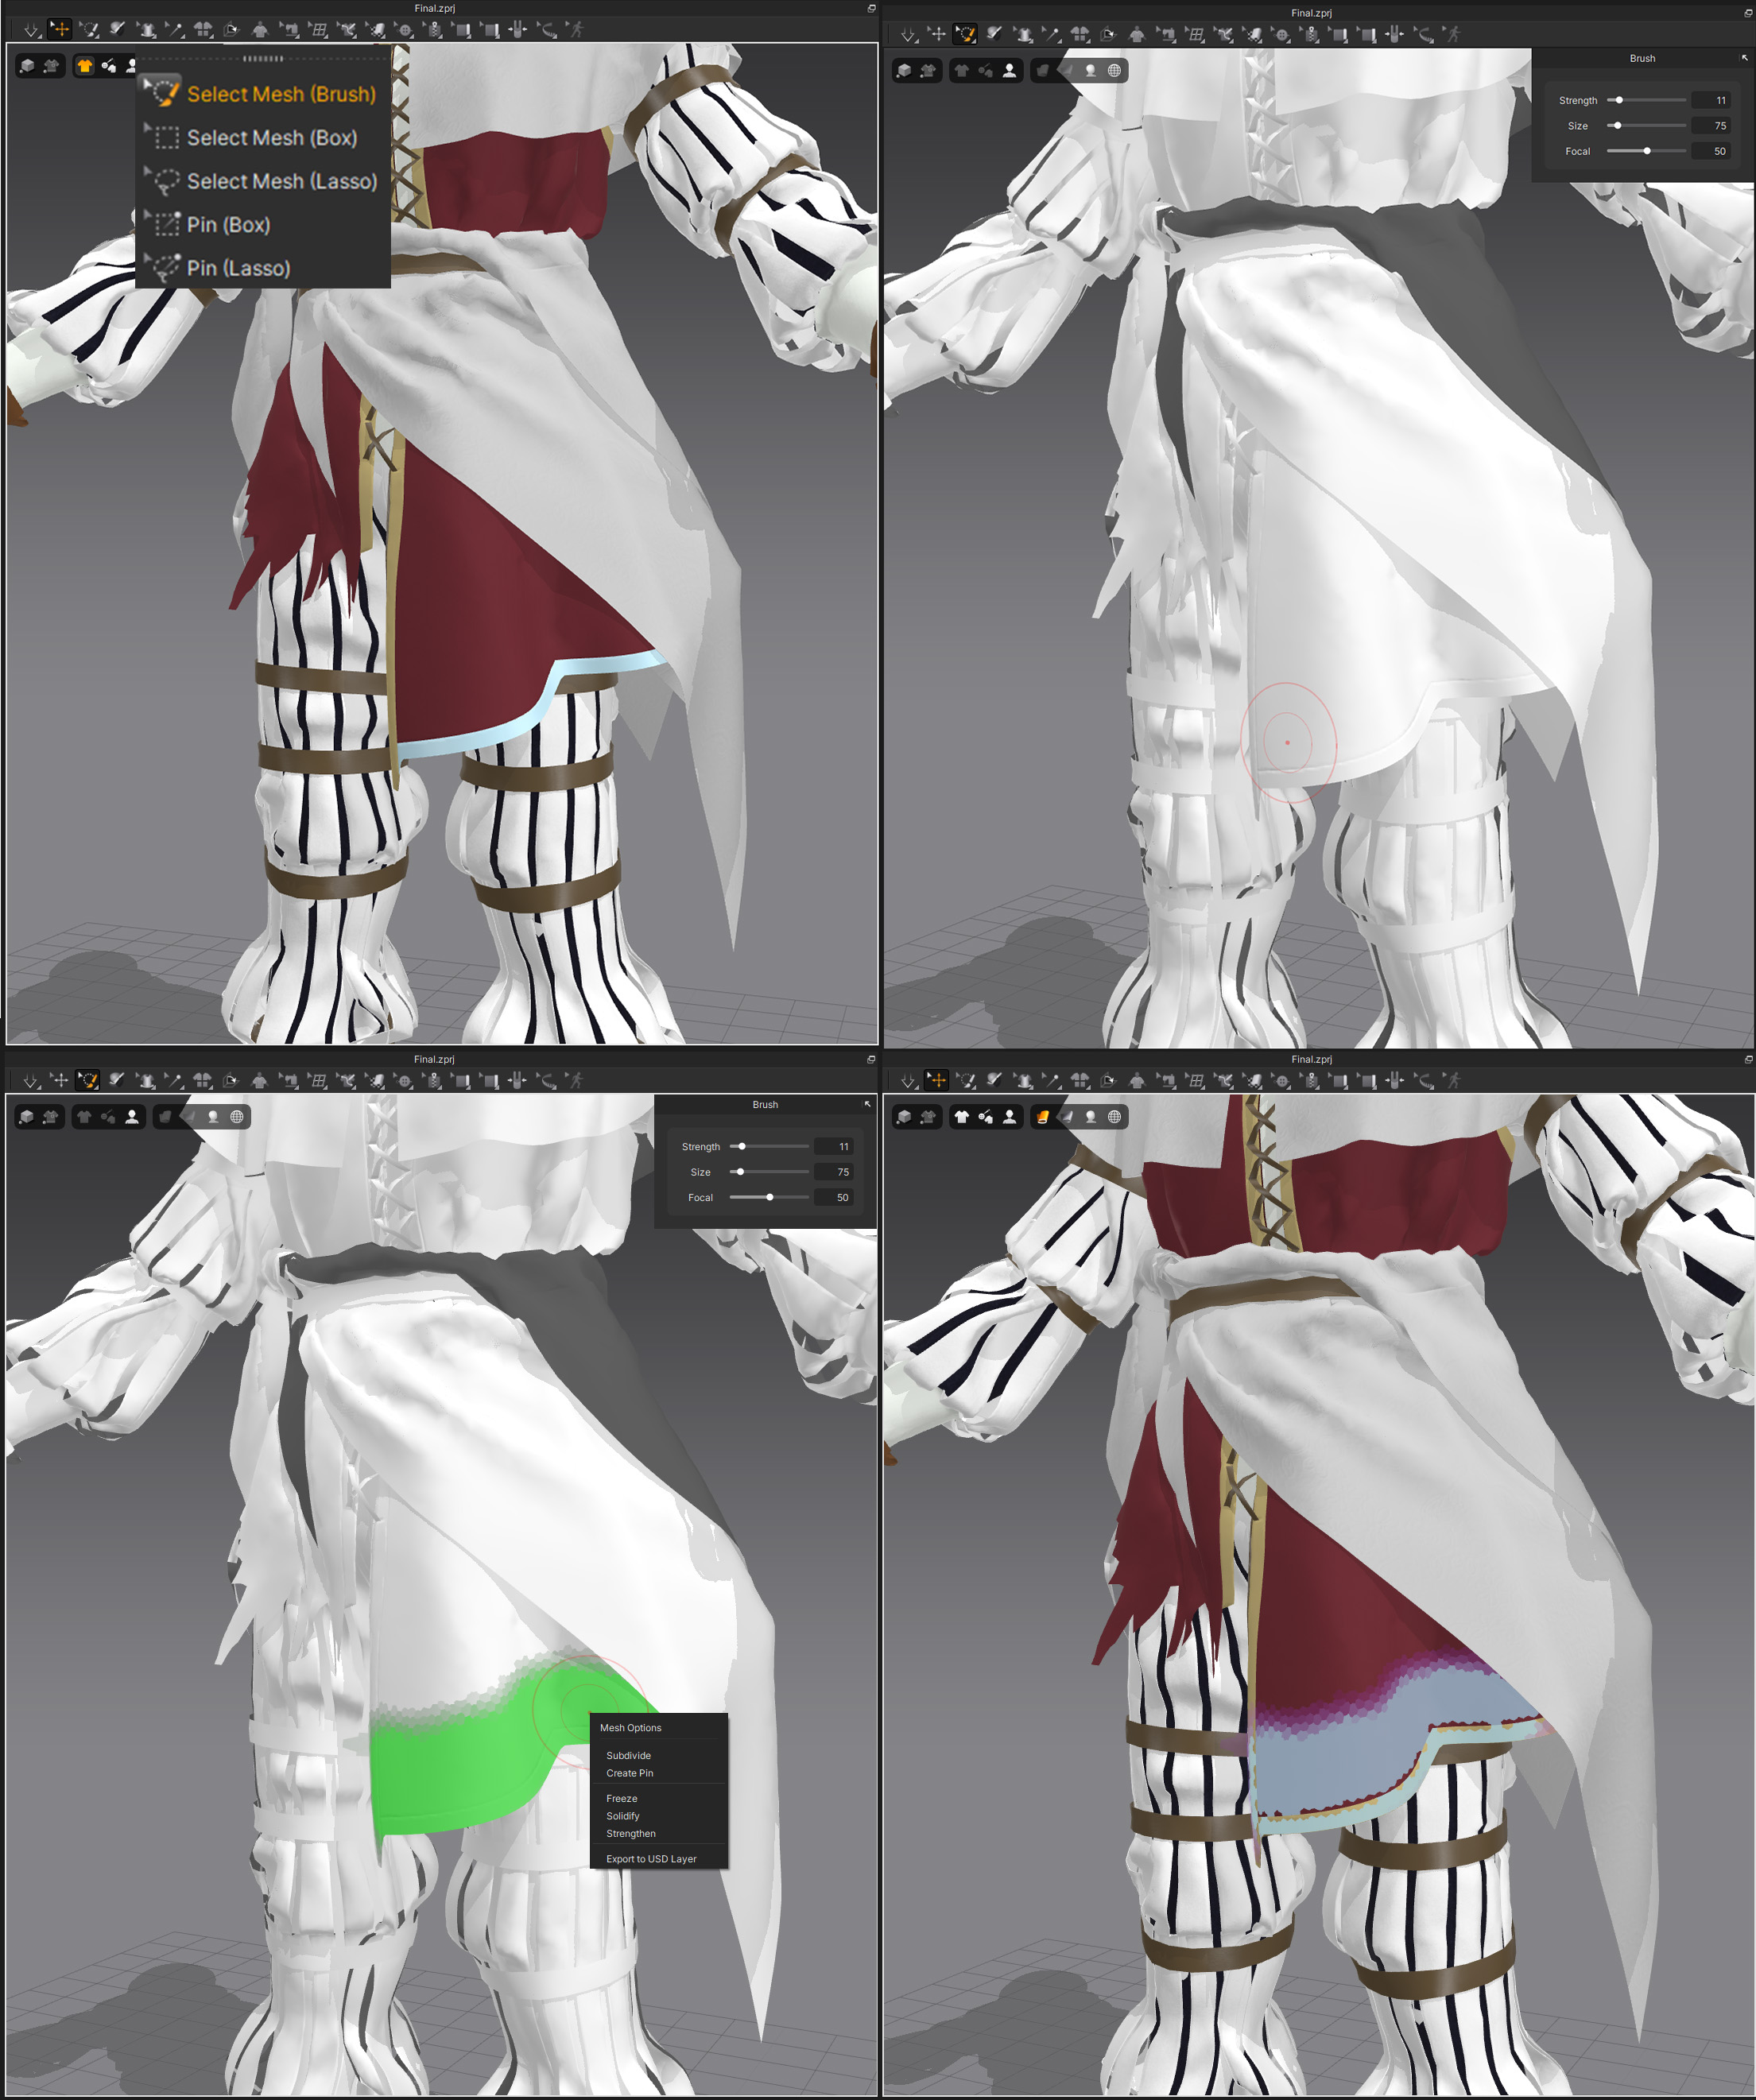
Another trick I found helpful is creating an internal line a few millimeters from the edge, cutting it off and freezing (or solidifying). This trick is helpful for the situations where you want to try to keep the shape but also let the simulation do its magic.
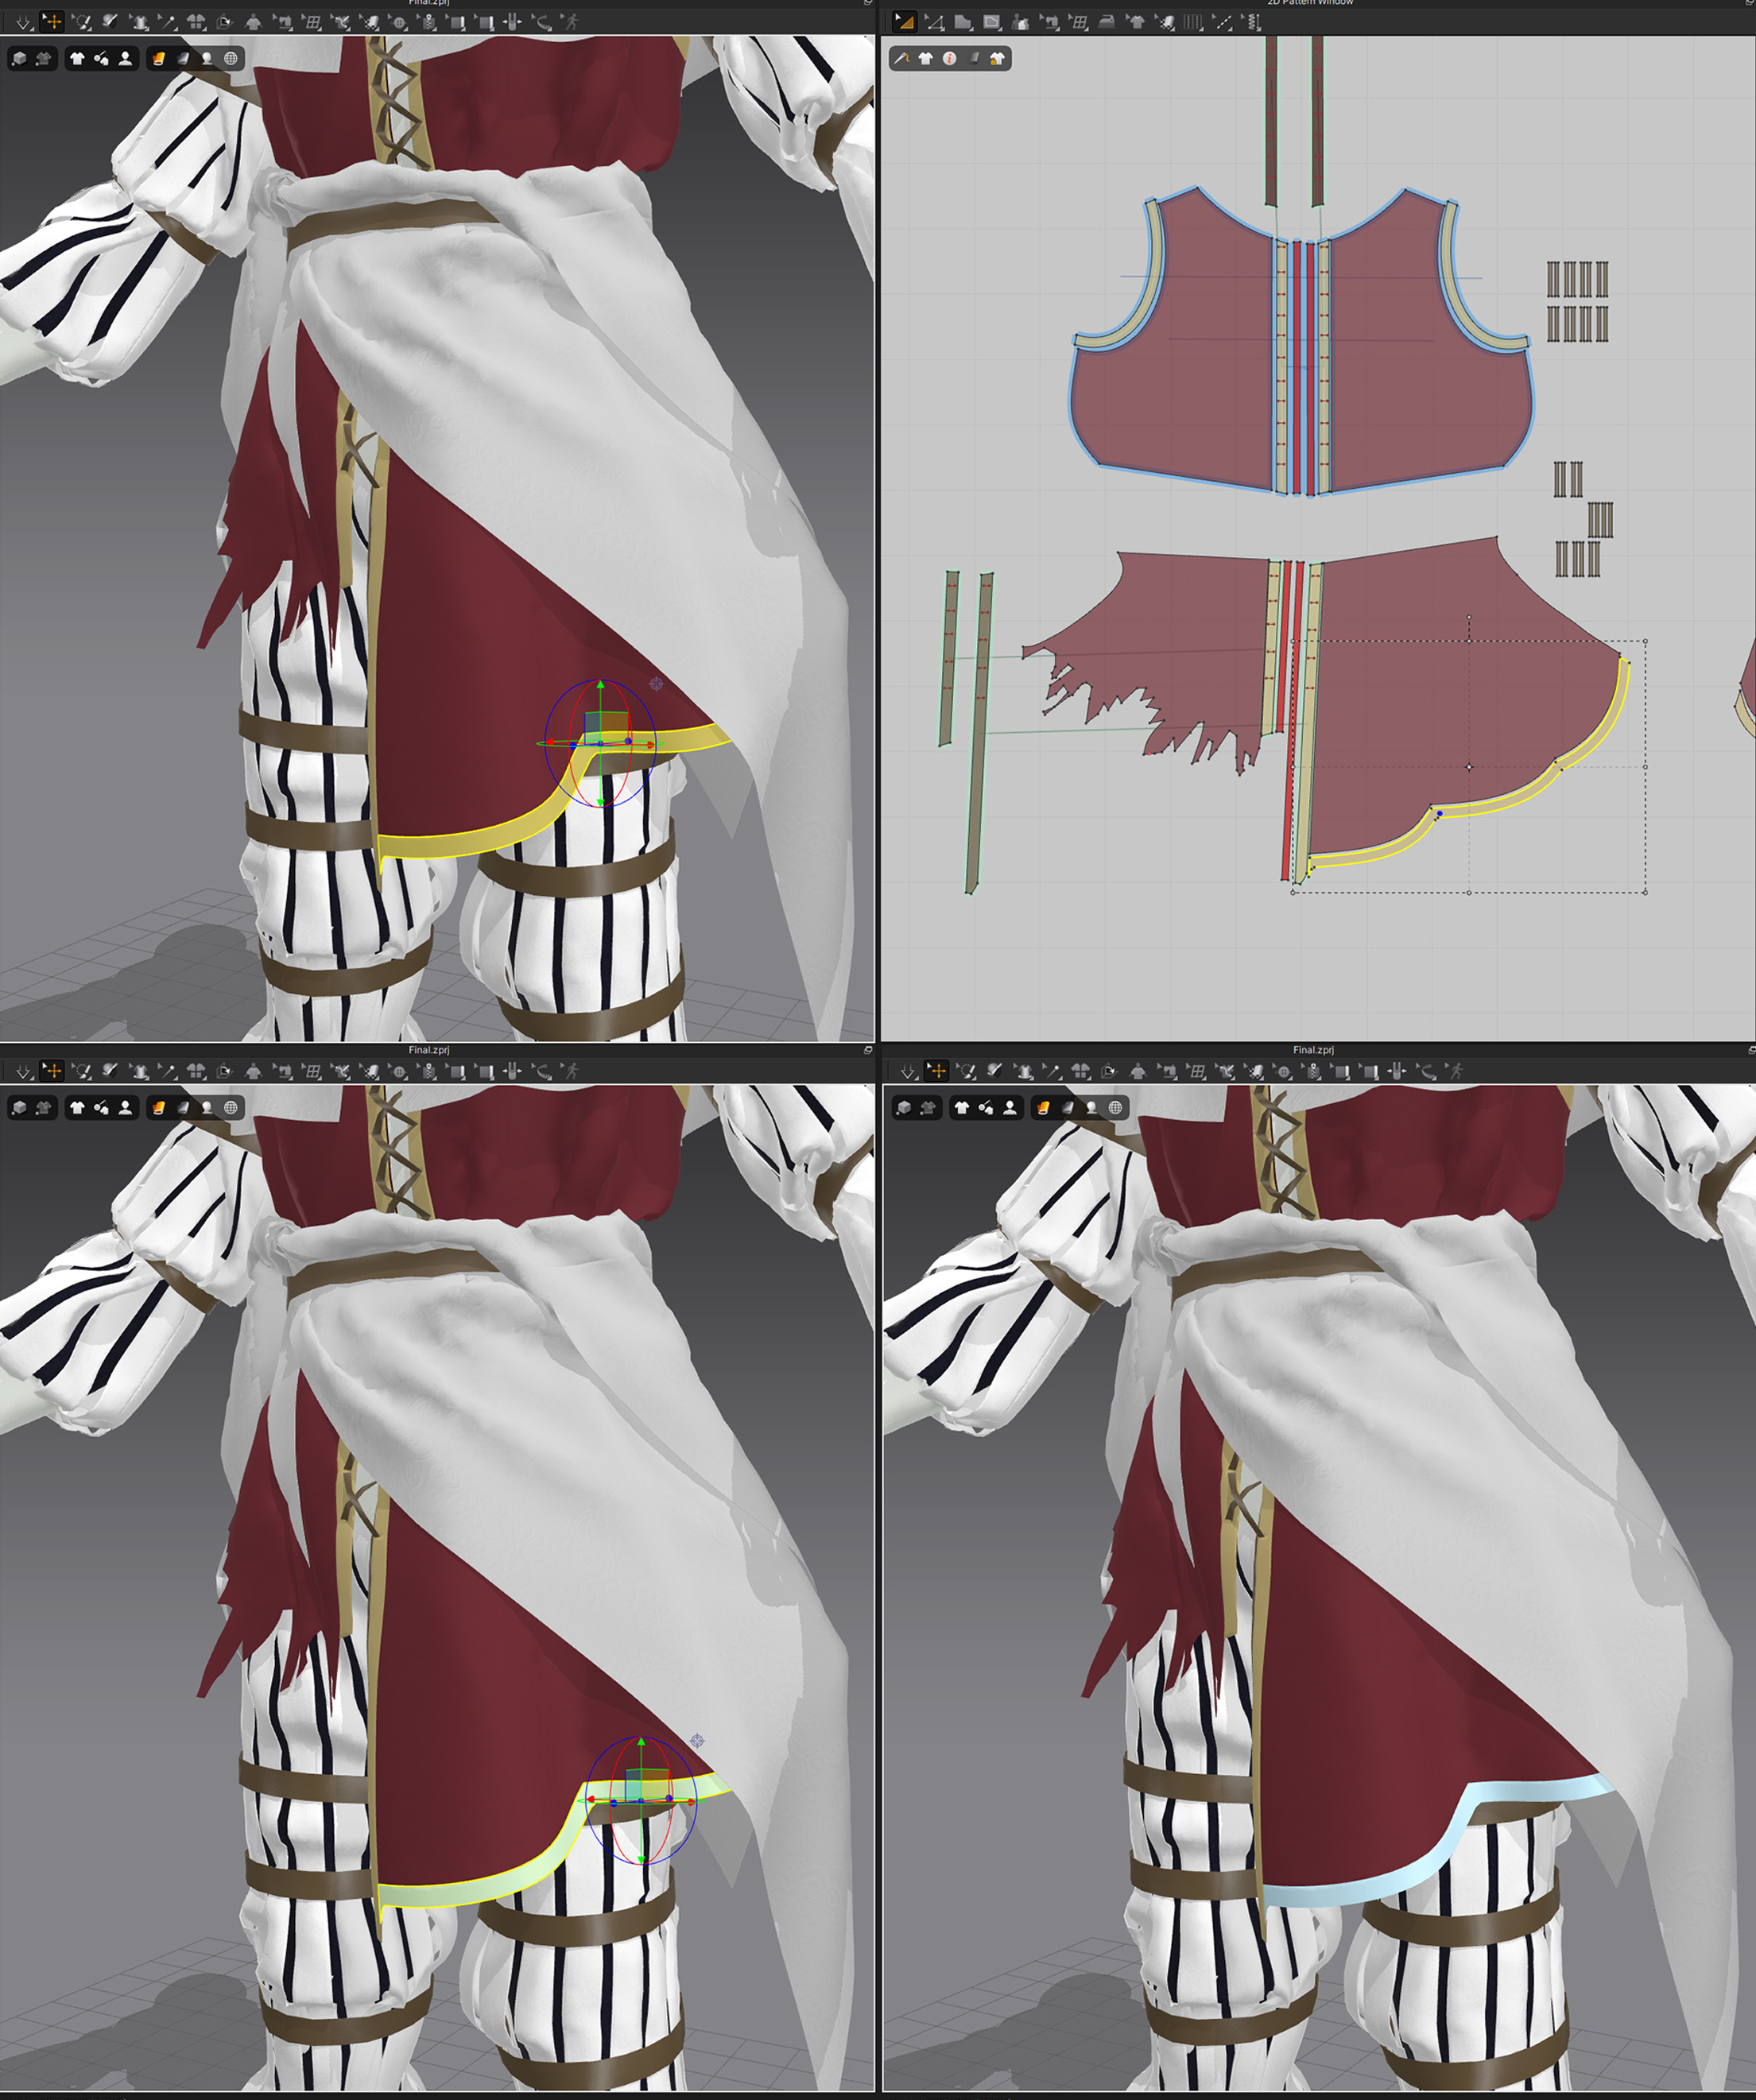
Another way I use freeze is cutting my patterns in a smart way. For jester sleeves it proved very helpful because I could focus on one segment at a time, making sure everything looks exactly as I want.
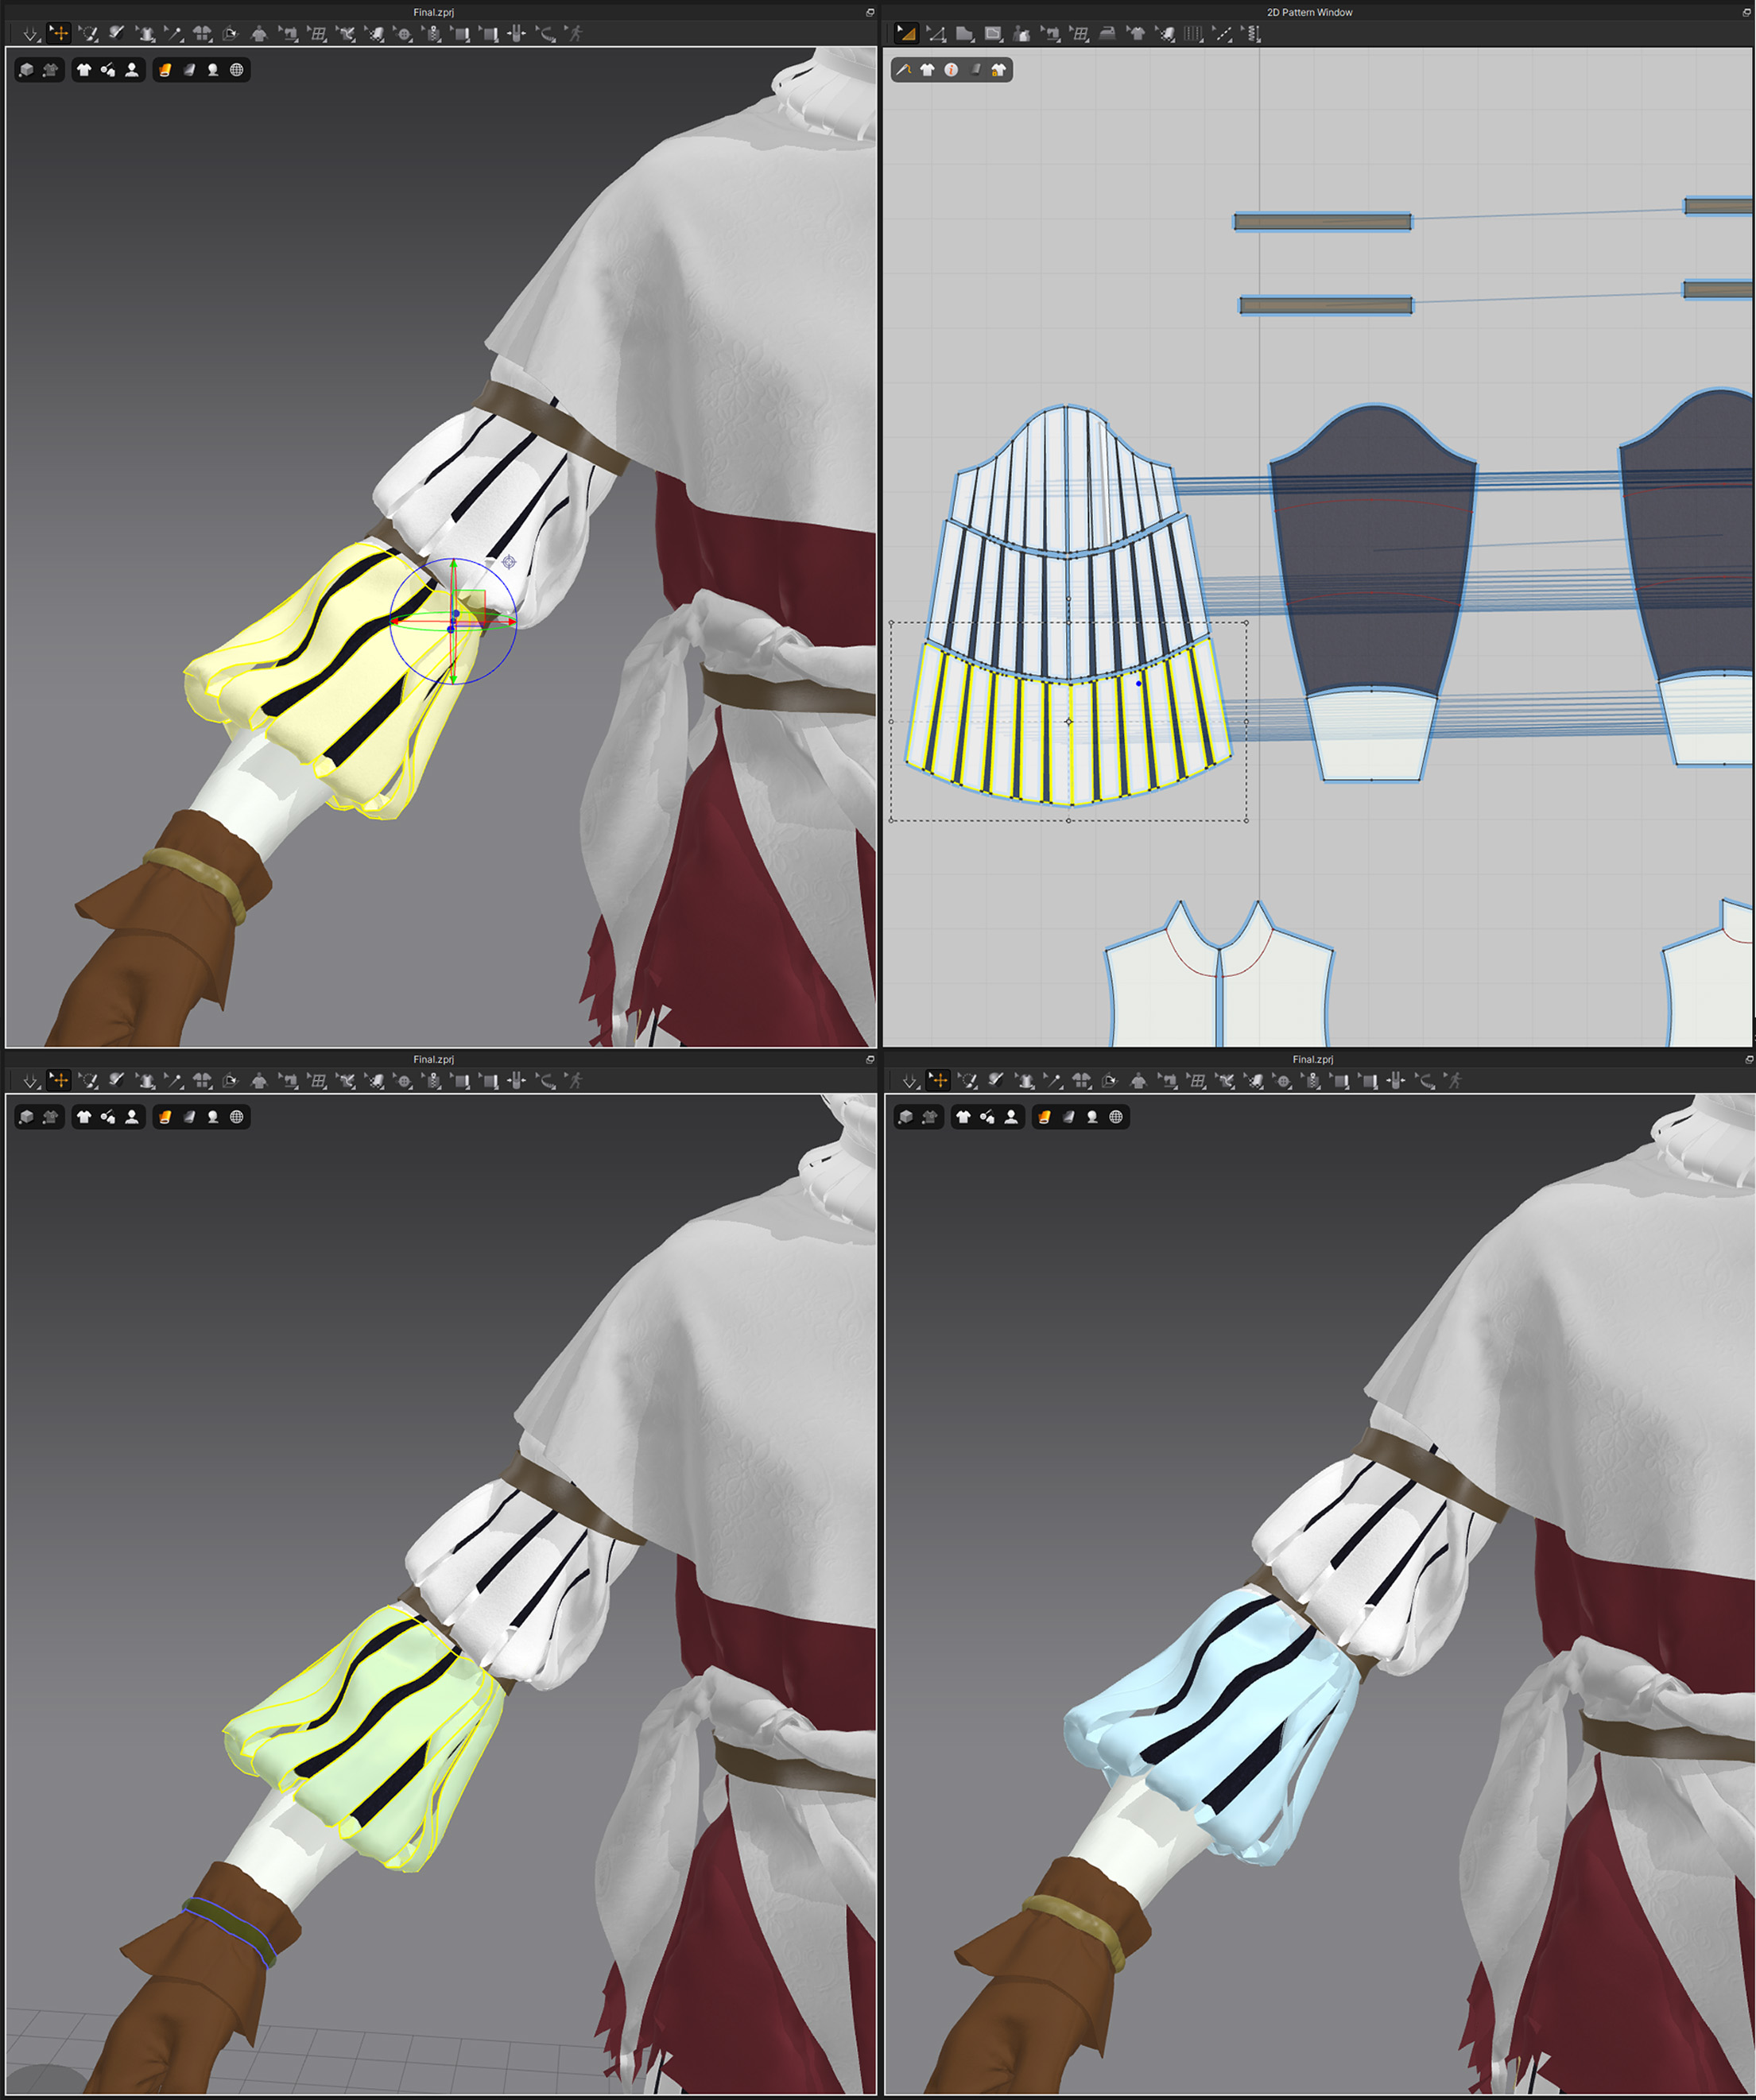
You mentioned converting custom 3D models into garments using UV unwrapping as a pattern. How does this technique fit into your overall pipeline alongside other 3D software?
When I created Jester’s vest in Marvelous Designer, the skirt would flop down and won’t hold the shape at all. Since I knew exactly how I wanted it to look, I took my ZBrush sculpt, UV unwrapped it in Maya to resemble an actual pattern and brought it to MD. From there I spent some time cleaning up, since converted patterns often come with a huge amount of curve points that will hinder any tweaking of the pattern. I only wanted to use the skirt, since I was pleased with the top part of the vest. I stitched my MD pattern with my blockout pattern, solidified the skirt to preserve the shape + manually painted some freeze zones where it was crucial to keep the shape intact. One side of the vest also features a torn edge that was created with curve points, but I decided to create a cleaned up version with an untorn edge for an easier retopology process.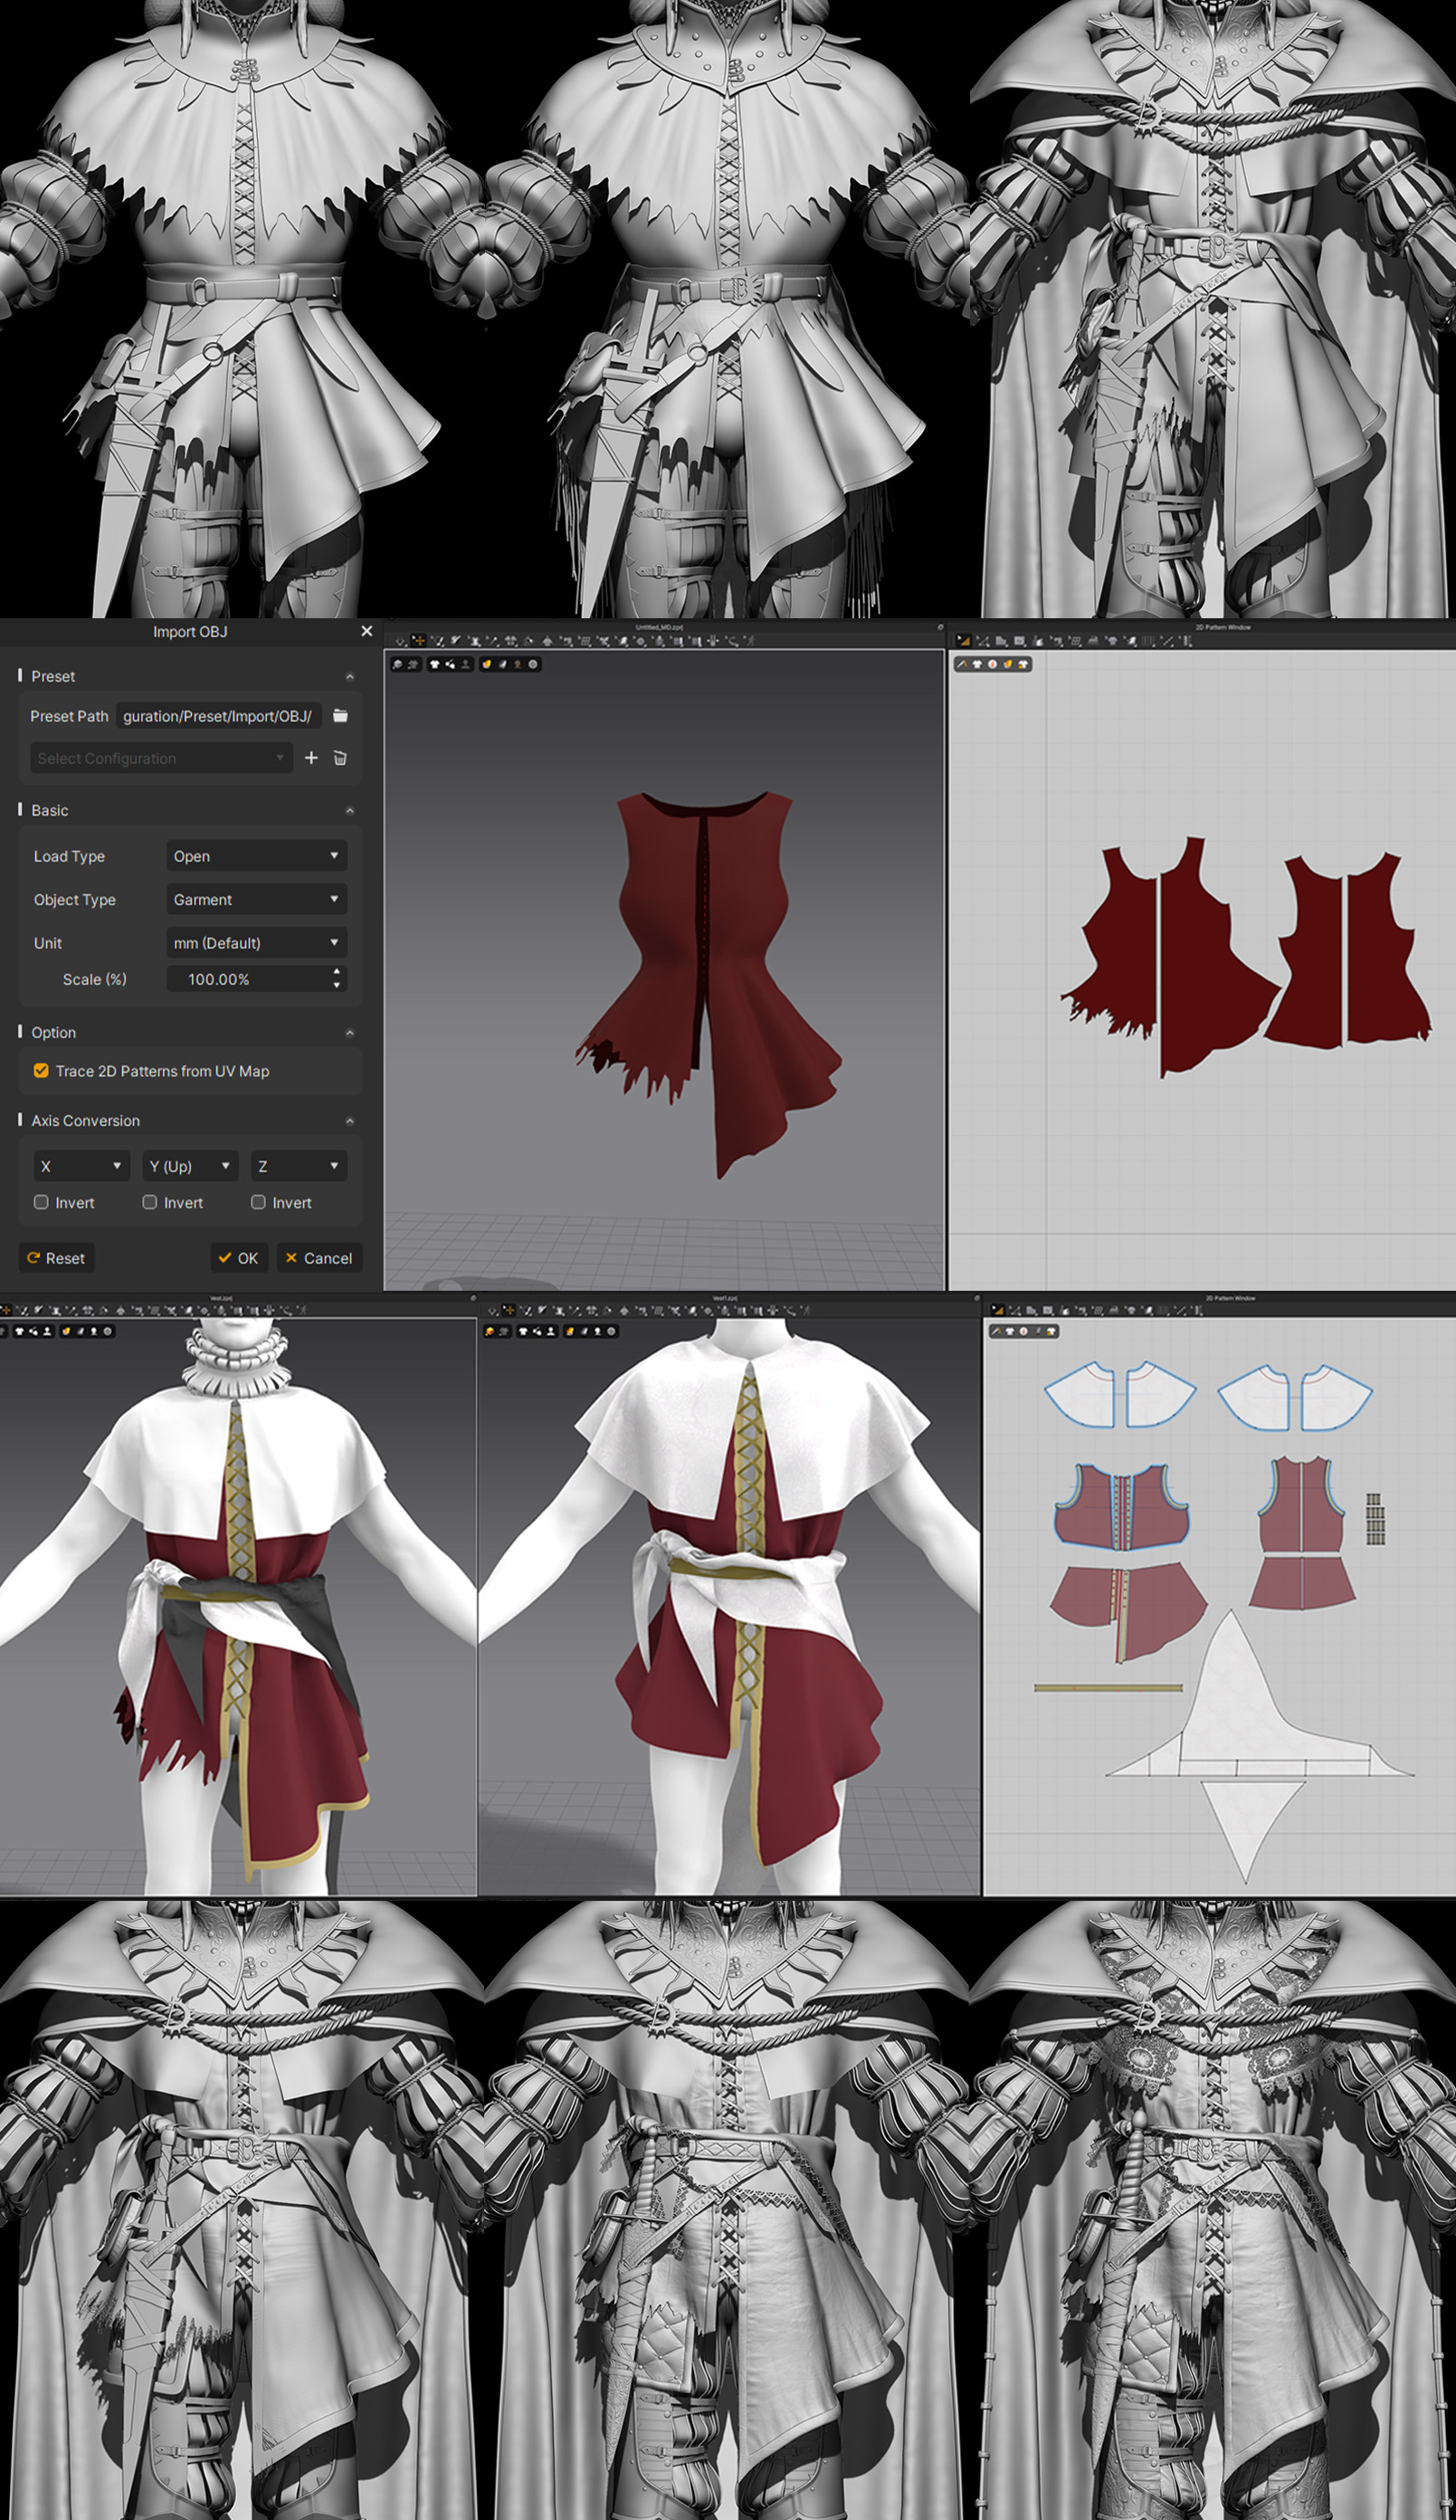
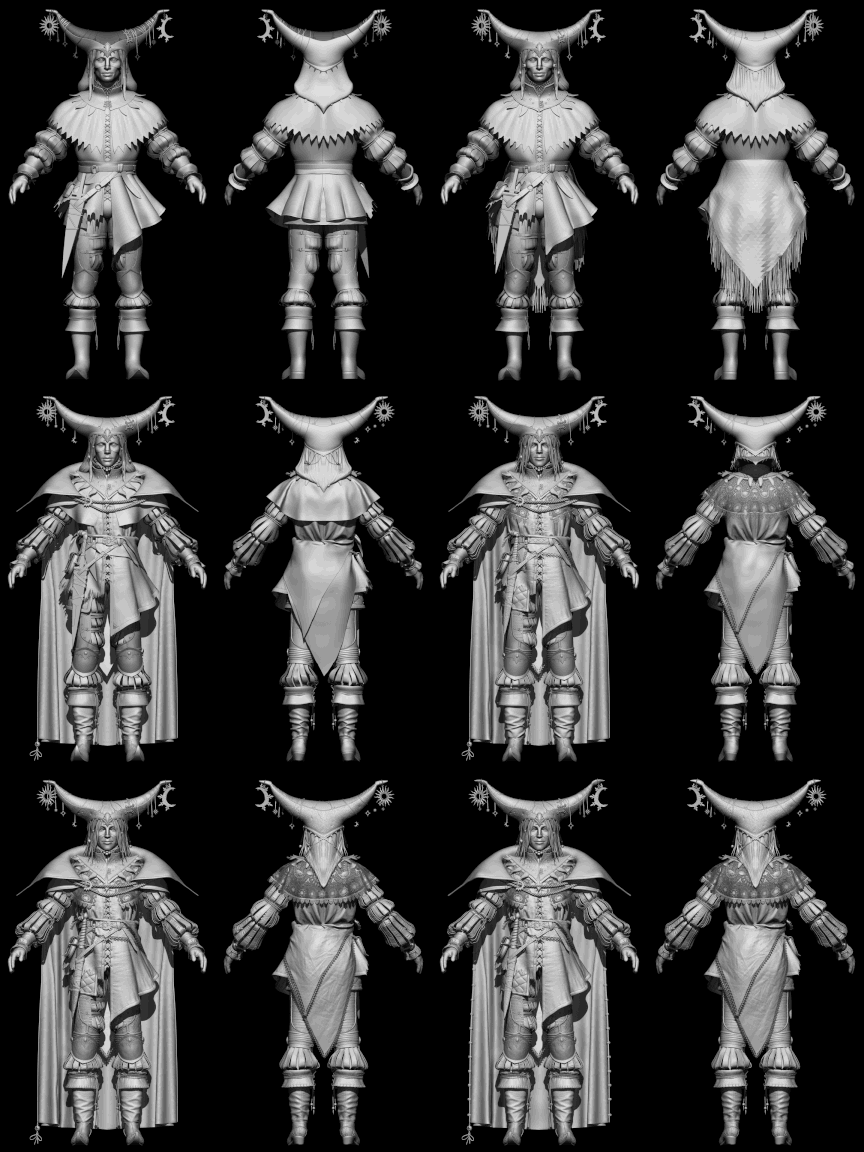
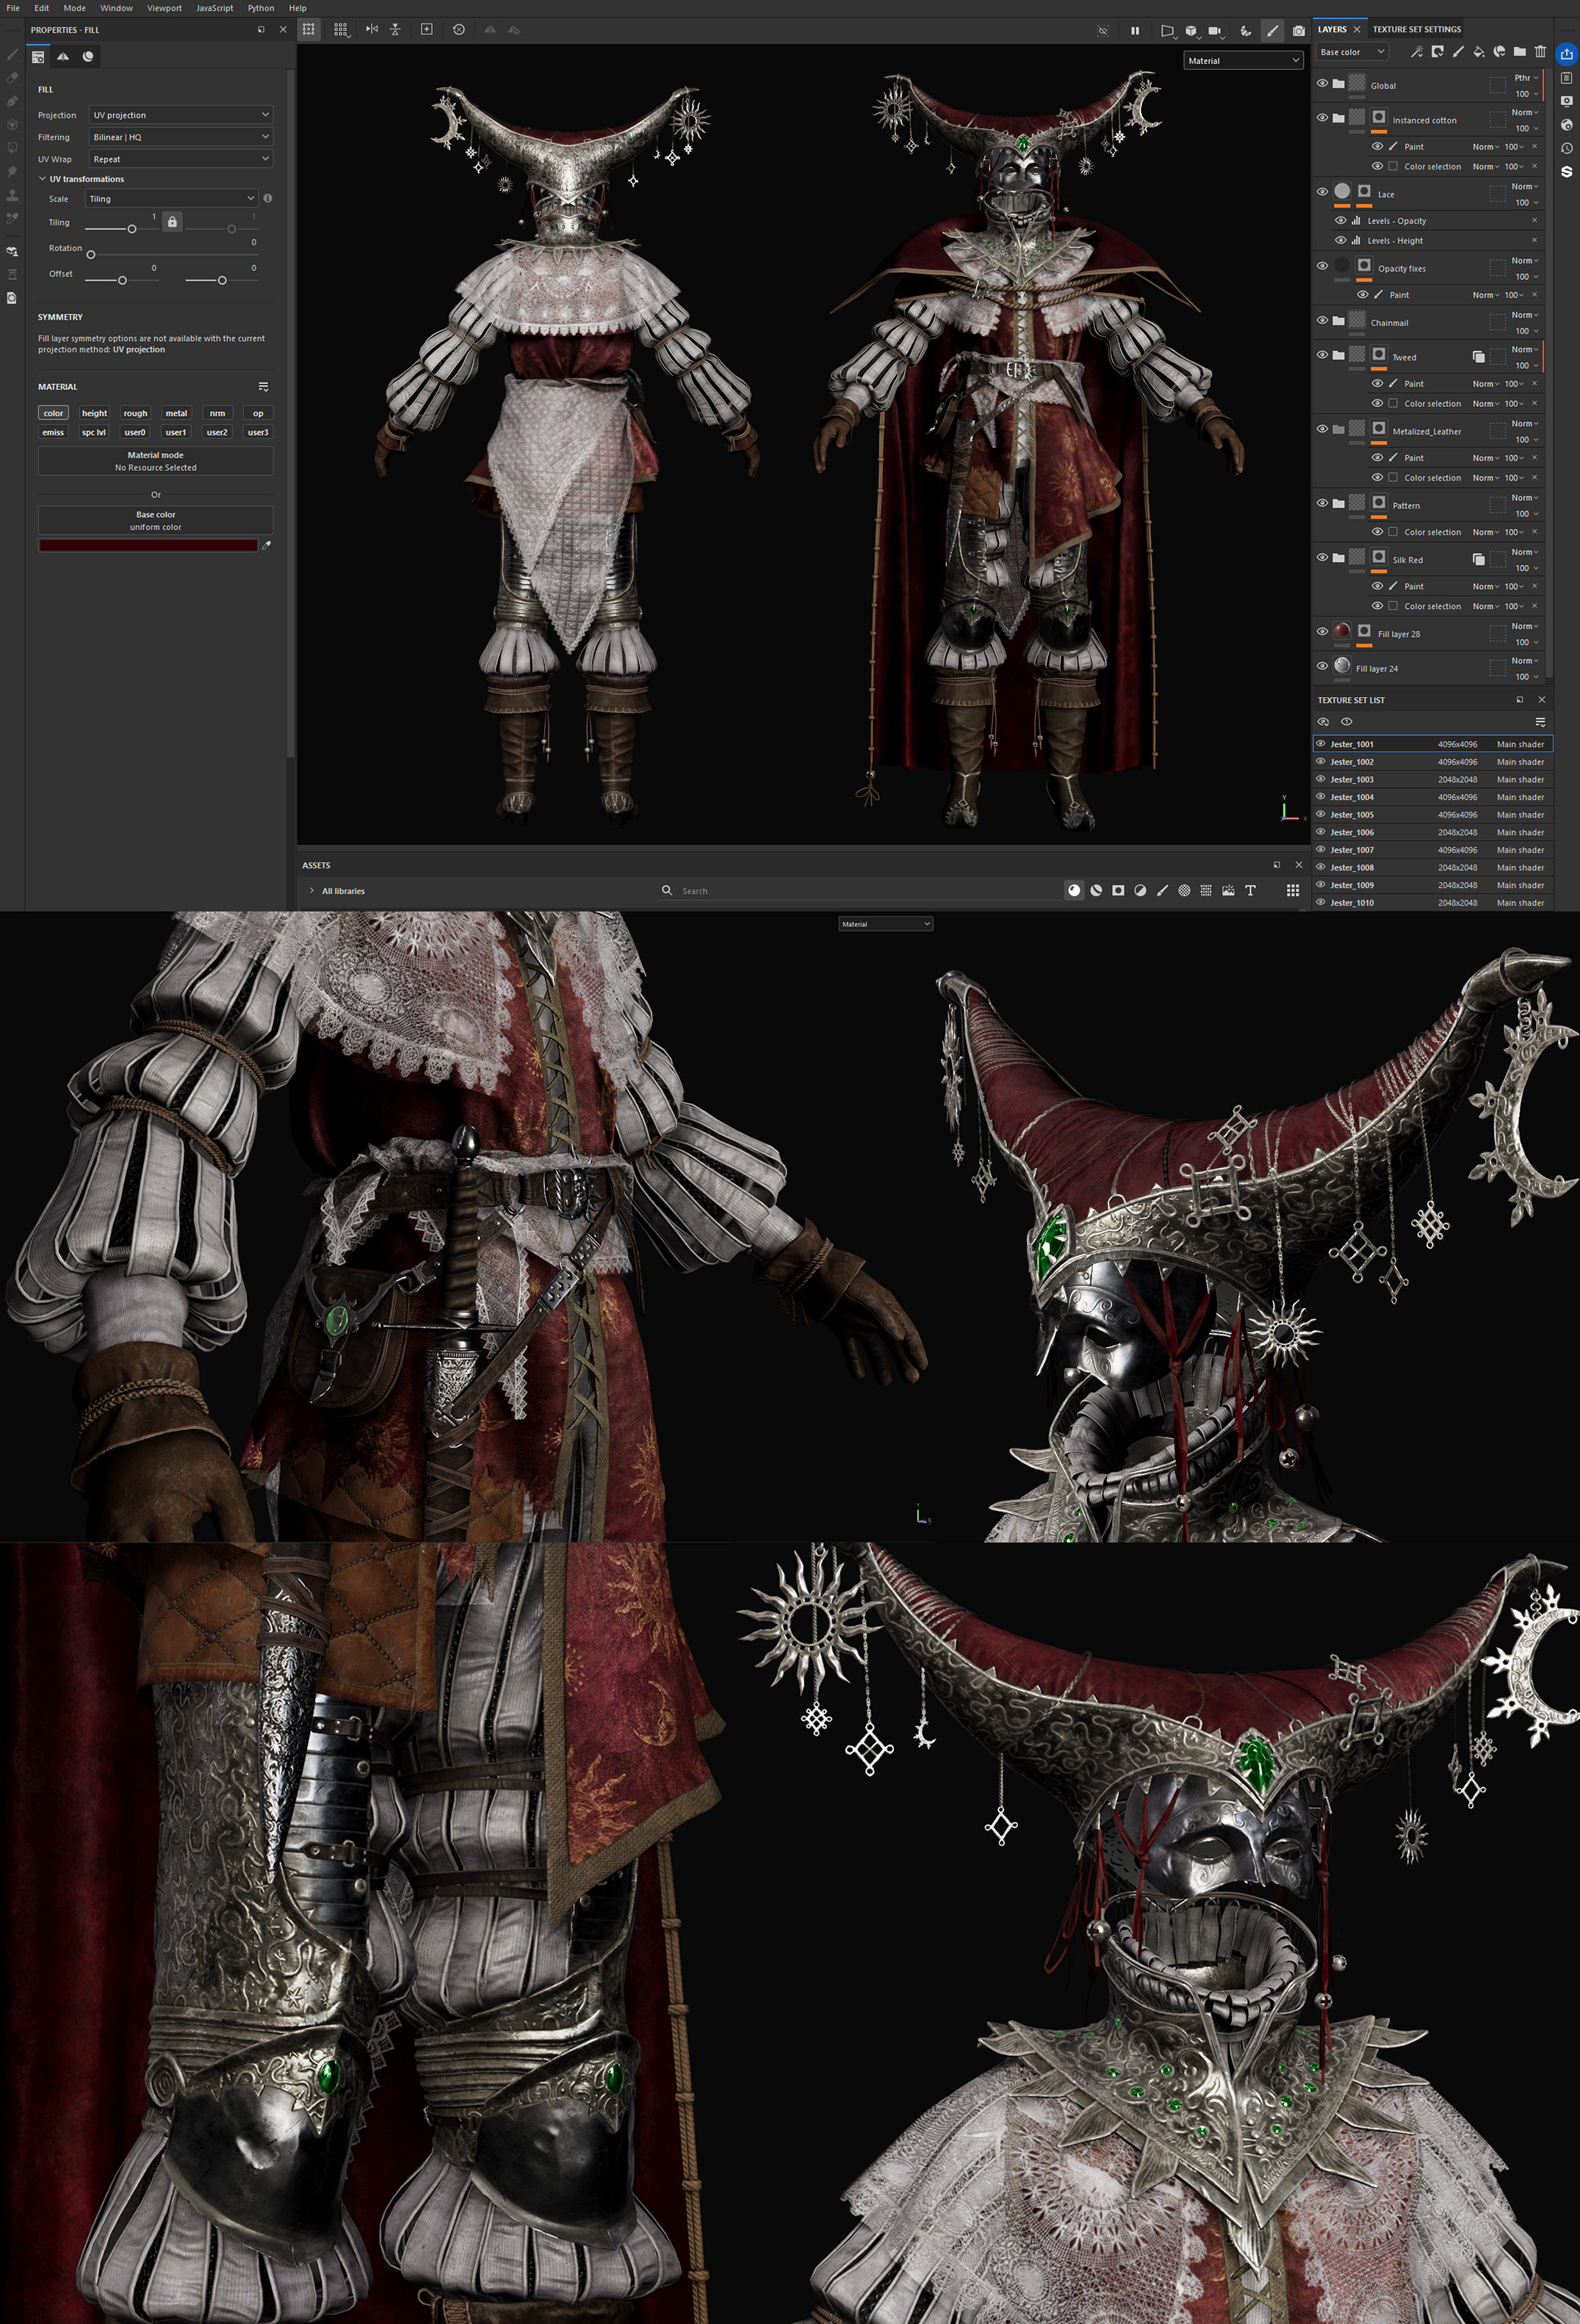
I also used the same pipeline for boots. They’re made from thick leather and I probably could’ve sculpted everything manually, but I wanted to try and see, so I did the same thing - ZBrush sculpt, Maya UVs and then Marvelous Designer for simulation. I made sure to freeze the bottom part of the boot where it tightly hugs the foot, since the simulation wasn’t required there. I really appreciate the wide variety of premade fabrics that MD provides - it helps immensely with simulations. I always make sure to use Full Trim Leather or Hard Trim Fabric for such elements, where I don’t want to get an excessive amount of wrinkles. I enjoy this approach and use it where I can because it can save a lot of time in the prototyping stage, and combined with a solid knowledge of patterns you can achieve a very clean result. 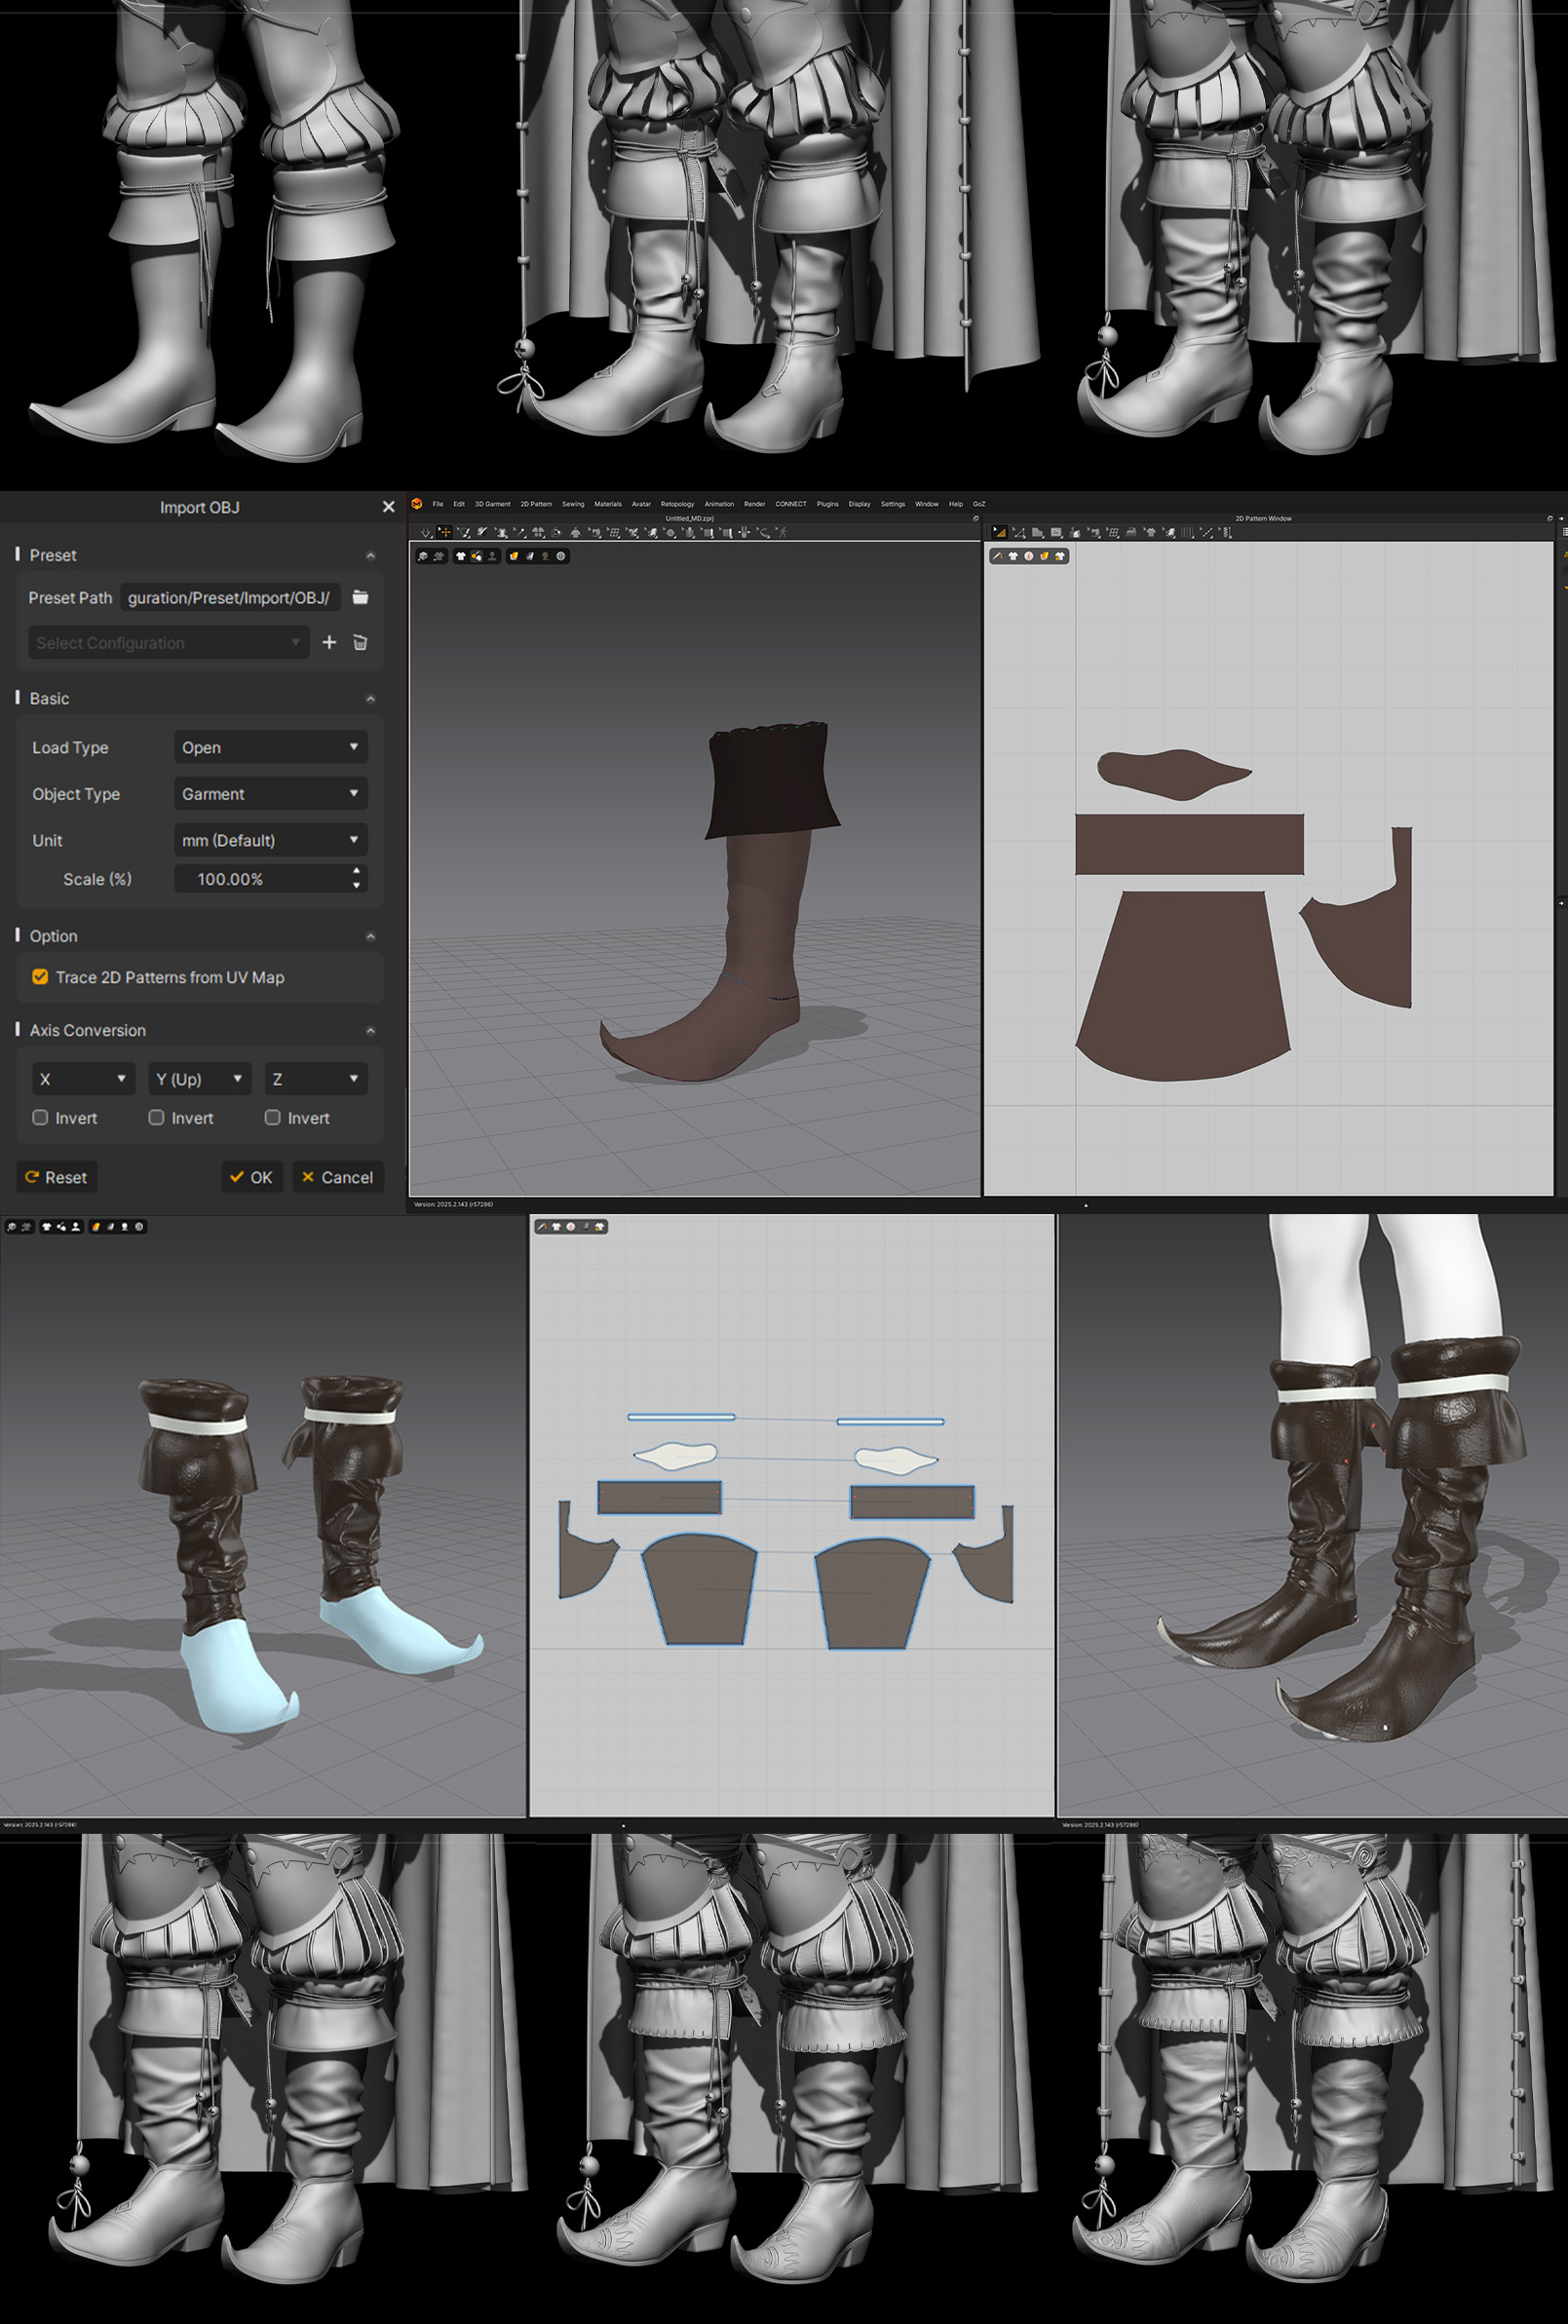 I really liked the idea of having a luxurious looking cape, and Marvelous Designer yet again ended up being the best solution. The free-flowing part simulated perfectly and it never changed much past the initial pattern, meanwhile the top part had plenty of manual sculpting involved to make it align with the concept art. I think I ended up with a perfectly balanced garment, plus on top of everything I was able to simulate it beautifully inside of Unreal Engine, which adds so much realism to the character.
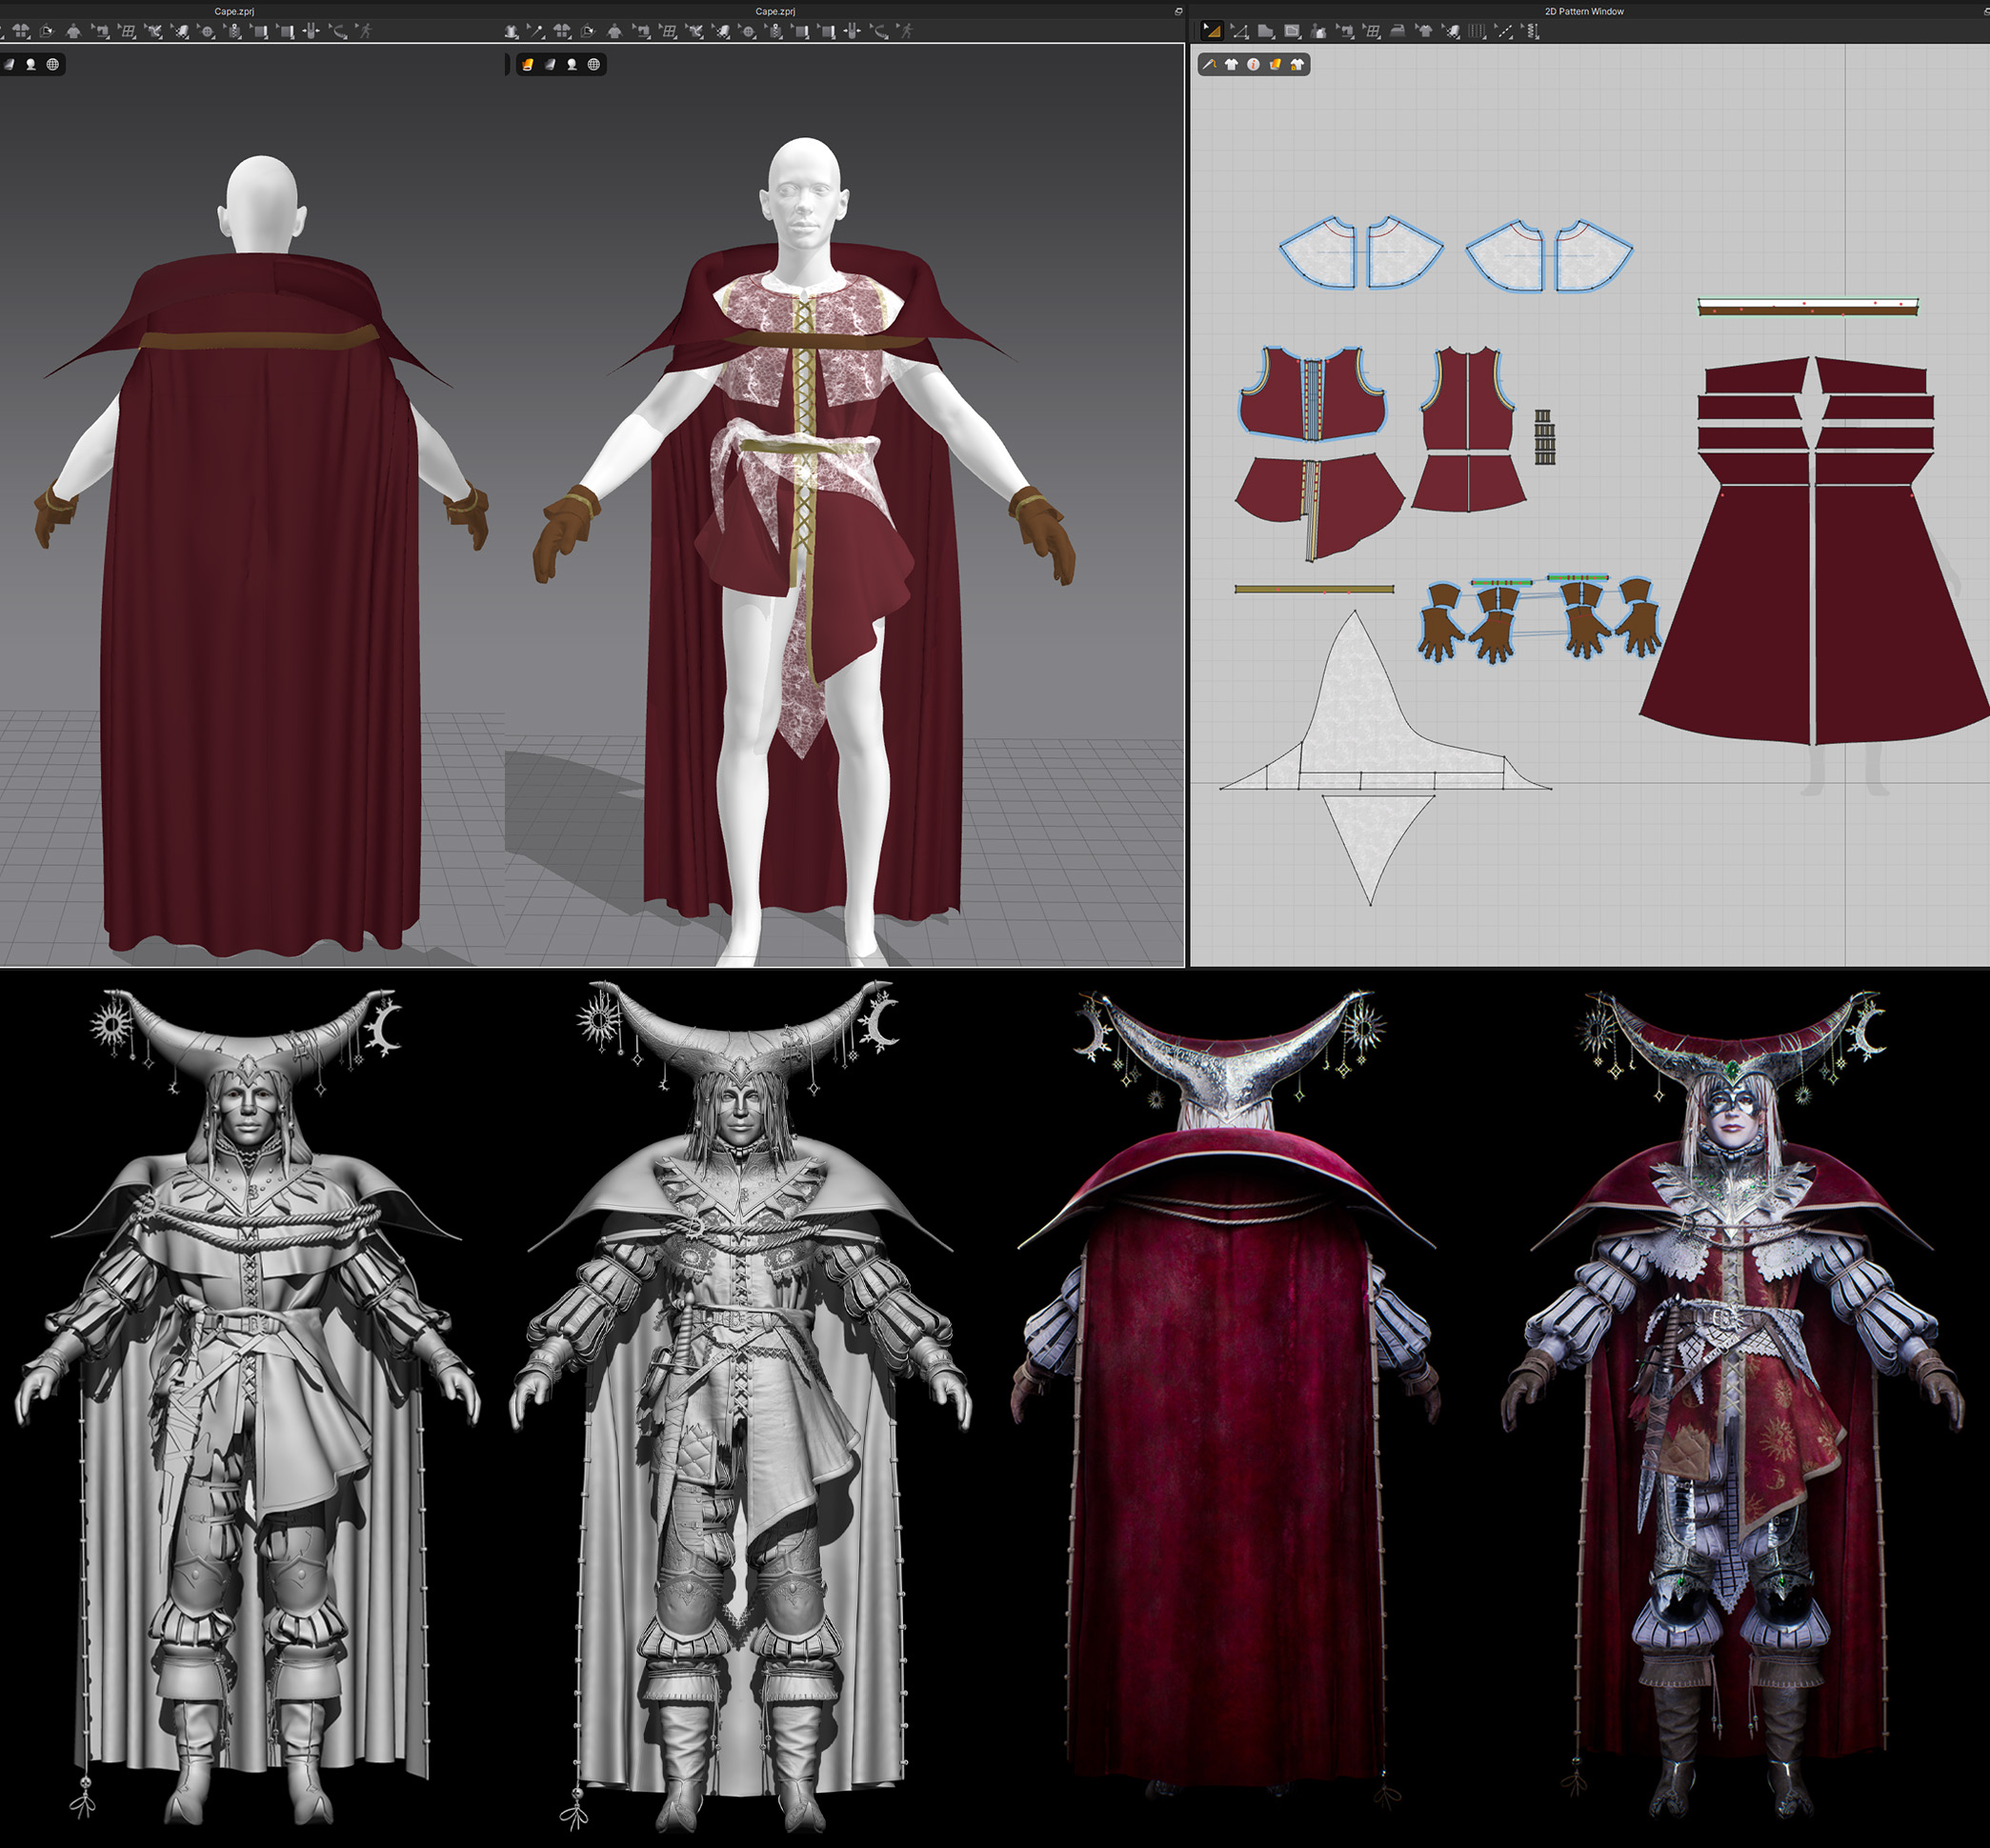
Marvelous Designer is an essential part of character creation in my opinion - creating realistic garments is very difficult and MD makes this process so much more satisfying. I always trust the process and try to preserve as many details as possible, so the garment is still recognizable in its final form, despite going through so many stages.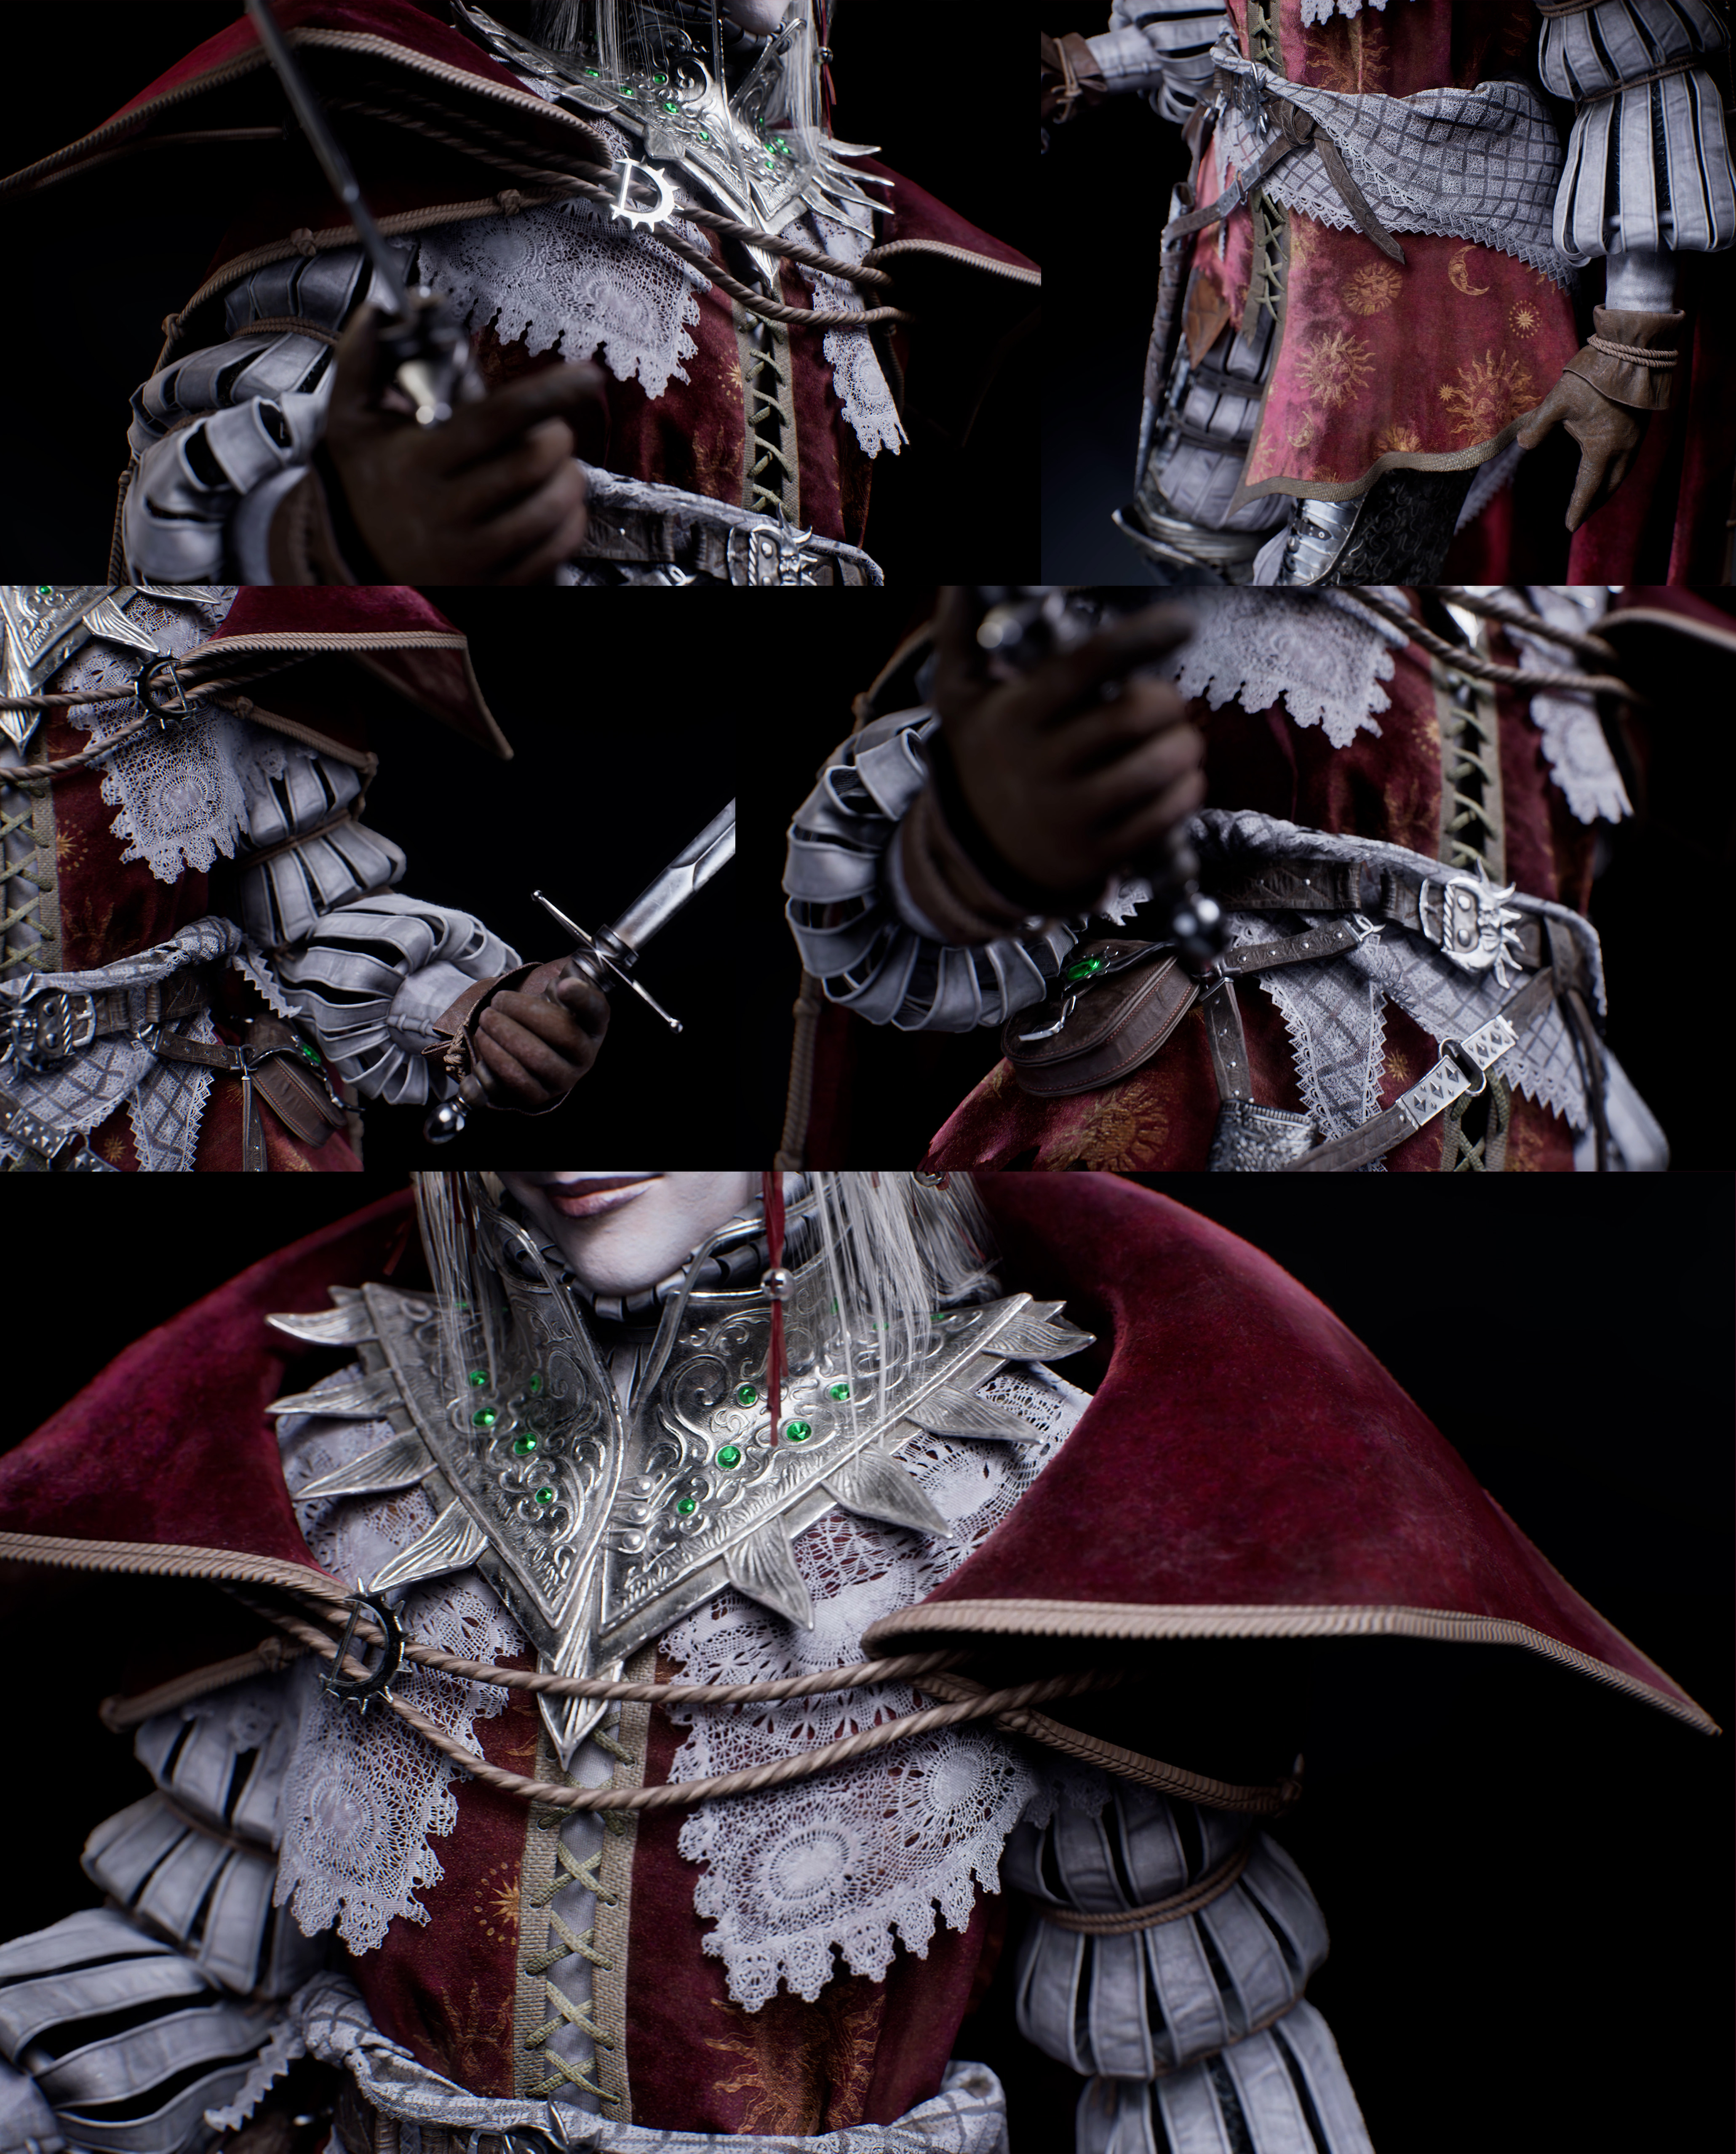
Having used MD for 2.5 years, you’ve seen significant software updates. Which feature addition over this period had the most positive impact on your daily workflow?
I used to only stitch my patterns in a 2D viewport, I can’t really tell if the 3D version wasn’t reliable or I just never quite figured it out since I was comfortable with the “classic version”. But recently I saw someone stitch in the 3D viewport and it worked so well, I just had to implement it in my personal workflow!
3D Pen is also my absolute go to in every project - It’s so convenient to use when you want to prototype a pattern and get exact measurements from the avatar. It saves a lot of time and gives you a great base to work with.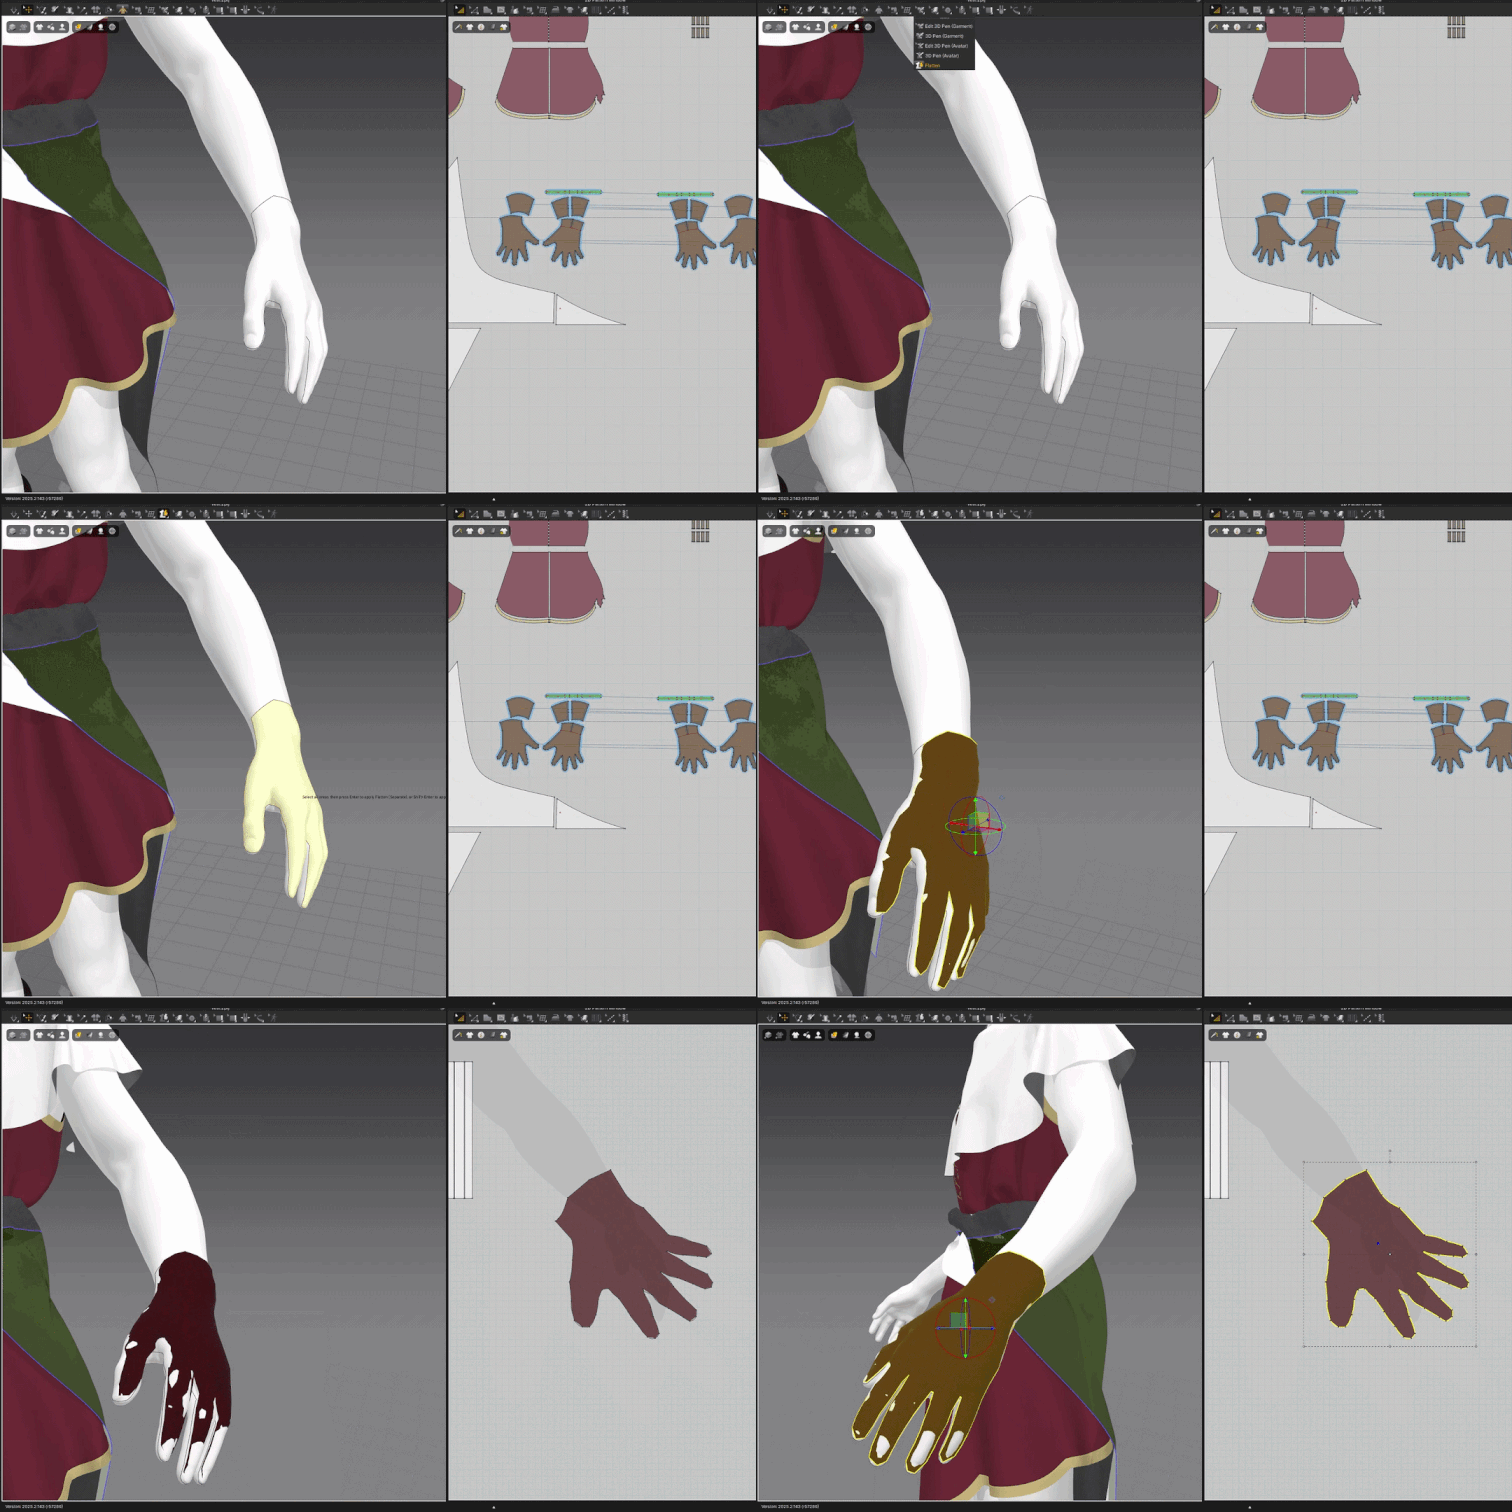
The Sculpt Tool is great for adding final touches to the garments. I find it most helpful as the final step, where I can slightly “edit” my pattern and nudge it in place or add a wrinkle I had in mind. Sadly, if you try to simulate the garment afterwards it will disappear altogether, but as a final touch it’s unbeatable!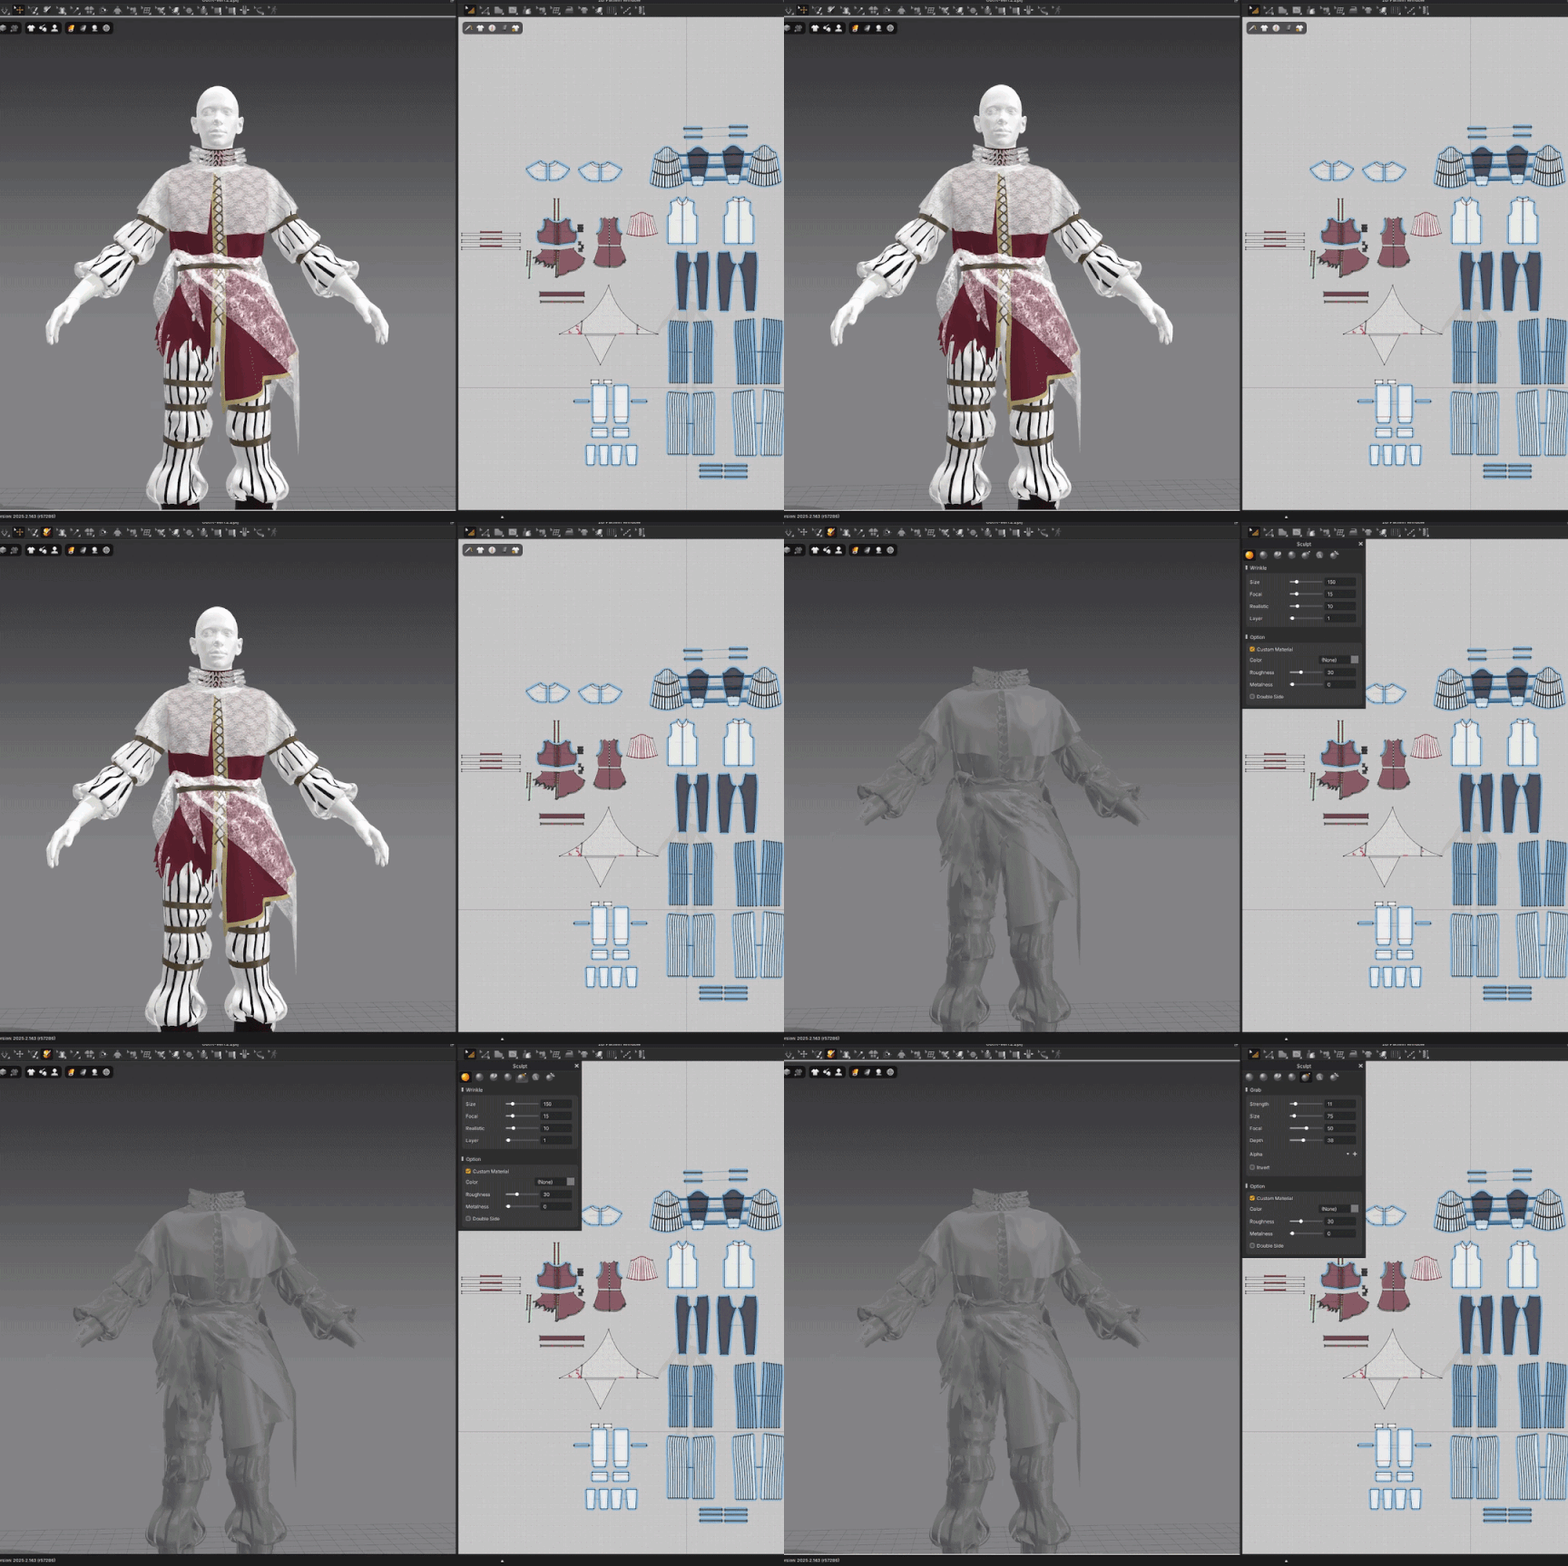
Another thing that is not often mentioned in any pipelines or tutorials is the option to convert pattern topology from triangles to optimized quads. I used to manually retopologize all of my MD garments before using them in the highpoly stage, but with the addition of optimized quad geometry I don’t really see the reason to do it anymore, only for specific patterns that end up requiring extra love.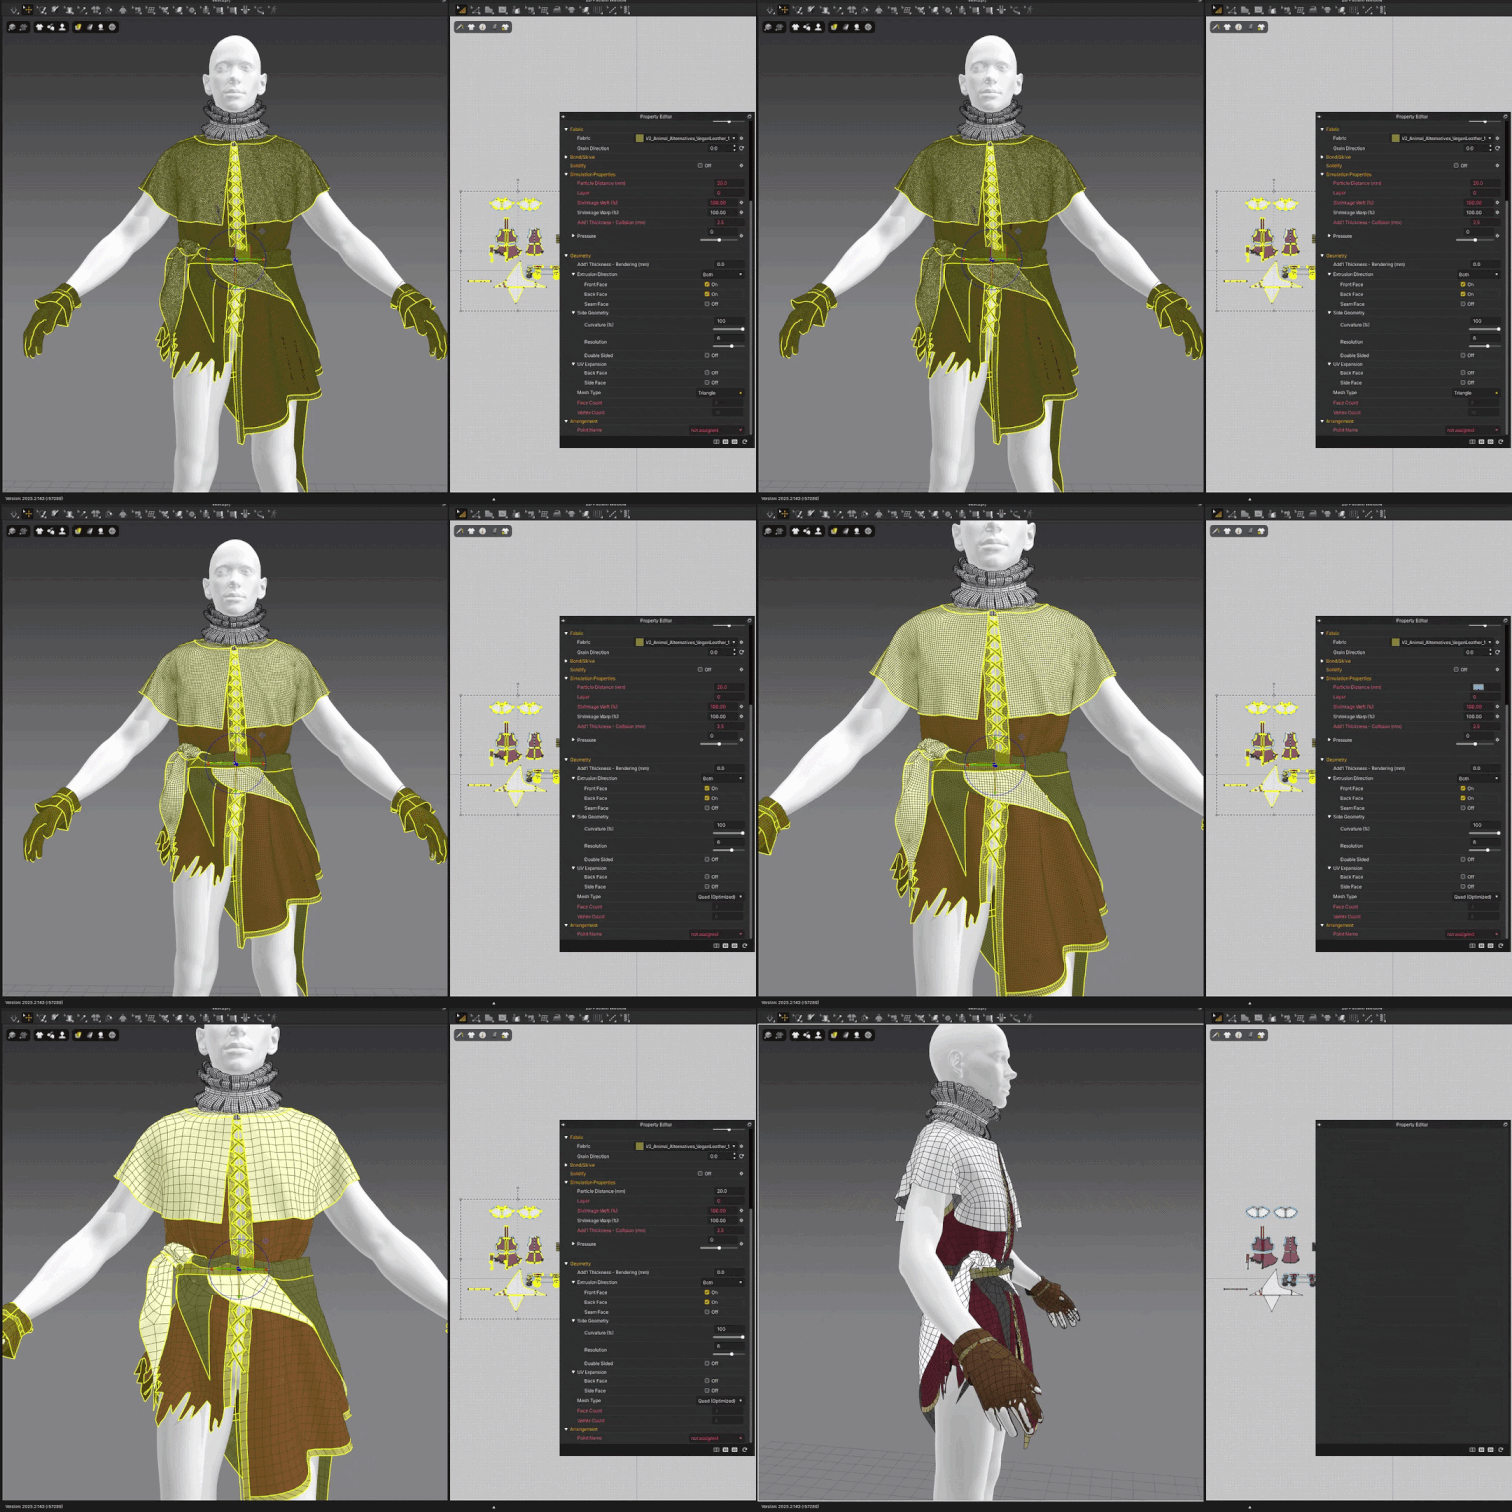
I also appreciate that nowadays I can effectively use the GPU mode in Marvelous as it now works as good as the CPU counterpart. It used to be different and the simulation was worse, but now it’s perfect and allows me to do more without any performance issues.
Artstation
이 작업은 UnrealEngine, ZBrush, Maya, Substance, Trim, 3Dpen 등의 기술로 제작되었습니다.
Marvelous Designer로 이와 같은 3D 의상·캐릭터 작업을 직접 만들어볼 수 있습니다.